Tag Archives: Layout Design

Layout Design, and Designs

This is inspiration

One image, can have vast and lasting influence on the viewer. For modellers, as Chris Mears points out in this post, one single image can make the difference between a model that works for you or one that falls short of your expectation. And none of us want something not quite right.
For Chris this image is iconic and is what he wants out of his model railroad experience. Enjoy reading along.

Chris Mears's avatarPrince Street

Steve Hunter kindly shared this photo he took it in 1981 at Mount Albion, Prince Edward Island. The subject is my favourite railroad operation and in the frame he found a way to capture why. This scene is central to my own layout’s inspiration. I’ll never have the words to properly thank Steve for sharing his passion for the railroad with me or inviting me into his archive.

mountalbion1981blog1
There’s just so much to drink in from this photograph and it tells so many stories it’s hard to know where to concentrate one’s attention.

The train is sitting on the main line. We’re facing Hazelbrook and ultimately Charlottetown. When the Murray Harbour sub was first built this line actually continued straight into Charlottetown on a bridge across the Hillsborough River. The bridge ultimately proved too light and by the 1950’s was closed. The subdivision was trimmed back, station by station, to…

View original post 287 more words

Why I chose not to design my layout – part 2

Introduction

In my last post (Why I chose not to design my layout – part 1) I discussed some of the reasons for ‘eyeballing’ my new layout and not ‘designing’ my new layout. This time around I wanted to clarify any uncertainties around the design process, and continue on with some meta-data about the design to help me clear my vision of the layout and the eventual role I’d like it to take in the future.

The Mod. 1, Mark 1 Eyeball

There is nothing better than eyeballing a space, and understanding how all the elements fit together. Obviously it makes the process easier if you understand what you aim to make, and have a sense of perspective on the amount of track you can reasonably have within the bounds of the layout space.

The layout’s story

My layout’s story revolves around switching within an industrial park. Service delivery is the primary focus of the layout and thus switching is the primary activity of the layout. With the design I wanted to be able to have a train:

  • arrive from the class 1 partner (interchange track),
  • be brought into the industrial park (switching yard),
  • switched into job lots for delivery within the park (customers), or to off-spot storage (storage yard),
  • run out to the customers needing switching that day, switch the site and then return to the yard,
  • have outbound cars switched and readied for delivery to the class 1 partner, and finally
  • have the outbound cars switched to the interchange track

Because I expect to have multiple small operating sessions each week, independent jobs that allow me to complete a little part of the operating session (between 30 – 50 minutes) each day I need a layout that supports that kind of operation.  Should I manage to get a couple of people over who want to operate a full session, we can simply pick up the next job sheet and continue on from where we started.

Why the design I’ve come up with?

A multiple industry layout was always my goal since I decided to build another layout in 2003. You can see some of these layouts in the Layout Design Gallery (Offsite Link), or directly from the ‘Resources’ section below.

I read about the Modesto & Empire Traction in Model Railroader many years ago, and have a lot of research on them. But as we don’t own our own home I am loath to build something bigger than my current proposed layout even semi-permanently at the moment. So I’ve gone down the path with my own module design, that can be added to over time. Another influence was the Progressive Rail layout that MR did several years ago. Again too big for me, but there is a core of the operation that I can mimic in the space I have.

In the next post ‘Why I chose not to “design” my new layout – part 3’ I’ll review my ideas on the operational aspect of the layout; the proposed paperwork that I want to use. It’s getting late and Sons of Liberty is on the Tele tonight. From Ballarat, on a cool and clear evening – good night.

Resources:

Multi Industry Switching Layouts


Why I chose not to design my layout – part 1

Introduction

I’ve designed a lot of layouts over the years, because I wanted to and because I got paid to. With my new layout though I wanted to take a more organic approach, one that relied less on the ruler and more on the eye.

Apparently I’m not the only one following this process. Over on Lance Mindheim’s blog, he recently wrote in a post  that (offsite Link Here) – “… with a smaller project a lot can be accomplished in 1:1 scale simply by mocking things up full-scale with boxes and loose pieces of track.  The elements can be re-sized and moved around until you get the look that you want…

I know exactly what I want this new layout to look like. I know the signature scenes I want to include, and I have my set of wants that have to be included to make this enjoyable for me. Sometimes you simply cannot beat the mod 1, mark 1 eyeball to tell you when you’ve hit the mark.

It’s all about the operations

Over the last couple of months I’ve played around with the physics on my DCC & Sound equipped engines. When I’ve times the sessions using an old Tablet computer set aside specifically for that task, what I’ve noticed is that when running prototypically, that is with slow switching speeds, easy moves, and time between moves to allow the offsider (a conductor, or second person) to do their work, eating up 20 minutes is very easy.

To enjoy an operating session I have to be actively involved in the doing of the work. To do this I have made changes to freight cars that I’ve found have a profound effect on how I work. For example; I’ve brought average car weight up, close to the Cubed-Root (CR) of the real car. You might not want to do this if you are running plastic trucks and wheel-sets or have cars traversing long distances as wear and tear will show.

Coupler Bounce what the … ?

With Kadee equalised metal trucks and metal wheel sets I’ve noticed a complete change in the physics involved, and that is what I had hoped for. So when I couple up to a single freight car with a CR close to the real weight you do not get what I call coupler bounce.

Coupler bounce is where the car takes off in the opposite direction (thanks Sir Isaac) when a locomotive pushes up against the car’s coupler face. My lighter freight cars continued to do this no matter how lightly I pushed up to couple on. The added weight causes friction in the Kadee truck journals, and physics come into play such that the extra CR weight requires more energy to get moving.

As I convert cars over to Kadee trucks I’m making sure that I CR the weight to make sure I get better handling characteristics. I know that this flies in the face of the accepted practice, but once you see this in action, especially in a longer string of cars when the slack runs out, you can never go back.

It’s all in the switch action

I love working yards, and switching industries. I was born to play at doing this. It keeps me happy, and engaged, and with many locations to switch, that are independent of each other I will never get bored with the challenge of switching a layout with multiple customer spurs and car spots.

I love the down and dirty, first mile, last mile railroad action that you find in customer switching. With a marshalling area that allows me to make up trains for delivery to interchange, and break down trains for delivery to customers and I’m about as happy as anyone can be.

In part two of this particular rant, I’ll talk more about the operations and paperwork that I’m going to use on the layout. For now, the sun is out, the wind is very cool and all is well in Ballarat. So I’ll leave you to it…

A tuning fork just begging to be modelled

Introduction

If you have not seen a tuning fork layout, it is a very simple 1 turnout operation. If you are still not seeing it in your mind, think of the letter ‘Y’. Most of the layouts I’ve seen assume either a mainline and a siding, or two sidings. However, that does not mean little operational potential. I found a video by Thornapple River Rail Series on YouTube [Link is below] this week and it got the creative juices flowing.

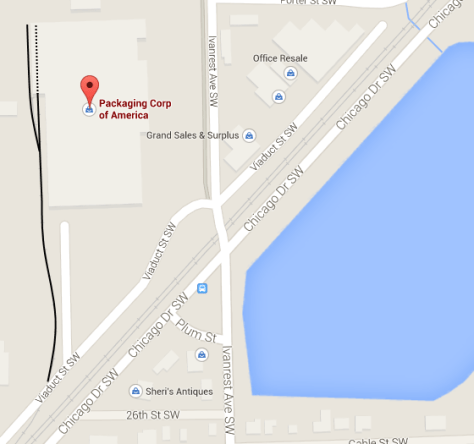
Packaging Corp of America - Grandville MI

Image 1: The location of the facility from Google Maps

The kicker is that the second of the spurs is used to allow switching to take place on the spur itself. Before you do any more reading watch the video (It is 18 odd minutes long but if you start at about the 4:36 minute mark you’ll get the gist pretty quickly).

Video 1: thanks to Thornapple River Rail Series

Operations

If you start at about the 4:40 mark into the video you’ll see the following occur:

  • Loco and first three cars cut off from the train
  • Same pulls forward of the spur switch, and reverses across Viaduct St SW toward the plant
  • You’ll notice the second spur on the outside of the plant as the train pushes back toward the plant
  • Once the roller door comes up, the train pushes back into the dock area, picks up the outbound cars, and pulls forward again to clear the switch for the spur
  • Next, the outbound cars get pushed onto the exterior spur
  • Inbound cars get pulled forward onto the spur again, the switch is reset, and the inbound cars are pushed back into the dock
  • Loco cuts off, pulls forward to clear the switch, and once changed over, pushes back to hook on and pump up the air on the 3 outbound cars
  • Pulling forward the loco and three outbound cars cross over the road and re-join the train
  • Just to add the cherry on top, the train then reverses back to the yard with the engineer riding the caboose

Now all of this takes between 10 – 14 minutes of video time. But what a fantastic way to spend your 5-20-5 minutes of daily modelling / operating time (read a post on that concept here).

If you want to make it last a little longer, first re-arrange the incoming cars into the order as required by the plant. Additionally some cars may not be unloaded yet, and they need to be moved off-spot, and then back on again with new inbound cars. Some cars may need to be left off-spot on the exterior spur for the next switching session.

Layout idea

While I mainly model in HO my true passion is 0 scale (and bigger when I can manage it). Alas I have not the room for a big layout to run those sized trains – yet.

The layout - via BING Maps

Image 2: The complete layout (click for a larger version of the file)

For an 0 scale layout I cannot think of a better idea. You could easily do that in 12 feet and no more than 12 inches wide. If you really had the room you could do it in 18 inches wide and go nuts with weathering, winter trees as in the video, and the knocked over Armco barriers. Glorious! The big gotcha here is that the switching lead ahead of the switch has to be longer than 2x the maximum number of cars you switch into the dock. Don’t forget to add a loco length on top of that too.

So if you switch in 3 cars and out 3 cars you’ll need to have six spots plus a loco length to allow the switching to take place.

Hope that this gets your creative juices flowing. And thanks to Thornapple River Rail Series for posting the video. I am going to be looking through a bunch of his videos now for other similar ideas for my layouts in the future.

It’s a sunny and pleasant Saturday afternoon in Ballarat, hope you’re enjoying your day where you are.

Resources:

Google Maps: Location

Bing Maps:     Location

Progress Rail in Waycross Georgia –

As someone with little space, and limited funds to put toward layouts, I am always looking to find that next great small layout idea. With my role at work coming to an end unexpectedly this week, a small lower cost layout is even more important than ever. While spending some time getting to grips with redundancy I was idly looking at image sites when I came across the Progress Rail facility in Waycross Georgia.

It is a great little facility that has storage for the locomotives coming in to be worked on or scrapped, and then a couple of simple buildings for work to be done. The layout of the track is very simple too. I’ll post updates on this post with additional images once I’ve completed the work on the images.

For now you can look at the following links here:

Videos:

Images:

I’ll post a plan and some other images I’ve found here soon.

Andrew

The new layout boards are complete!

Originally Posted on the Old HVL blog March 24, 2013

OK, so a little about the design and build of the layout boards.
In general all wood is fine quality pine dressed all round (DAR). The board top is 12 mm ply (1/2 inch), while the sky board is 6mm (1/4″) ply. THe legs are “L” girders using 1×2 and 1×3 DAR pine glued and screwed on the along their length. At the base of the leg is a glue bock of 2×1 DAR pine which is used to locate a T nut, with a 5/16″ bolt as a leveller. The nut for the 5/16th bolt mounts on the top of the glue block locking the bolt in place once you’ve levelled the board. I’ll be building a better foot arrangement at some point in the future that is easier on the floor, most likely a wooden ball with a 5/16″ nut through the centre of the wooden ball.

All of the side and end rails are 3 x 1 DAR pine and these have not been glued, but have been Kreg pocket screwed together. The ply was then glued and screwed to the box. Nice, tight and very rigid. There is one rail across the board in the centre  of 2×1″ DAR pine, this has also been Kreg pocket screwed to the sides and the top was glued and screwed tothis also. The skyboard is glued and screwed to 1×2 pine DAR which acts as a stiffener and mounting point on the back of the main board. Mounting to the rear of the main boards is achieved using Kreg pocket screws.

The legs are mounted to the main board using 3 screws on each side to the sides. The top horizontal board bears the weight of the main board above; while the bottom horizontal board acts as a bearing face between boards and allows the boards to lock together using a wooden clamps from offcut of the hozontal boards and 1 x 2 DAR pine. Think an inverted U locking the two legs together. Nice, tight, simple and about 3 months in the planning.

Overall what are my impressions? Very happy to be over the hump of the work. The boards are light and strong. I can lift them fork lift style on my own without hurting myself and as I have a 50 year old back; this is a good thing. Thanks to my wife (Janette) for suggesting the mounting height for the sky boards. At 400mm above the plane of the board they are high enough to be at or just below my eye height, and with the 2×1 stiffeners behind allow easy mounting of lights that will hang out over the board for better simulation of daylight.

I’ve a few sketches and such to put on the gallery site later in the week. This should give you an idea of how the parts look. More photos will be coming before I paint everything later this month or during April, depending on the weather. Well a great day in all, now some remedial work on the old boards to bring them up to spec and height, and then my work is done.