In the last post about my own layout, I said I’d cast aside regrets and was moving on to do some drawing in AnyRail to make sure that everything fit. The reality was somewhat different, and since it would have taken some time to do the layout in AnyRail anyway, I did a ‘Chris Gilbert’ and started layout planning with gusto.
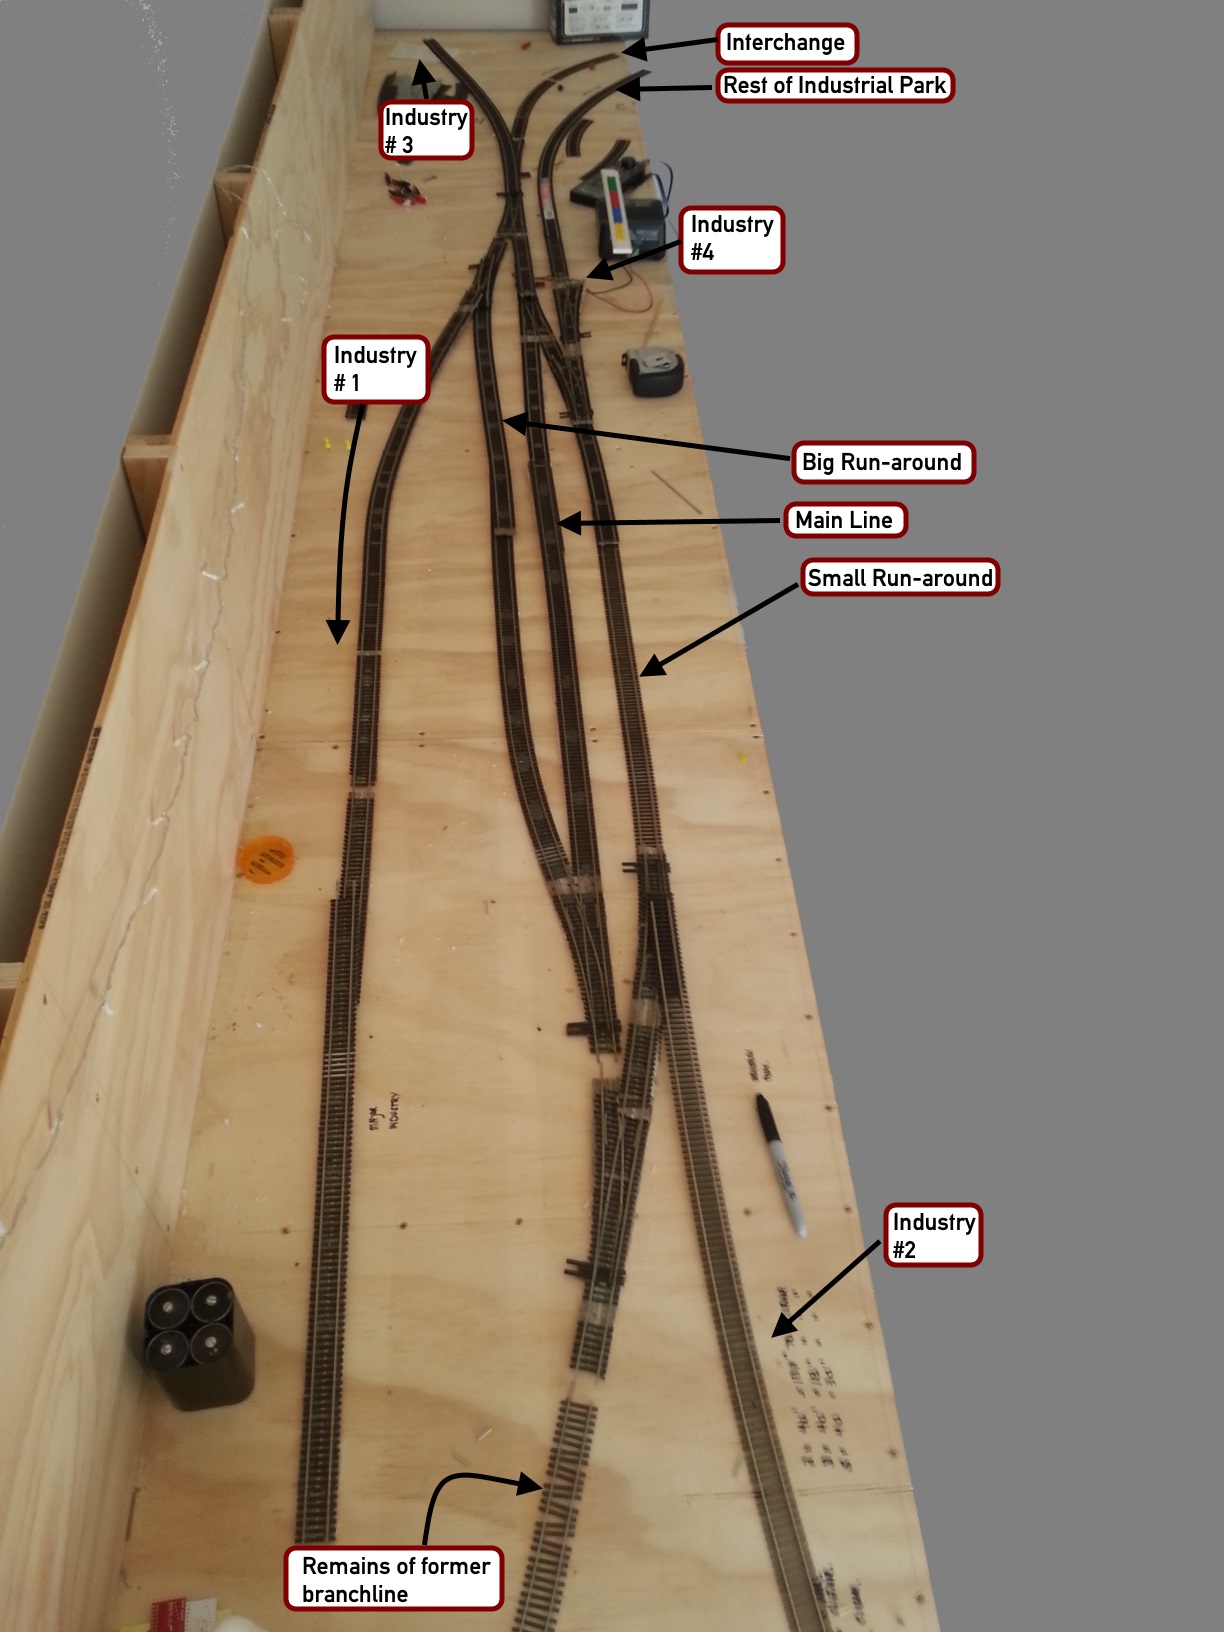
The basic design is an L shaped layout that is 12 x 2 feet (visible in the photo below) on the one side and 8 x 1.5 feet on the other. I am in the process of manufacturing a new set of higher legs for the boards from a former layout so they do not appear in the picture as yet.
Here’s a photo of the layout in its ‘take 1’ guise. I’m still playing around with siding lengths at this time, just to check and make sure that I can do what I’d like to do in the space available.
I’m interested in what you might think. Post a comment and let’s talk about it when you have a moment. More later this week.
I’ve said it before that I love the Internet – when I need information on a specific locomotive or car I can find it at a moments notice.
Site 1: The Diesel Detailer
One of the best US focused locomotive sites on the web. This site is especially useful for modellers (link here). There are boards for all levels of diesel modellers and those interested in improving their modelling.
There are boards for specific diesel manufacturers, Alco, EMD, etc. with more boards by generation also. So if you need a second generation (Dash-2) model there’s a board for that too.
When you get a chance take a look and let me know what you think.
Yesterday I focused on David Ballie’s Victorian Railways scratchbuilding site. In keeping with that theme (and who knows March may end up being the month of scratchbuilding and kitbashing – scratchbashing anyone?).
Site 1: Peter’s Model Railroading
In the scratchbashing vein I’m going to point you at Peter’s Model Railroading (link here). Peter is an S Scale modeller and is working with radio control (using DCC chips in the locos). There are articles and how-to articles on a range of topics. Take a look around and enjoy his range of articles on scratchbuilding.
I’ve been a scratchbuilder since my early teens. In those days it was mainly sci-fi models that I built. The modelling bug bit early, like many of my friends, with ship, tank and aircraft models; most of those in the early to mid 1970s being Airfix kits.
Sci-fi kits however were a little harder to come by and once you want past the Space 1999 Eagle Transporter, sci-fi kits in Australia were thin on the ground.I saw lots of them in the modelling magazines, but for an economically challenged teen in Sydney’s west, they were out of the question.
Early on I came in contact with Plasticard and balsa (both of which at the time were cheap) to begin making my own models and accessories. I remember among the first of these was some extra pods for the Eagle Transporter. Over the last 20 years I’ve built many models that I wanted, or that I’d seen in the model railway magazines and wanted to reproduce.
NOTE:Keep an eye out – I’ll have an article on a long-term scratchbashed O gauge model will be posted some time in March.
This year I have a couple of scratchbuilding projects in 1/32nd scale running on 32mm scale track. I know it’s not quite exact for the gauge of track, however, it is easy to get running and there are parts available left right and centre. There are a lot of articles in my head but little on paper (or on-screen) at the moment.
Today’s site gets the nod because of the amount of sharing that David does. Every modelling project he does gets its own PDF (available for download). Good one David!
There’s a list of complete scratchbuilding projects, and kitbashing subjects on Victorian rolling stock as well. Most importantly he has a range of ideas, and best practices for building models from the ground up.
Take a look at the site, and no matter what railroad you model, there is information here that will increase your modelling skill.
PS: David notes on his site “5 Jan 2015: I am in hospital undergoing treatment for an aggressive cancer, and I am hanging on to get home to see my family maybe sometime in February. In the meantime, I will miss my modelling, but even more so my family!”
I feel for him as a fellow cancer survivor. I wish him all the best. If I get any information back from David, I’ll let you know. More importantly if you feel right about it, send him an email from his site. I’m sure he’d feel better knowing others were thinking about him and his family at this time.
It’s true; I love YouTube. In the same way the Internet has changed the way we read about the hobby due to the explosion in E-Zines, how we consume our train videos has changed too.
YouTube has become my go-to place for rail fanning vision. Today’s ‘Site seeing’ reflects the best of railfan video.
There’s a great choice of documentary length videos here. Some switching related, others location related. Some are only 6-8 minutes in length, others like this one (Offsite Link) run to just under an hour and show a lot of freight action.
Danny Harmon’s a railfanning machine. He’s been producing railfan videos for a long time (view his website here to buy his DVDs) with some of his earliest videos from 1995.
His recent series on the CSX signalling display and head indication (speed signalling) has been great to watch. Based in Florida he manages to have a great volume of vision and all of it interesting. As he says, he’s a railfan, not a modeller, and his videos reflect this. With great production values and a melodic voice, the Distant signal ought to be on your favourites list.
Look in the resources section for a bunch of links to Danny’s videos.
Other thoughts
We are 1/6th of the way through the year, and tomorrow we’ll be at the beginning of March. In Ballarat (and the rest of the southern hemisphere) it’s the beginning of Autumn. We’ve just had a big cool front blow through with rain and thunderstorms. 2015 is rocketing forward and before we know it winter will be on top of us. Thanks for reading along with me during February. I’ll talk to you next month.
I have toyed with track plans for some time to see how best to fit a layout into the current space that I have. I’ve drawn out 50 different track plans, all of which will fit my needs and space, none of which really grabbed me emotionally.
I took another look at a layout I’d designed early in 2014 last week. Designed to be portable and to be taken to exhibitions. In the space I gave it (8 feet or 2400 mm long) the design was right on the perfect size if for me just a little short of perfect. There is nothing wrong with the layout design or operations plan; it works exactly how I’d designed it to work and with the attached fiddle yard it will be a cracker of a layout to work for extended periods at an exhibition.
It will be:
Easy to work by one person,
Take about 30 minutes per show (operating session),
Allow short bursts of work, interspersed with periods of talking with the people asking questions about the layout), and
Worked from the front of the layout.
To get a sense of what I’m aiming for take a look at this video from Model Railroad Hobbyist:
MRH shot the video on Mike Confalone’s layout (I loved it so much I bought his video and book set – they are really worth their weight.) Watch the thing and you’ll be hooked.
Introspection
The layout is a fictional end of the line switching area. I’ve long been a fan of a little layout call Iota from a long ago RMC article. But while I wanted to make a larger version of the Iota, and have devised several track plans to do just that I’ve never been able to get it to work for me in my space.
I’d even thought about doing Box Car Haven (link here) as I have the space and boards ready to go. However, I wanted something simpler, with enough work operationally to allow me greater play time, and less staging and management.
Context
The fact that my location and layout is fictional means little to me. I have thought about the location, its history, and its present in-depth. There’ll be a sense of abandonment, growth, decline and then regrowth in the scenic treatment; buildings will also show this time of change on their surface, with old parts, and new construction giving the viewer a sense of time having passed.
The layout sits at a datum of 49 inches off the floor. This is about right for my son’s eye height at the moment. My wife and daughter are a couple of inches shorter than my son and so for now the layout stays where it is. I’d like to have the datum moved up to my eye height of 66 inches above the floor, but then no one else would enjoy the show.
I’ve designed lines of sight into the layout to stop people from being able to see the entire layout at any one time, and forcing them to move, change their viewing angle, look around corners and peer through building alleys into the layout.
The layout though small works on the principle of a two person crew. So even through the engineer cannot see the distances he has to go, his conductor is on the ground guiding him in – just as in the real world of railroading.
Physics
I’ve changed all the freight car bogies over to Kadee fully equalised trucks. Proto-weighted the cars to their cubed scale-weight equivalent, and weighted them heavy down low but glued weights along the tops of the cars in the corners to ensure that I’ll get a little rocking motion; it’s not perfect or quite how I’d like it but I cannot fully scale down the physics. In this way the cars move in a very prototypical fashion along the rails – especially Boxcars and Covered Hoppers.
During testing on the mocked up track plan I had a couple of months ago, the cars moved pretty much like you’d expect a real car to move. My switcher strained to get cars moving (so I’d get to feed power in to take up the slack) and then I could ease back on the throttle to keep them moving. In HO scale (I also model in O scale) you have no idea how sweet it is to see a switcher stretching a train and watching cars fight the move until inertia takes over. Once the load stretches out you have to drive the locomotive like the real thing.
The last thing on my list is to limit the speed of all loco decoders to around 25 MPH. And I’m going to drop the output level of the bell, and the sound decoder in general.
Additions
As a whole package the design will work, at least for me, to allow a simple and easy to set up switching session any night that I want to for around 30 minutes worth of fun. There’s little management time required and the fun starts with only a limited amount of set up time. There are additions I’ll be adding to the layout to extend the run around the second wall of the garage to extend the switching room and to lengthen the operation time to about the 60 – 75 minute mark for longer operating sessions.
Added to that the CV changes I’ve made to make sure that trains simply do not stop but roll on means that all along the way I’ll be happy working the model to give me and the other operators a sense of what it really means to work my layout.
Summary
Gritty, run-down, rebuilt and modernised, the Hunter Valley RR will be a lot of fun to run. I’ve got to spend some time working the track plan out in AnyRail over the next week. Once I have that completed I’ll post a copy here and see what you think.
Earlier in the month I had talked about Sadler’s sidings – T-Trak Andrew’s adventure into the world of operating layouts – his current work in N scale using something very close to T-Trak standards.
He has posted an update to that original post, about building the layout boards which I found to be very interesting considering how small these things are.
Andrew’s use of materials and his notes make for interesting reading. And he’s going to post a full description to his blog shortly. For right now though head on over to the N Gauge Forum – go to page 2 – and read all about it.
I have extended my description of the construction of the modules for Sadler’s Sidings at the N Gauge Forum on page 2 of the following thread: http://www.ngaugeforum.co.uk/SMFN/index.php?topic=26139.0
will update this blog in a more orderly manner in a week or two.
Chris Mears has posted a great article on the aesthetics of layout design. About how things look, how they feel to him as the operator, and as a viewer within his living room space (the layout will be a piece of furniture within the room so I think his point is more than valid. He’s aiming for something that is organic but satisfying from a modelling perspective too. Have a read, I hope you find it as interesting as I did.
I’ve been reluctant to place my layout on a map. In the past, I started with a list of prototypes, a list of what I have already, and a list of what I could or wanted to buy. Past layouts were borne in the common ground where those lists intersected. With the opportunity to start over again this time, I wanted to approach everything from a more emotional perspective.
By hosting my mock operating sessions and pushing trains around on the cardboard deck I’ve been fine tuning locations of not just track or scenic elements but providing myself with a chance to evaluate each element and questions like:
Do I like the way the locomotives look when they’re backing down the branch to tie onto a car?
Do I like standing here when I’m switching that car?
Does it feel comfortable when I reach into the scene here?
The Internet has changed the way we model. No longer do we have the tyranny of distance – where what we model is simply too far away. Over the last few years a modellers ability (in my case from Ballarat Australia) to model US prototype no longer relies on the US model magazines to show me the areas I can model. And this does not apply only to the US. If you want to model Romanian railways, French, Lithuanian, Scottish, Welsh, South African or Chinese railways the resources are out there for you.
Modelling magazines have changed what they present too. There are the old school magazines, like Model Railroader, and the new magazines like Model Railroad Hobbyist, S Scale Resource and O Scale resource among others.
Site 1: The O Scale Resource
Another of the new style magazines, with no upfront costs and advertiser supported. The new March – April edition of the magazine was just released.
There’s a review of the O Scale West (USA) show
A feature on Battery power, and
Making retaining walls from castings
Check the website for more and note that you can also download previous issues for free.
Chris Mears is building a new layout at the moment in N Scale and has chosen to hand-build the switches and track work.
In this post from the Prince Street blog he share some valuable lessons learned while building a major switch on the layout (which looks smashing by the way). Lessons like taking your time, protecting your creation until it is ready to be installed on the layout, and the value of learning from your own experience while teaching others.
I hope that you enjoy his post.
When I got out of bed today I thought I would make some coffee and then head west to join up with some model railroaders from Moncton who were visiting on the Island today to operate on some local layouts. While savouring the first mouthfuls of hot espresso I figured I’d switch on the computer and double-check today’s schedule. Then I realised I’ve made a terrible mistake: the Moncton guys weren’t going to be here today. They’ll be here tomorrow. It’s been a long time since the last time I was that grateful for re-reading an email. Feeling a little embarrassed, I poured another coffee for myself and looked around for something quiet to pick at so as to not disturb the tranquility of an early Saturday morning. It didn’t take long to warm up the soldering iron and with that in hand, I added the missing rails to my…