Chris points out a great blog, where the modeller, Matthieu Lachance, is building a perfect, small and operationally interesting layout, from what he’s seen in his area.
If you’ve not seen this blog before you should go to the link and take a look at his track planning and layout build threads. Very interesting and really well done.
I was cruising around the ProtoModeler forum and somehow found my way to a blog that introduces itself with these words:
April 1986, CP Rail’s local switcher is busy working on St. Pamphile Spur on Quebec Central Railway’s Chaudière Sub while talks about abandonment are heard…
That’s a pretty easy sales pitch. The blog itself is titled Quebec South Shore. I’m only just starting to reading through the posts and looking forward to learning more about it. You should too:
<http://theendofsteel.blogspot.ca/>
Apart from better weather, warmer temperatures, gentler breezes and being in NSW, Albury has nothing on Ballarat. Well except for the better weather, warmer temperatures, gentler breezes, being in NSW and the recent Murray Valley Modellers exhibition that was held last weekend on 22-23 May 2015.
Image 1: My current favourite exhibition layout – Town and Country
It was a relatively large show, for a country show, with a lot of vendor support from around the region.
Layout’s of note
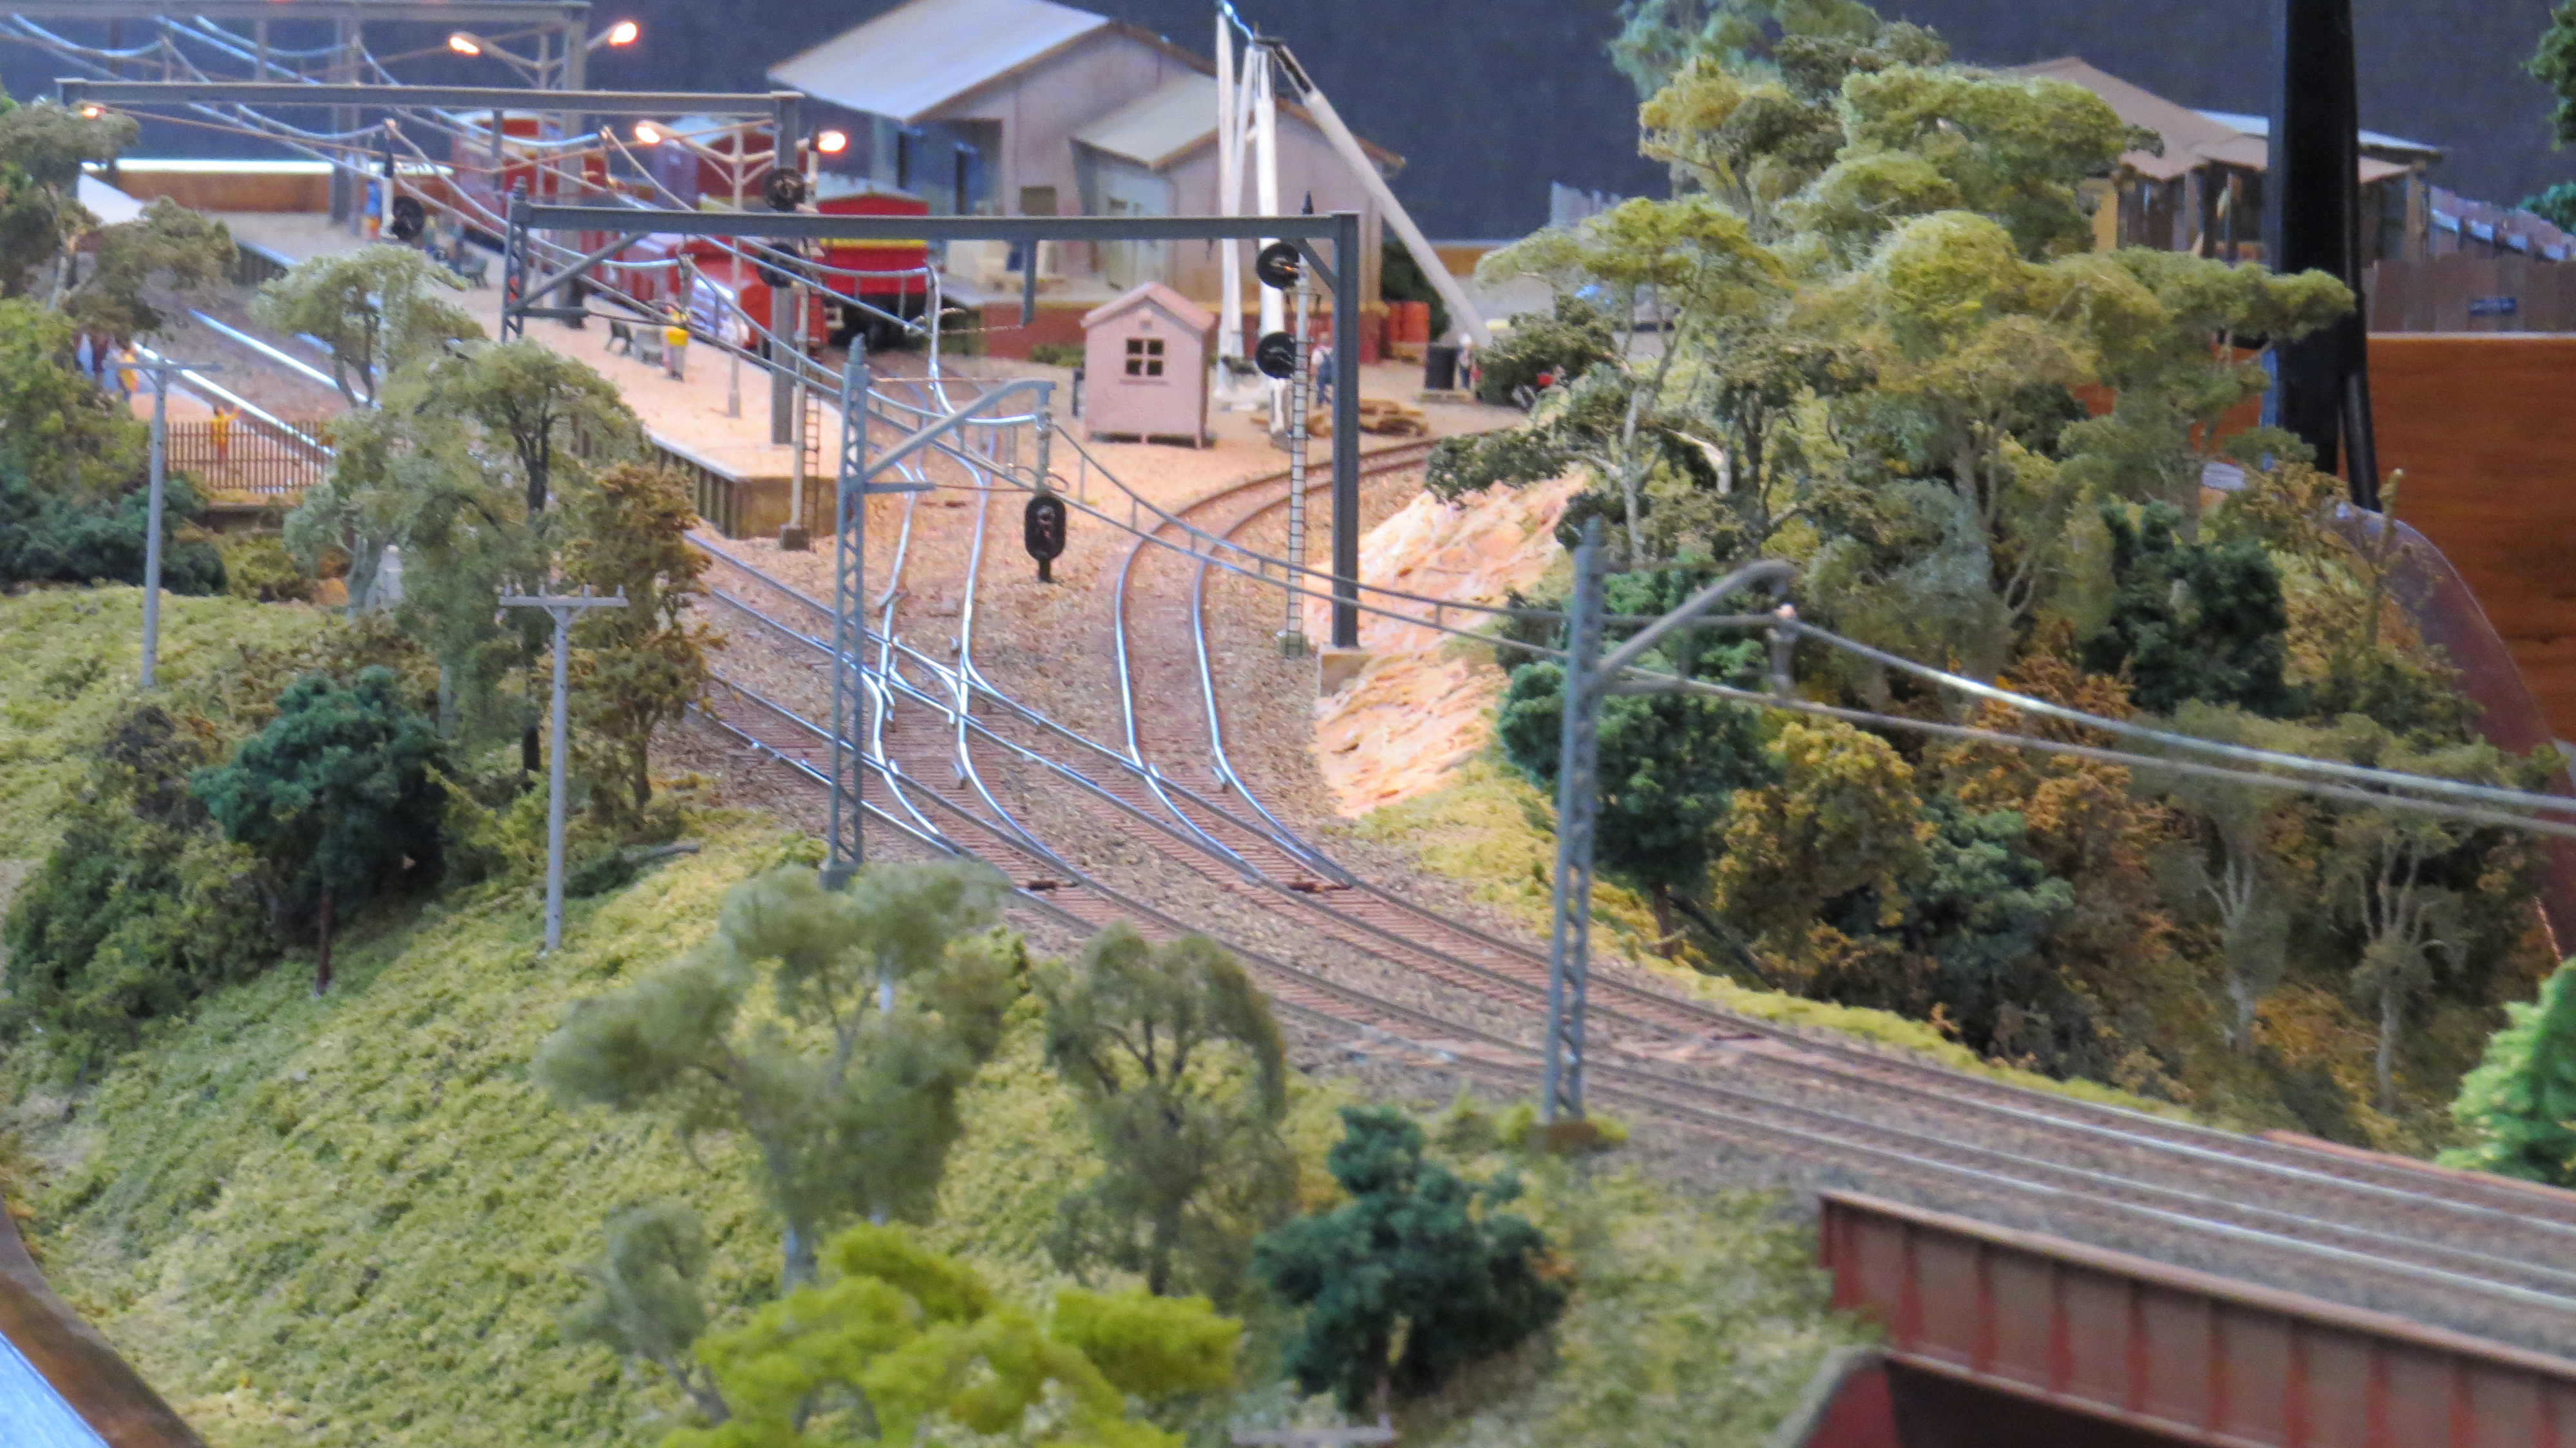
1. Town and Country – HO scale – Gavin Shuttleworth
Town and country is a fictional HO scale layout of the Victorian railways 1970’s to 1980’s era where the country meets the city with a suburb in between. The structures are either scratch or kit built from timber and styrene while the power is from a mixture of analogue and DCC with computer controlled automation.
I think the best part of the layout is that we have electric heavy rail, running under wires. There’s a lot of pictures for you to see, as I took quite a lot of the layout this time. I only managed to get a few shots in when I first saw the layout at the Geelong West show in January.
Image 2: the standard of modelling on Batlow is outstanding
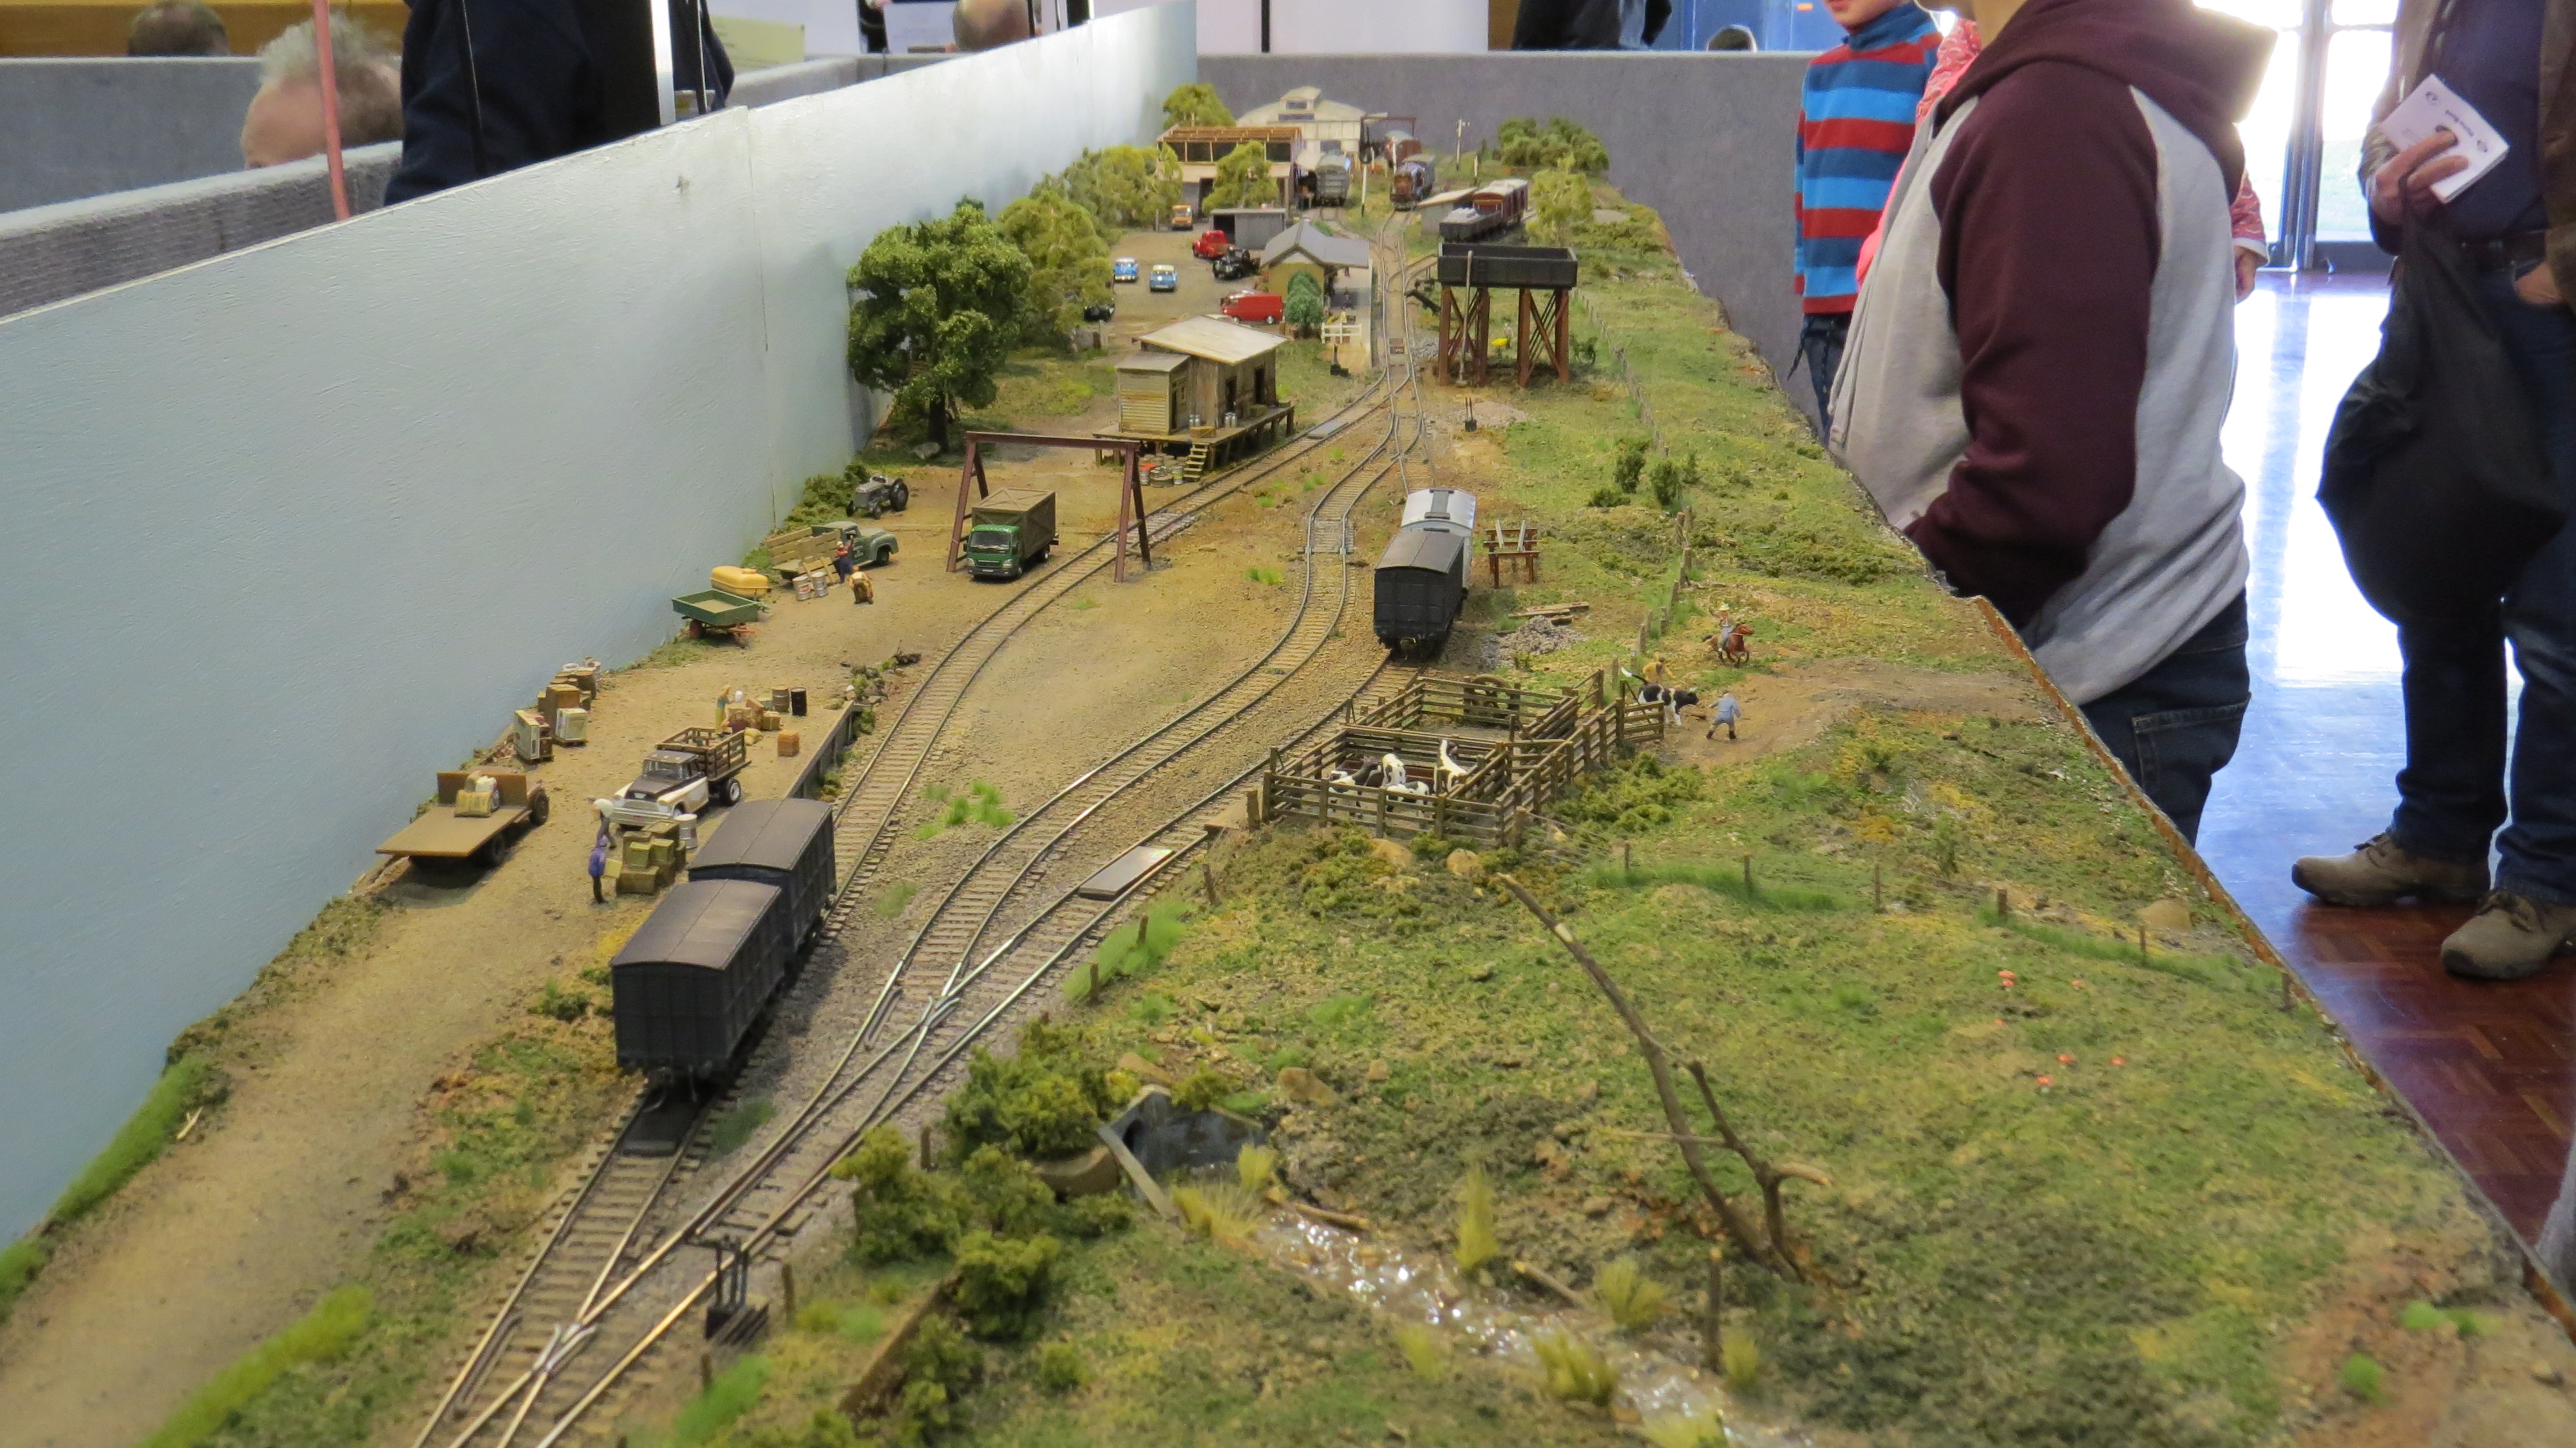
2. Batlow – HO scale – Andy Lawson
Batlow, a small town in the foothills of the snowy mountains is famous for its apples.
Featuring a packing house and cannery as the two main industries as well as the goods
yard this small layout has lots of shunting to be done. This layout depicts the railway
as it was from the mid 1960’s following the days of steam.
Image 3: a track diagram of Batlow (Source NSWRail.net)
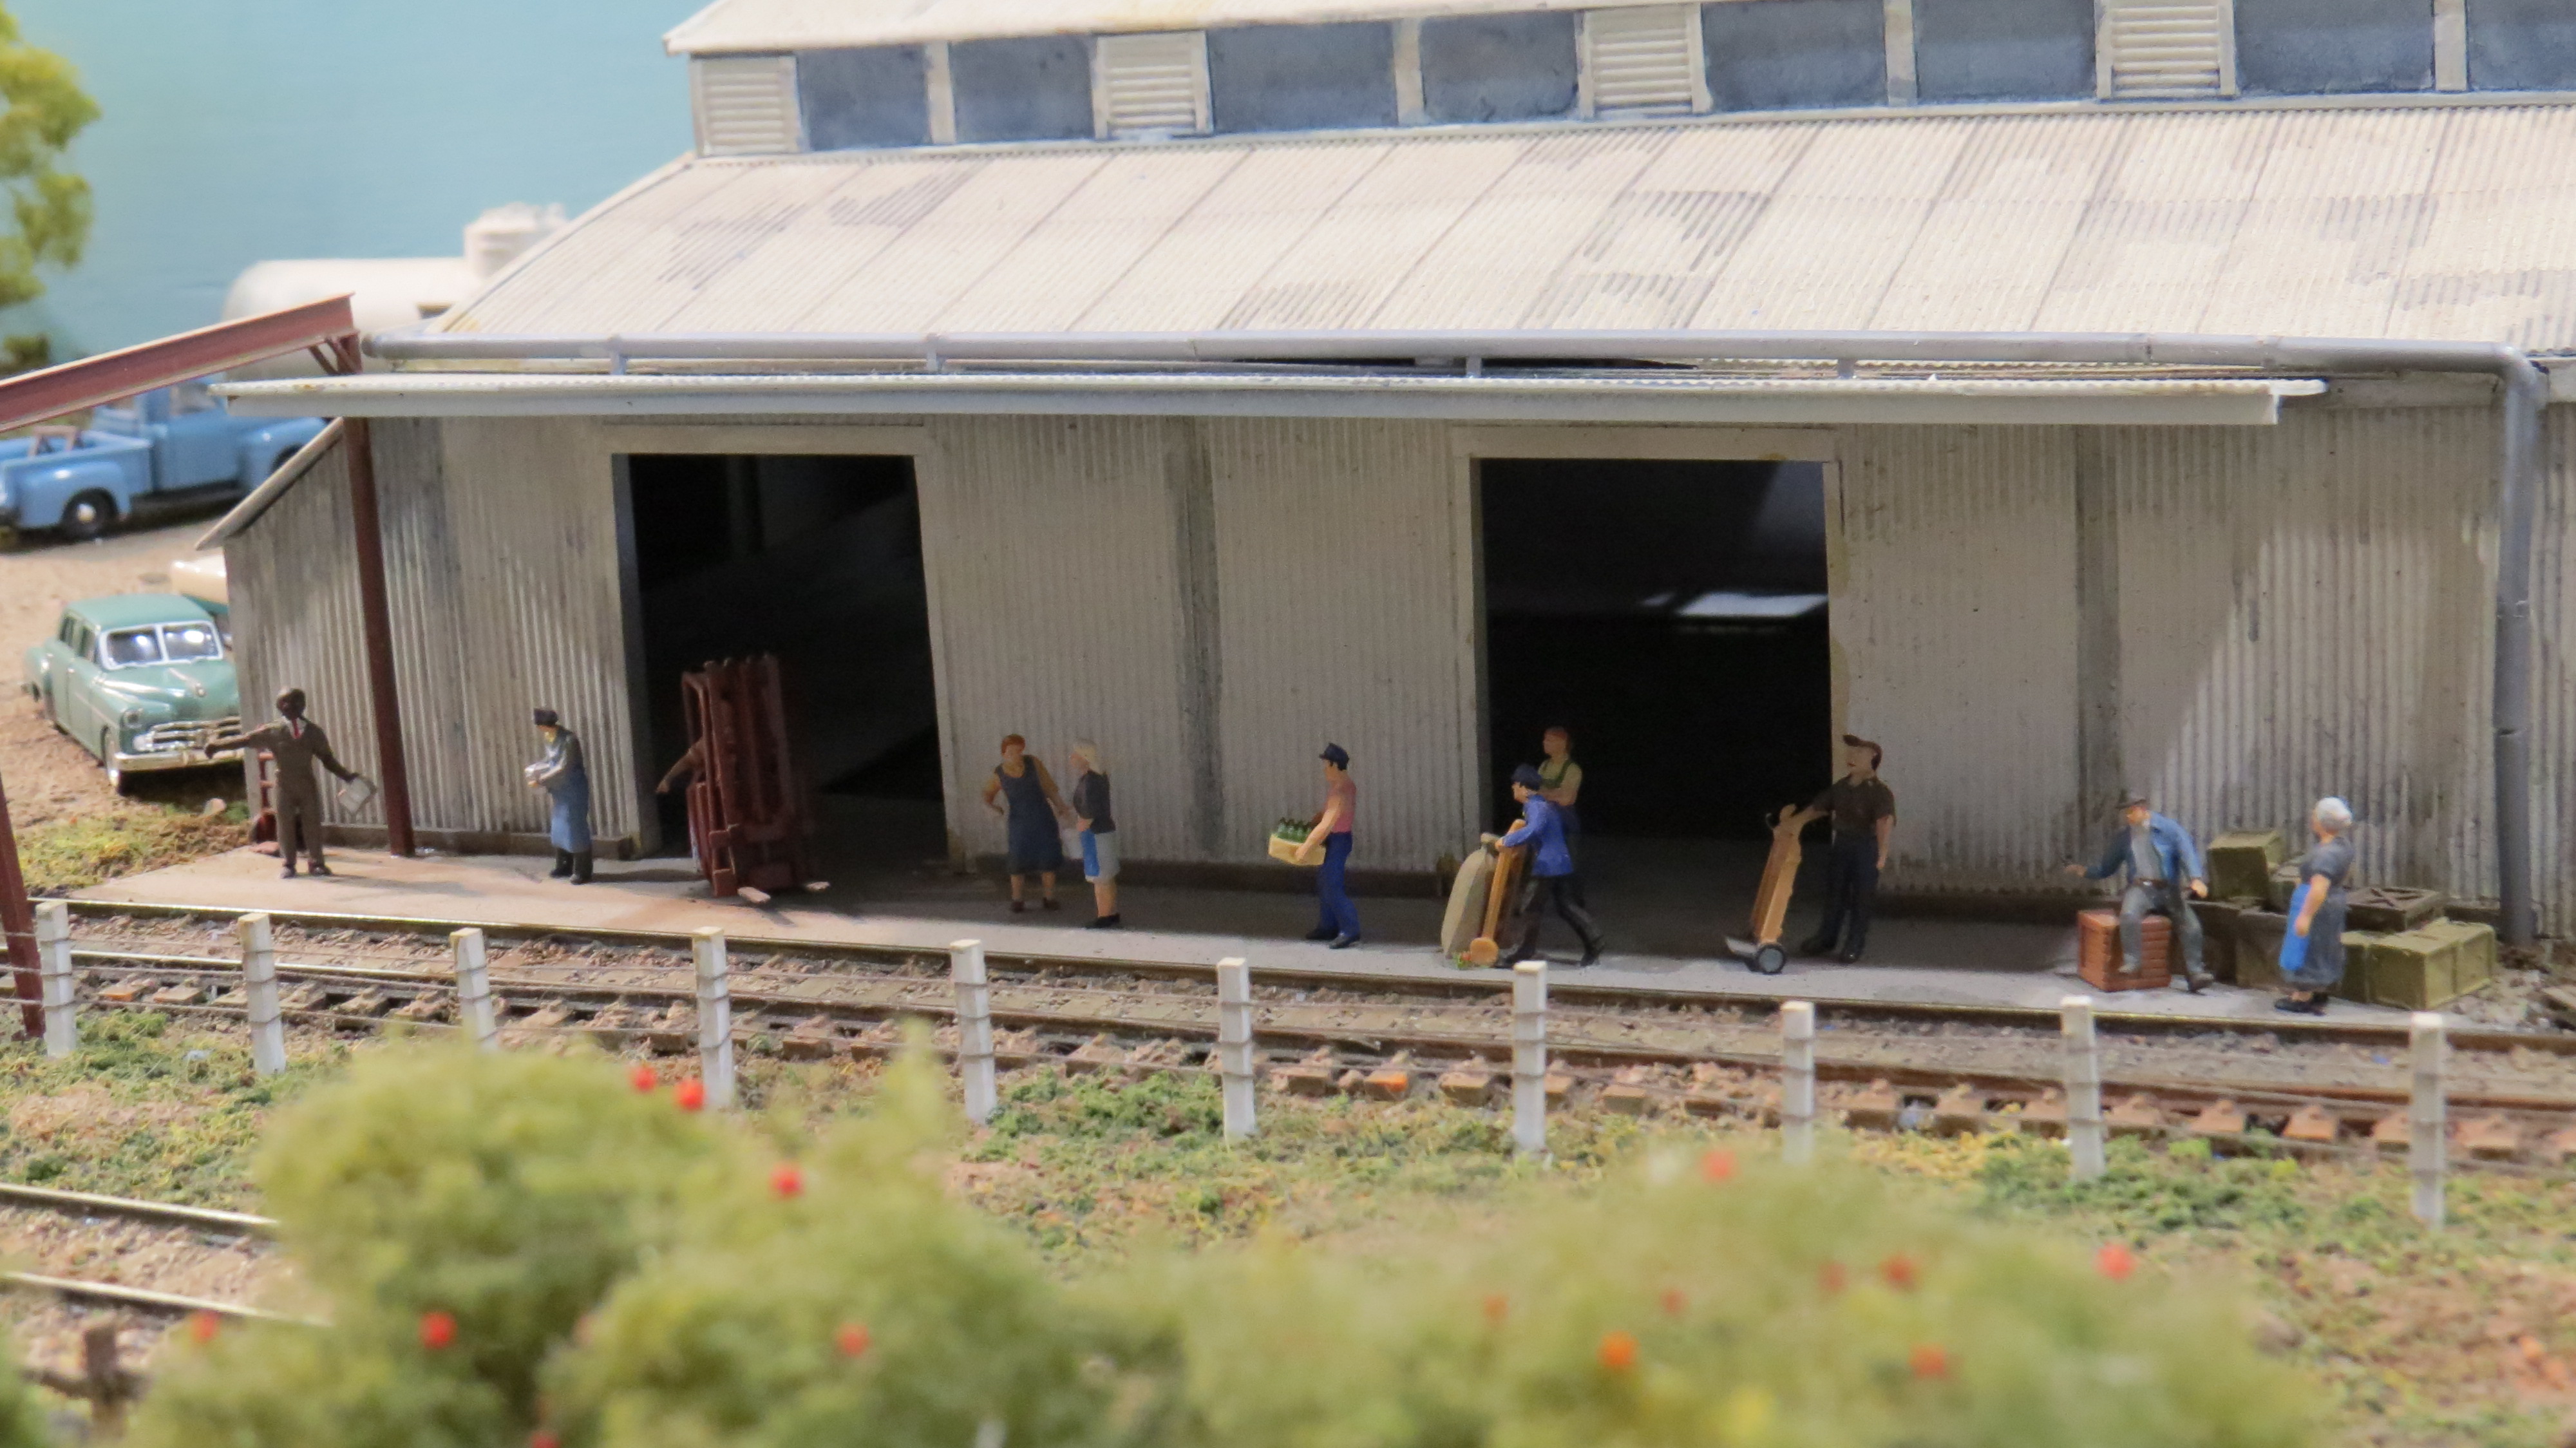
The only issue I had was with the control of the layout. It looks like the layout is DC controlled; the lack of DCC and sound really hampered the layout in gaining my vote for best layout.
The shunter (a new model Alco 48 class) shot off from a standing start, screeched to a stop and had all of the problems of those nostalgic layouts I remember from my youth. The modelling however was first rate. As you’ll see in image 4 below.
I’ve mentioned before how much I love taking my time when I’m working my layout. While reading Lance Mindheim’s blog [ + Link Here ] the other day I came across one of his older posts talking about exactly that; so I thought that I’d share Lance’s words on the subject.
Site 1: Lance Mindheim’s ‘Capturing the Essence of Industrial Switching Operations‘
I’ve followed Lance’s thoughts for a long time and while I don’t always agree with everything he writes I do agree with this article.
Specifically he writes: “Industrial switching operation is characterized by a slow, purposeful, rhythmic cadence. Locomotive crawl at a few miles an hour as they pull cars from the deck and deal them with precision to the customer’s door. The atmosphere is one of mass, momentum, and the sound of 2000 horsepower prime movers constantly throttling up and then cycling down…over and over and over.”
While it is a long post, there is a lot for the person interested in switching, but lacking in the understanding of what really goes on in the real railway world to absorb. Hope that you enjoy the article. It’s 4 years old, yet still as valid today for the switching minded as when it was written. I dare say it will remain as valid for many years to come.
Image 1: An image of one of Lance’s switching layouts
Off to the Albury model train show this weekend (a 4.5 hour drive north of home). Looking forward to that. If you get the chance drop in. I hope to be there on Saturday morning. I’ll be the big boof-headed Ballarat bloke wearing a big green hoody. Say hello. More on the layout next week.
Yep – it’s on again this weekend, and I’m going. Could not get there last year, but this year I am going.
You can see the program here (a very forward thinking club they’ve put the program guide online as a PDF – well done that club). Saving paper and time as you know what’s there before you go.
Image 1: Ballarat station awash with a heaping helping of Vlocity sets (Wikipedia photo)
April and May have been a modelling wasteland. Easy to say, but hard to stomach. So in the mode of personal repair this week, I headed into Melbourne on the train to do a bit of business and add to my track hoard for the layout. I hope that you’ll remember that I was short some track and needed to get some before the dreaded ‘kidney stones from Hell’ incident.
Now I spent more than I probably should have, however, I now have two Peco curved code 83 switches, two left and one right #5 Peco code 83 switches. I was going to buy some more Peco code 83 flex, but while at the Hobby store I had a look in the bargain bin and lo and behold there was some Atlas code 83 on sale at $AU 5.85 per length (about $AU2.00 cheaper per piece than Peco). 10 pieces later on and some code 83 rail joiners and I was on my way out the door – my wallet significantly lighter.
Off to the Albury model train show this weekend (about 4.5 hours north of home). Looking forward to that. If you get the chance drop in. I hope to be there on Saturday morning. I’ll be the big boofheaded Ballarat bloke wearing a big green hoody. Say hello. More on the layout next week.
A month down the track and I am on the mend after discovering the joys and pitfalls (and there are no joys) of kidney stones. Not being in constant pain is allowing me to get back to normal operation; thanks to the skill of the urology team at the Ballarat Base Hospital.
But enough of me, and on to the first of this month’s site seeing.
I grew up with a very Scottish grandfather, very Scottish. I listened in awe as a child to his stories of the highlands. Working for the railways (in Australia) all his working life, it was perhaps fated that I should fall in love with the Scottish highland railway lines. One particularly holds me in awe all these years later – the line out to the Kyle of Localsh.
In the very early 1980s Michael Palin’s Great Railway Journey’s travelled the line, and quite apart from being a fan of Michael Palin this program only made my yearning to travel it greater. It still is on the top of my railway journeys bucket list.
Over the years there’s been a couple of great layouts on the highland lines. Two that come to mind are presented today.
Site 1: Portchullin – a layout by Mark Tatlow
I love the sound of diesel engines working, doing what they are supposed to do; industry, grime and dust. Hearing a diesel notch up, lifting its train, from station, industry or yard reignites my passion for modelling. I don’t know why; it just does.
While ‘tubing recently I came across Portchullin. It ticks all the boxes for me on how a great North of Scotland layout should be built and come to life.
You can watch “A day’s trainspotting at Portchullin” here:
Best of all the creator of the layout has a great website with lots of useful posts (which I’ve just begun to follow) here: (Offsite link)
If you are a signalling buff like I am, you’ll enjoy the excellent working signalling on the layout too. Mark also sells (albeit as a small run manufacturer) parts for signals, which you can also find on his website.
Site 2: Kyle of Tongue – a layout by Steve Flint
Featured in the February 1990 Railway Modellers magazine, this layout was completely immersive. You could feel the cold coming off the highland hills, and leaching into your bones. Unfortunately images are hard to come by on the web. However this image shows Port Pennan also by Steve Flint I believe.
This ought to give you an idea of the layout style that Steve is famous for.
Resources:
Great Railway Journeys – Confessions of a train spotter
You never know what you are going to capture with your camera. Sometimes you’ll get a photo, and unprecedented access to things that you might never have believed would happen. Other times you manage to get a great series of photos just before a major event happens in the life of your chosen subject, after which event, things are never the same.
Just after we cam be back to Australia from the United States in 2006, my wife asked me why I bothered to take all of these photos of trams and trains. I told her that it was simple: “Today’s photo is tomorrow’s history”.
Over on the Rails West blog there are two recent posts that follow in just this theme. Zip on over for a 1979 trip through the SP’s Hardy Street shops in Houston Texas.
Extreme weathering on our models is sometimes criticised as being unrealistic, and to a degree I can understand why many people would say that. But, that is not always the case so long as you have a modelling situation, or photographic evidence to the contrary. Today’s site seeing looks at prototypical examples of extreme weathering.
Site 1: Railpictures.net – image by Logan Allen
In the first image by Logan Allen an ex ATSF CF7 #2627 returns to service on August 8th 2014 after being “dead-lined” for months prior, due to engine and truck issues. Click on the image for the full size photo.
To be noted in this photo are:
Faded and worn out paint surfaces, note the mismatched colours and faded nature of all of the surfaces
Rust patches and rain marks from the large surface rust patches under the degraded paint
Dirt, dust and grime on the undercarriage and trucks, specific to the area (note the light brown colour of the dirt matches the dust on the unit)
Thanks to Logan Allen for allowing the use of the image.
Site 2: Railpictures.net – image by Joe Vittitoe
This photo is of former Southern Railway SW 9 (SOU 1177) as she sits in a scrap yard in Harriman, Tennessee on April 20 1988. Items of note on the locomotive:
Rusting on the bottom of the hood doors, and lower body side nearest the photographer
Dirt and dust picked up on the coupler face – note how the painted stripes have worn off by the abrasive nature of the stuff
On the top of the hood there’s oil and dirt and soot, and its run down the side of the hood due to rain
Extreme fading of the originally black paint to a dusty grey, and the same applies to the bogies and under carriage all are now a standard dusty grey
I’ve sent Joe an email from the Railpictures site asking him for permission to use the image, but have not heard from him by post time. Image is copyright Joe Vittitoe. Let me know if you have any information on the photographer. If needed I may have to take the image down if later contacted.
Site 3: Railpictures.net – Image by Ron Flanary
Quite apart from the great rust and weathering detail in the picture there’s lots of history. L&N 2376 was new in 1941 when purchased by the Nashville, Chattanooga & St. Louis. Then she carried the number 1, the lines first ever diesel-electric locomotive.
When that road merged into the L&N in 1957 the loco became L&N number 30. The last change for the old girl was during the late 1960s when she was re-engined with an EMD 567-C prime mover from a retired E-unit.
This photo taken in 1974 shows the EMD 567 engine shoe horned into the hood. Three years later in 1977 number the railroad retied and scrapped 2376. Here endeth the history lesson.
Onto the weathering lesson:
Faded paint all over the body, note the different shade on the top of the loco by comparison to the sides,
There’s roof rust here too but not so much as the RS-3 in the background (at least I’m pretty sure it’s an RS-3)
Oil spills and dirt accumulation around the base of the cab near the walkways as well as road-grime and muck on the trucks, under-body and on the coupling faces, and finally
Look at all the rain weathering dragging down the sides of the locomotive
Thanks go to Ron Flanary for allowing me to share the photo.
I hope that you enjoyed the photos and the weathering lessons that you can learn from them. Drop me a line in the comments if you feel so inclined. All the best and a good Friday night from a cold and rainy Ballarat.
While I am still on the mend, with one more surgery to complete, I’ve not been too interested in doing much of anything. However, today while looking for some inspiration for the HVL’s loco shed I came across a great layout that I really had to share.
Site 1: Worcester Road
It’s not often that you see a 1 gauge (1:32nd scale) layout at a show, in fact I’ve not seen one here in my area since we’ve been back from overseas. However, that does not mean that they are not out there. Once case in point was Worcester Road.
Worcester Road is a straight-road, 10 feet x 2 feet engine shed layout. Operated from the front, the scenic/diorama board is 6 feet in length and the fiddle yard board is 4 feet in length. It took ten years to build.
There is a video from the Eastleigh Model Railway show (in 2011) that shows a great layout idea, well executed and displayed. You can watch that here:
There’s also a great build blog on the RMWeb forum (now archived) that you can read through. Link here
I hope you enjoy reading about the layout as much as I did.
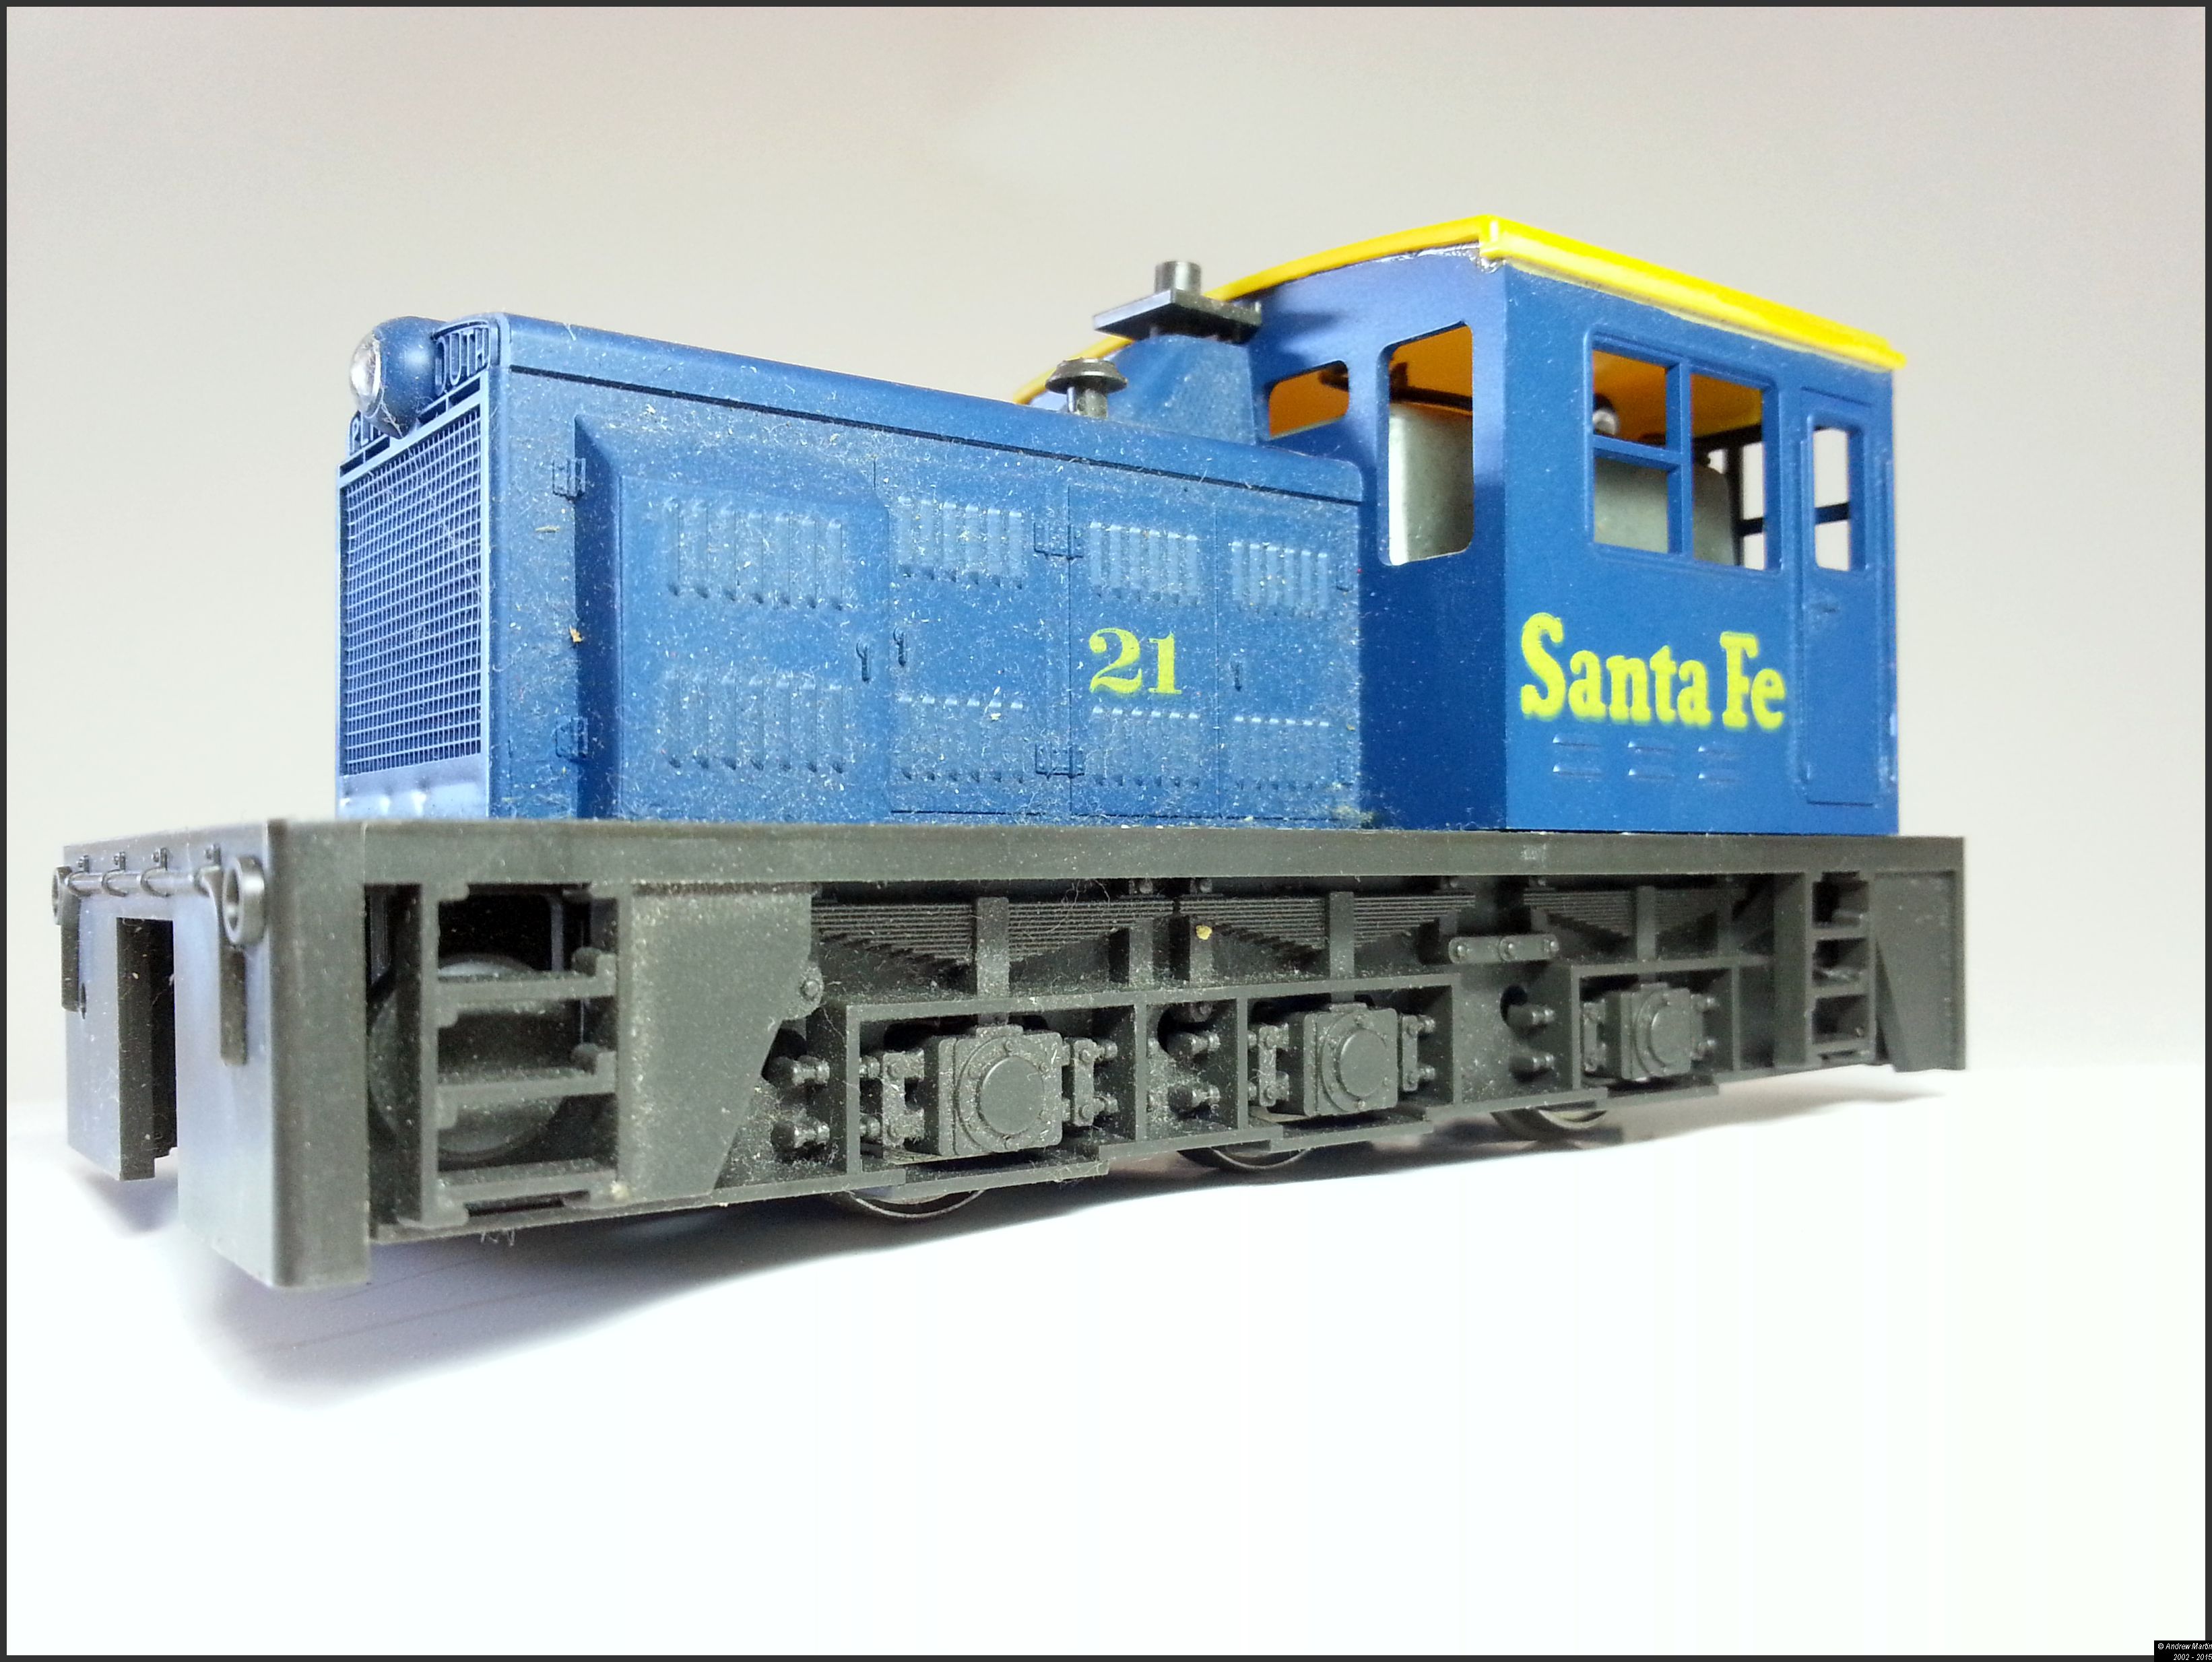
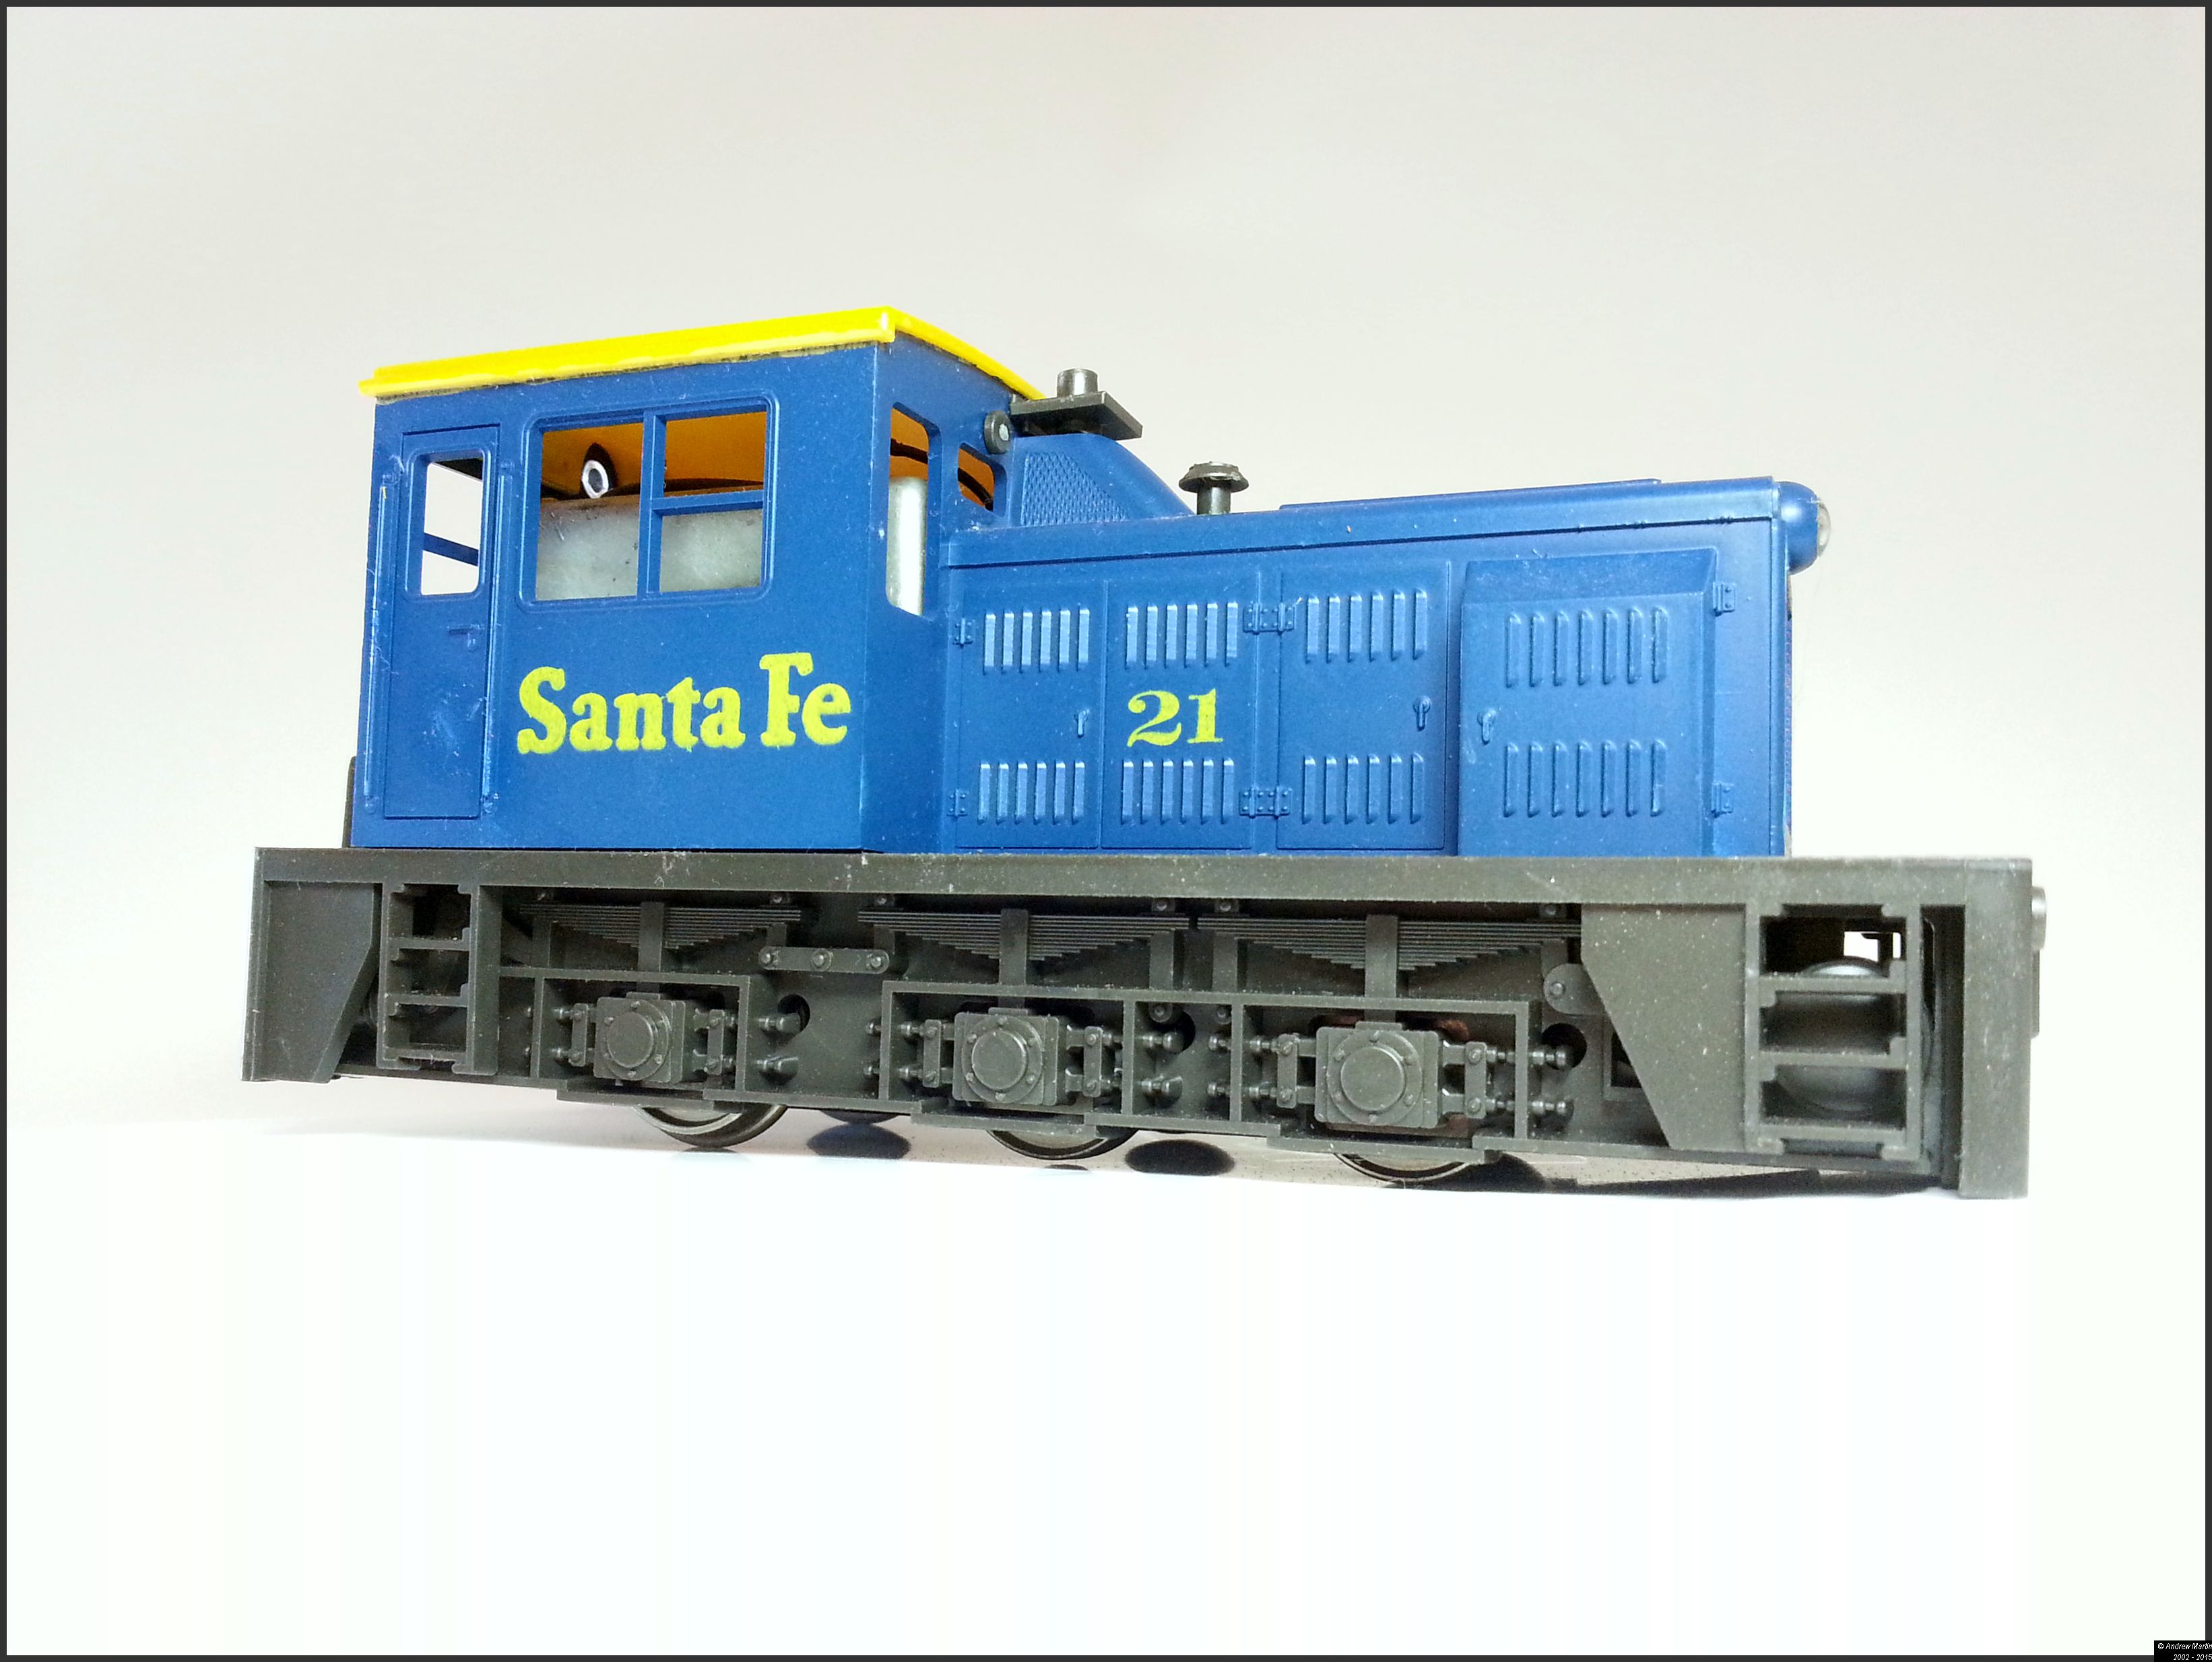
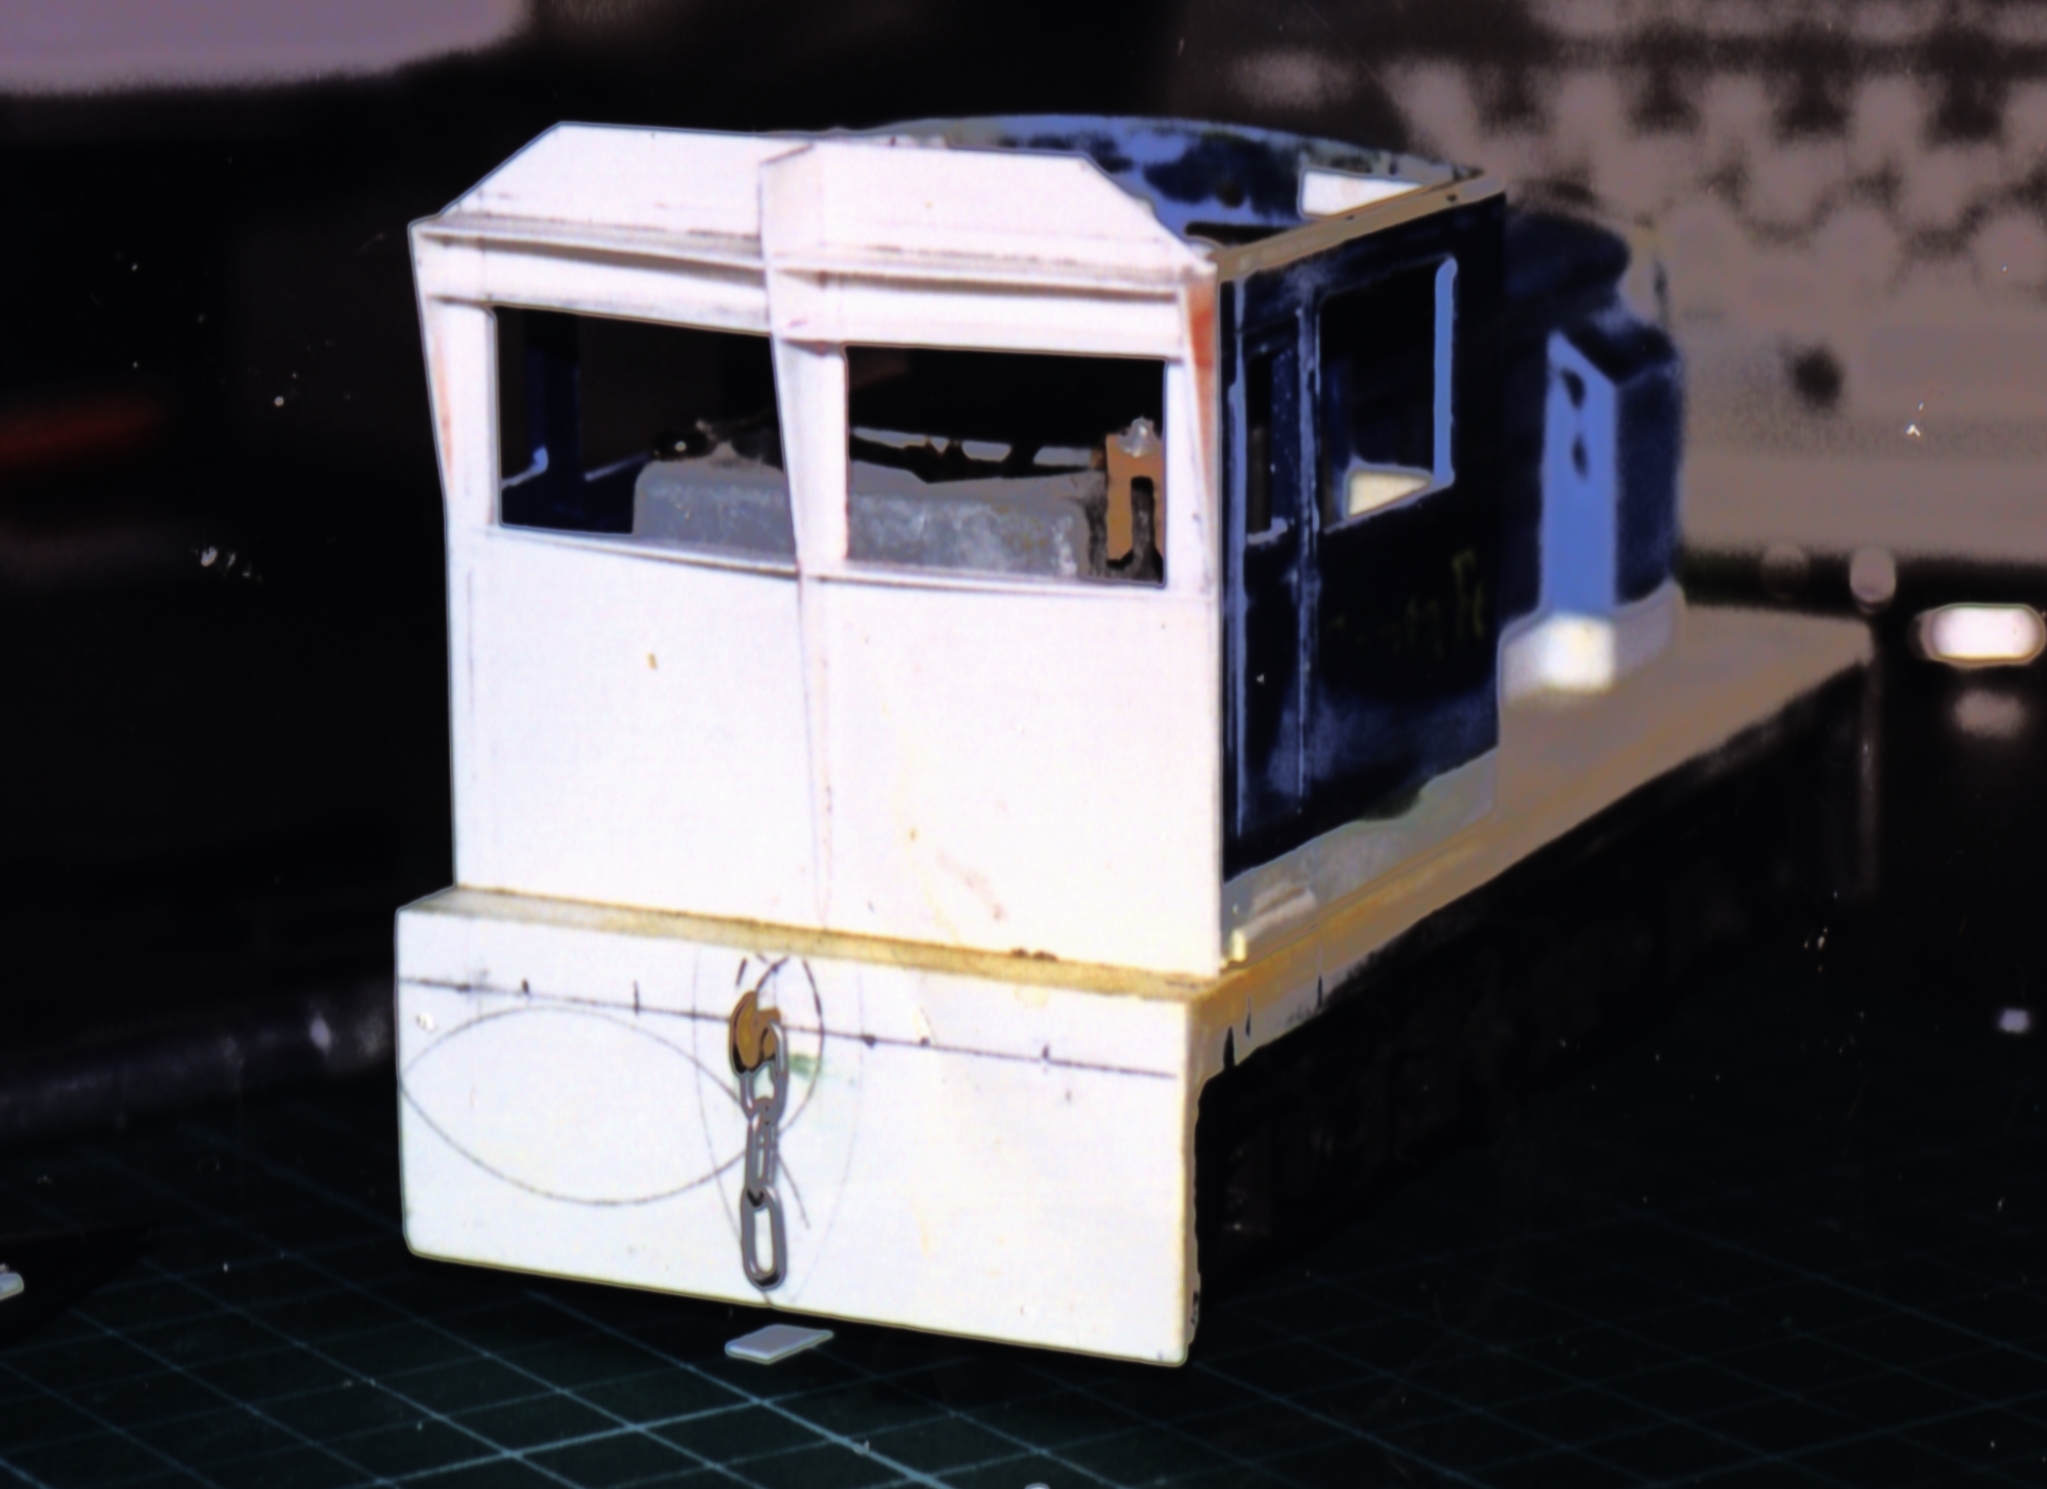
A long time ago, in a modelling landscape far, far away… there was a UK Model Trains magazine (I cannot remember the issue) that described the conversion of the Atlas O scale Plymouth switcher; the aim being to turn it into an industrial UK shunter.
If my memory serves me well it would have been about 1982 or there about. In short order I found myself owning four of these locomotives, and set about modelling the shunter as I’d seen it a couple of years previously. Having said all of this the title of this article now becomes important because I am about to finish the project that I started sometime back in the early to mid 1980s, in the mid 2010s. Yep – that’s 30 years.
That ‘Model Trains’ magazine article suggested either:
Keeping the cab height the same as it was on the original model and raising the buffer beam height to allow for buffers etc. or
Raising the entire cab by about a scale foot and raising the height of the footplate at the same time to allow for buffers to be mounted on the end of the frame.
I chose the second option as I wanted a snappy looking locomotive and not something half thought out that I’d never be happy with. So with magazine, (I have the copy somewhere and I’ll update the article details when I have them) plasticard, liquid glue, files and a sense of adventure I started working on the model.
I left the length of the loco as it was, and raised the body height with a conveniently wide piece of plasticard stock to get the height visually right. In reality that was the easy part as you’re just adding that to the bottom of the body.
All images are Copyright Andrew Martin 2015 unless otherwise noted
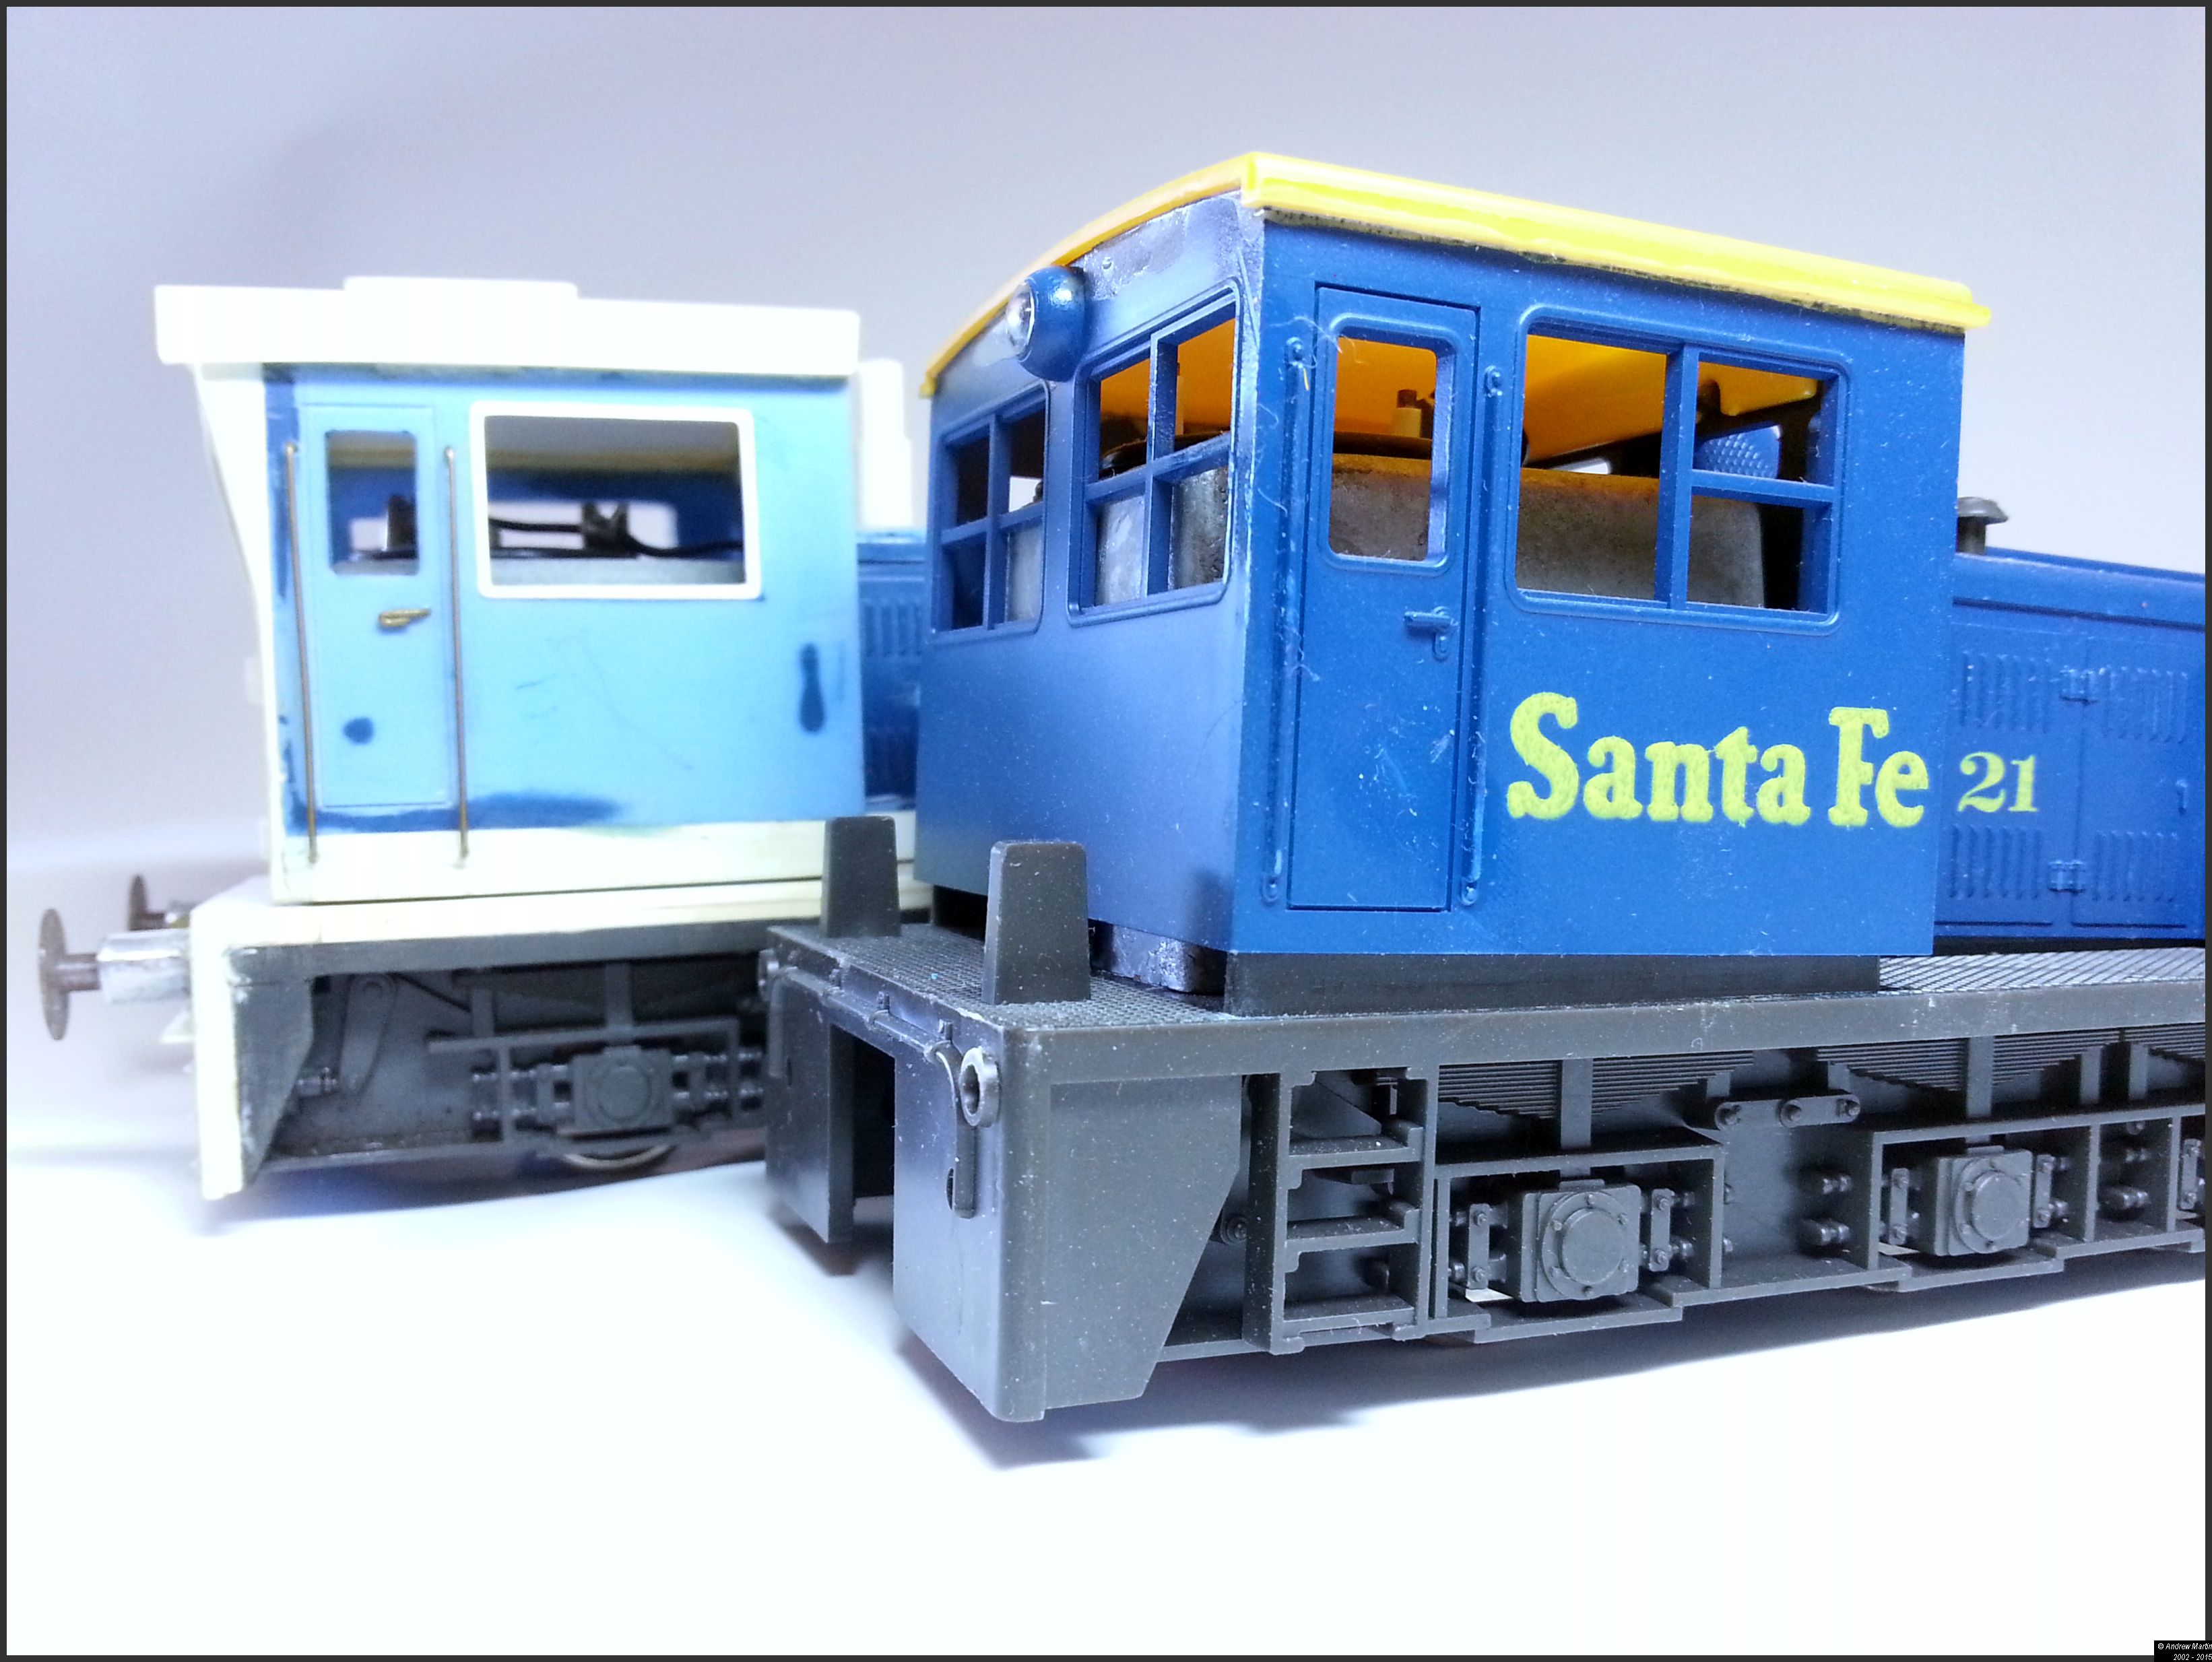
In the four photos of the unmodified model note the squat nature of the body. The last photo shows the difference in height between the modified and original loco that the two 40 thou shims of plasticard give. It should be noted that the loco models that I have come with a textured surface on the footplate simulating a safety tread pattern. This was sanded down and removed prior to installing the higher floor.
Next I cleaned up the four pane windows and made them single pane. Finally I sanded down and covered over the buffing faces on the loco ends in preparation for the 3 link couplings and buffers. The only problem was that having put all of that work into the loco – it did not look right to me. It looked like a higher roofed American loco and not something that would have been made in or for an English railway, especially a Quarry railway which I’d always wanted to model (and still do). So it was back to the drawing board.
The second coming…
Unfortunately I only have photos from the second rebuild that I started in 1996 or there about and none from that first effort as it was back in the early 1980s and I don’t remember owning a camera at the time (being a poor electronics apprentice).
Before I begin any modelling project (I over think them to be honest) I do a lot of work on how the final model will look; This locomotive was no different. First was a working sketch that I scanned recently and cleaned up below. (Yes I store all my sketches of train models.)
Figure 1: Concept Drawing – Copyright Andrew Martin 2015
There are some differences between the concept sketch and the final model that I’ll be completing in the next week or two – overall I’ve come pretty close to what I wanted. I’ve not bothered with the end rails and chain nor the MU stand. As the quarry locomotives were generally run individually and not in MU service in the UK from what I can gather. Additionally I took about 10 mm off the rear end of the unit since I did not want the air tank or a balcony on that end with the new look.
The changes
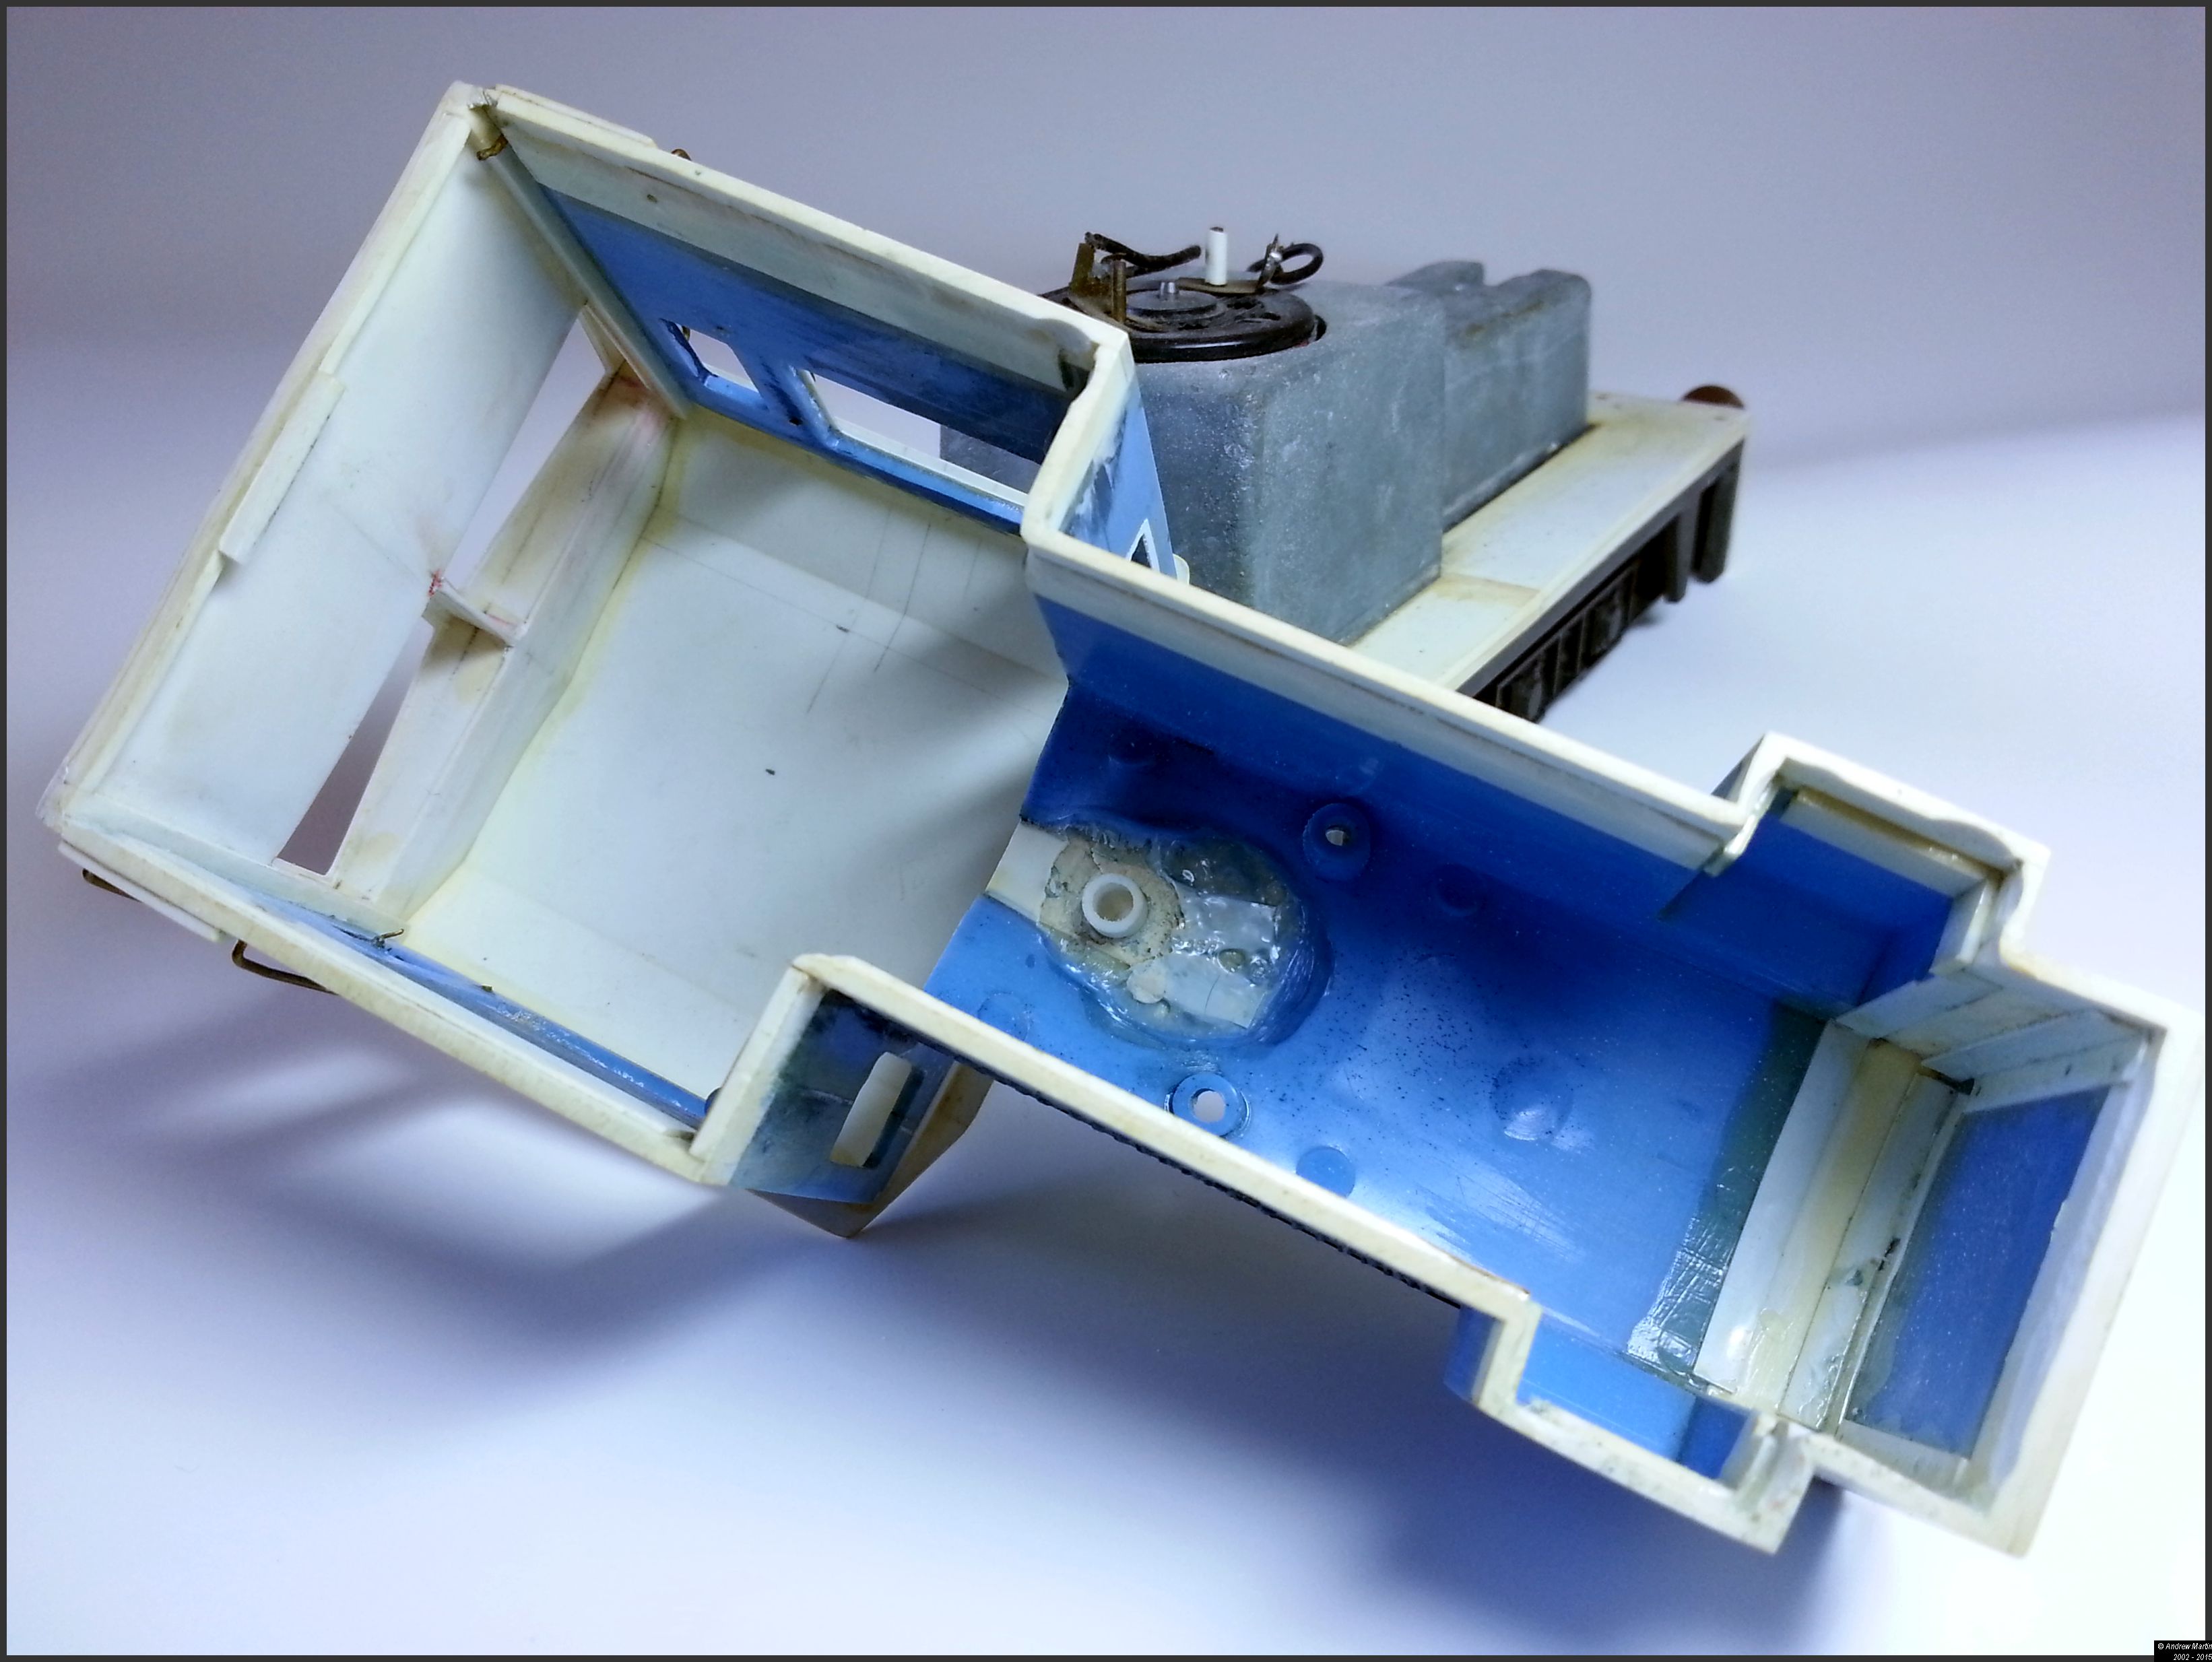
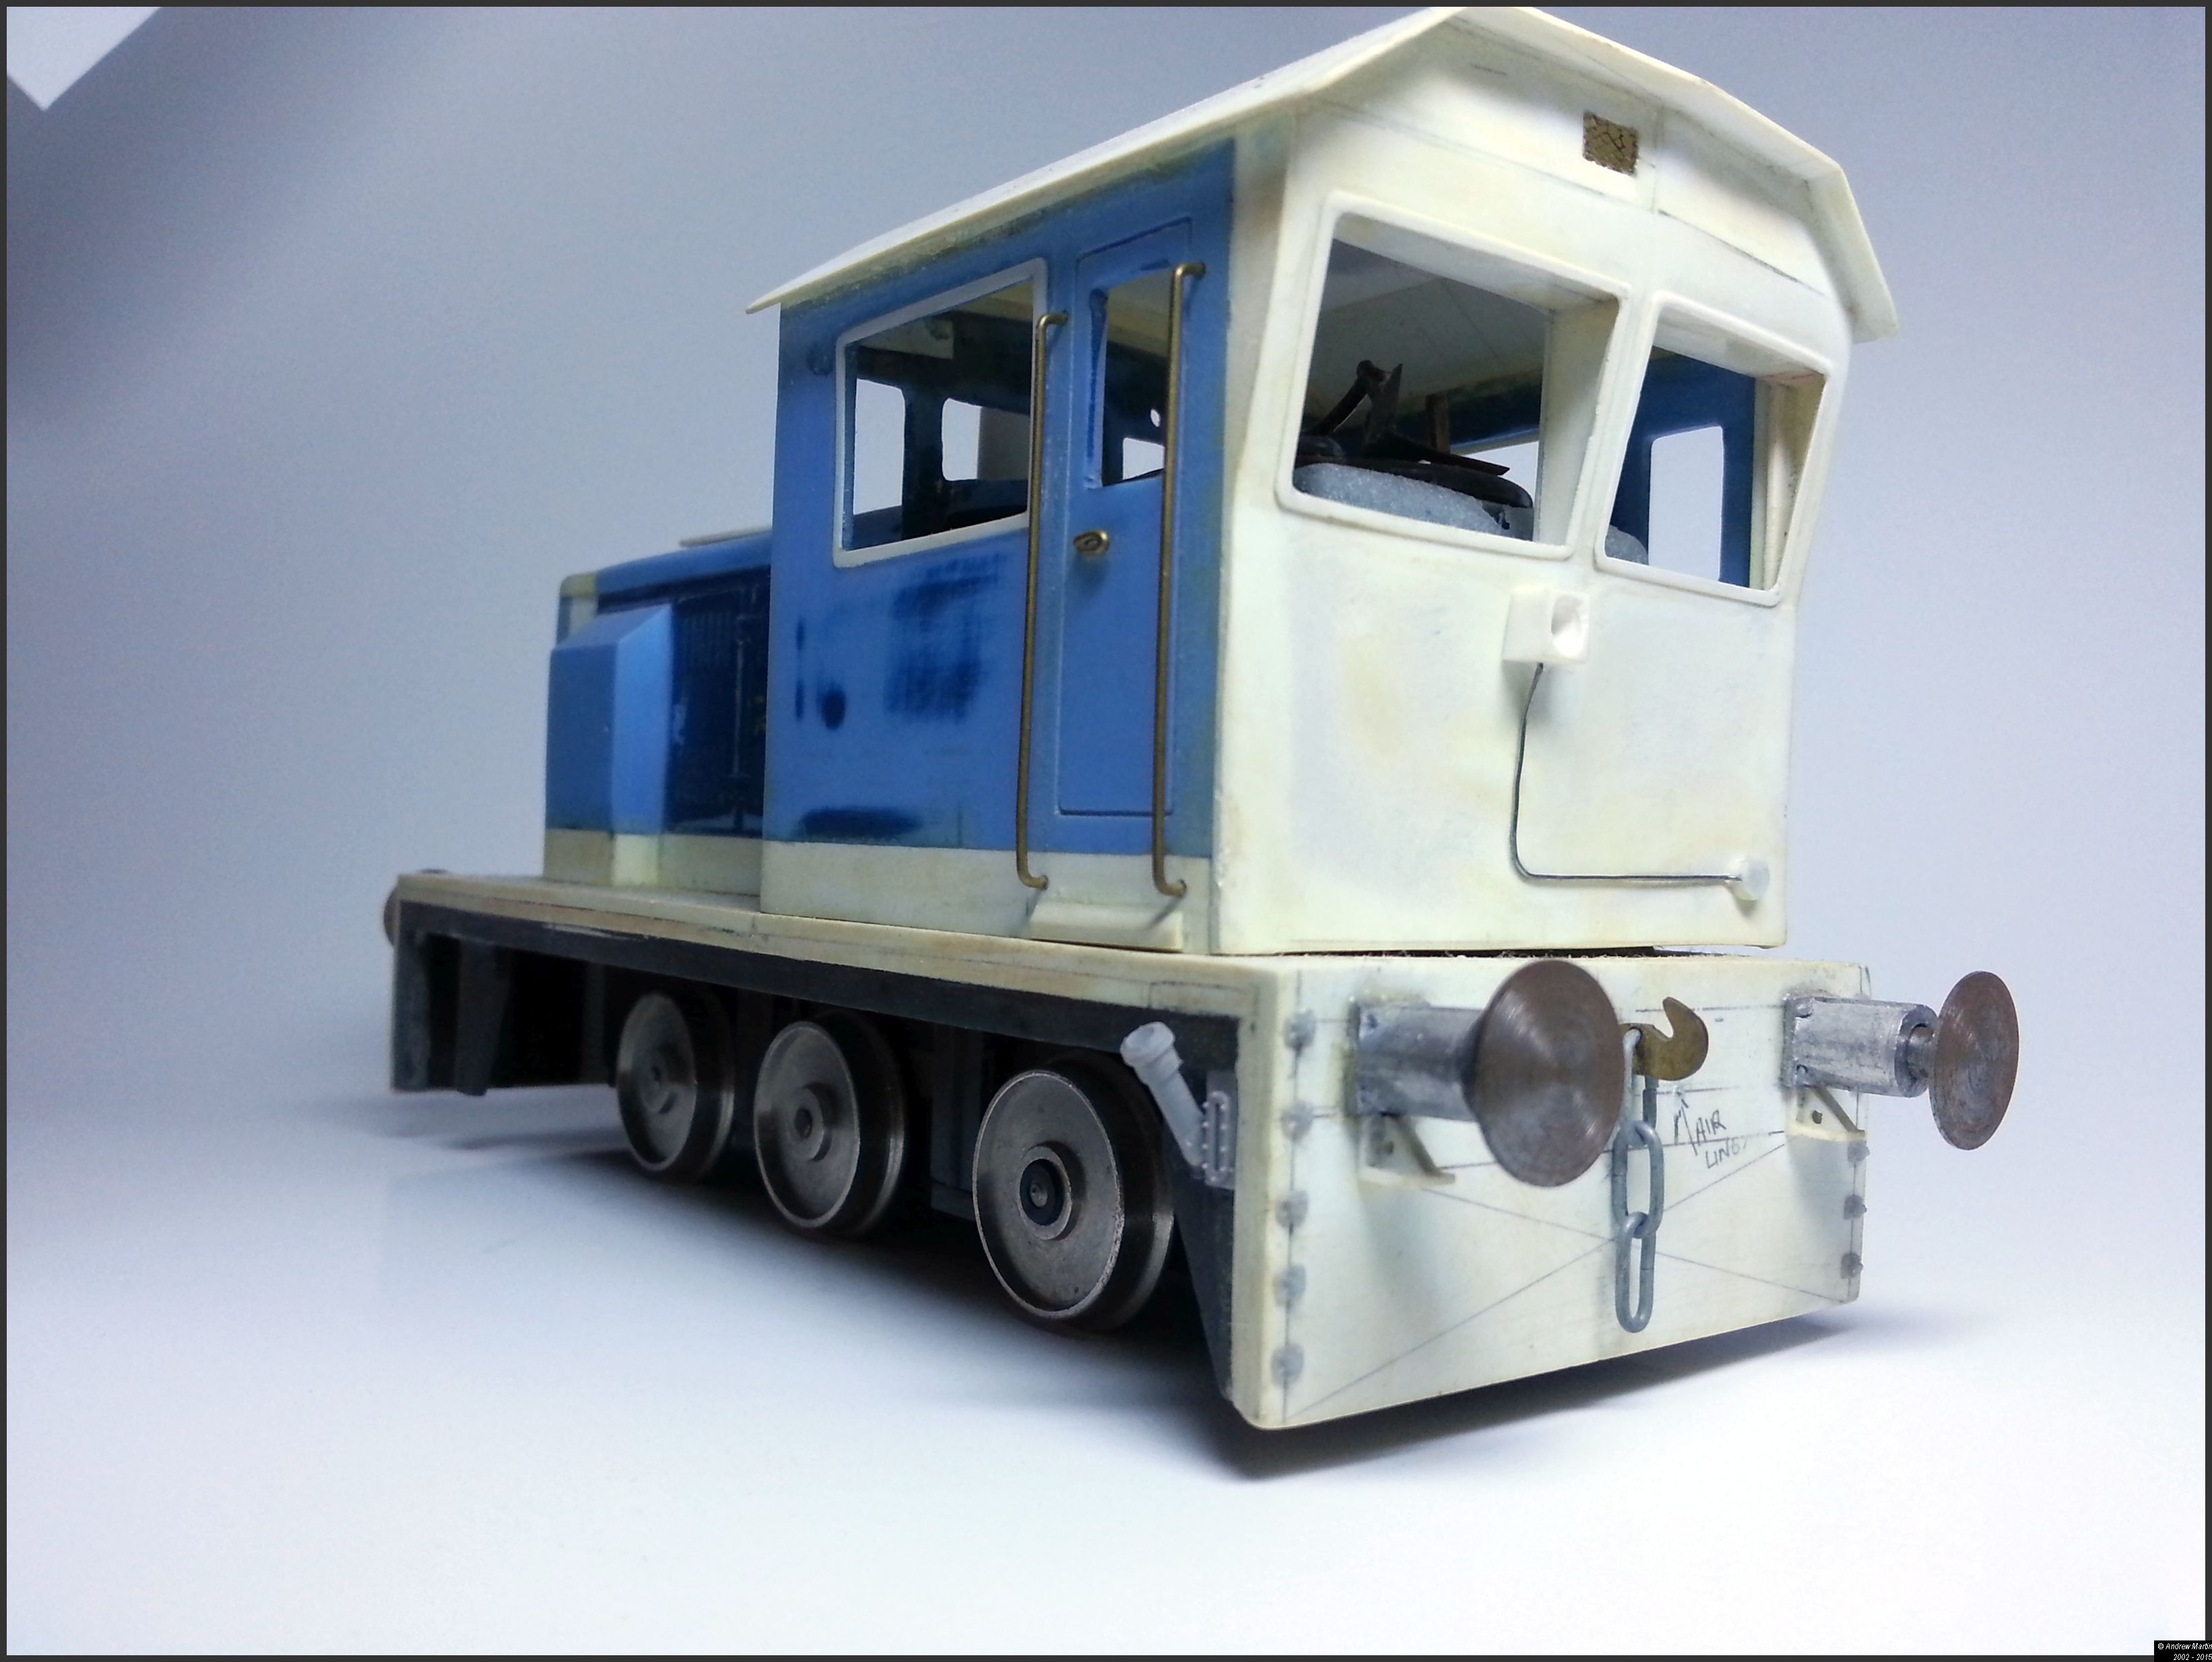
Photo 1: The extent of the surgery
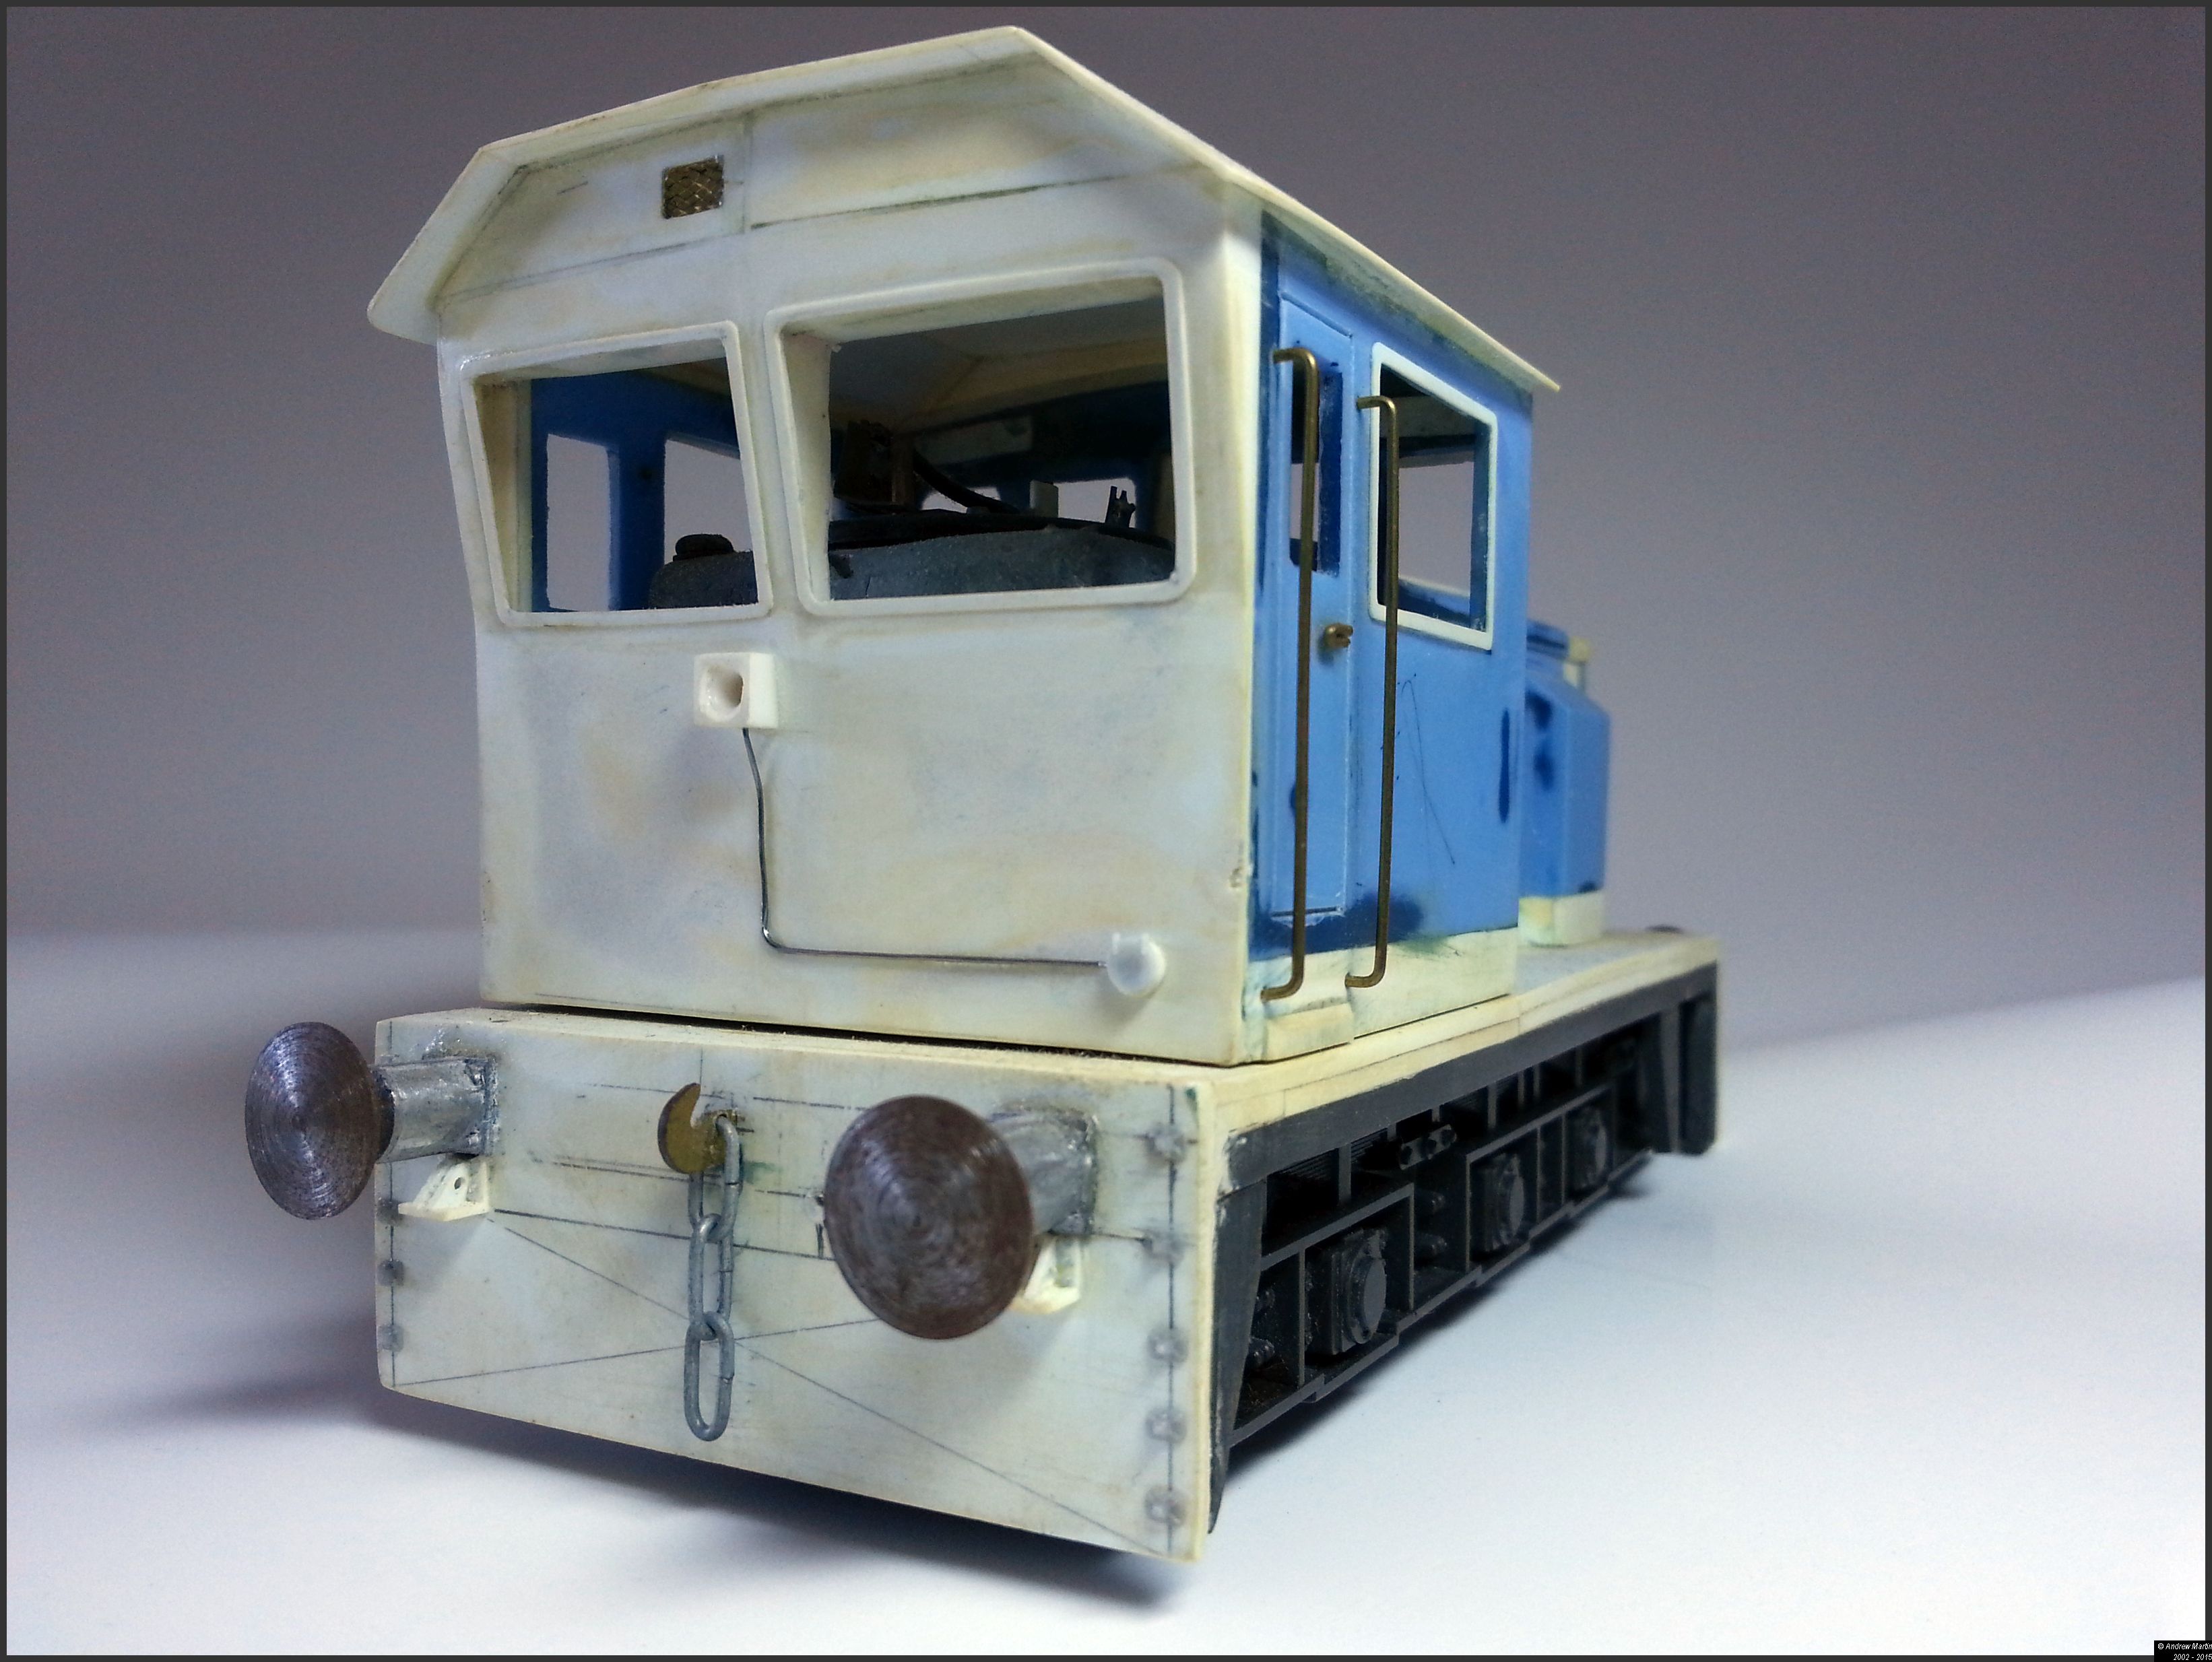
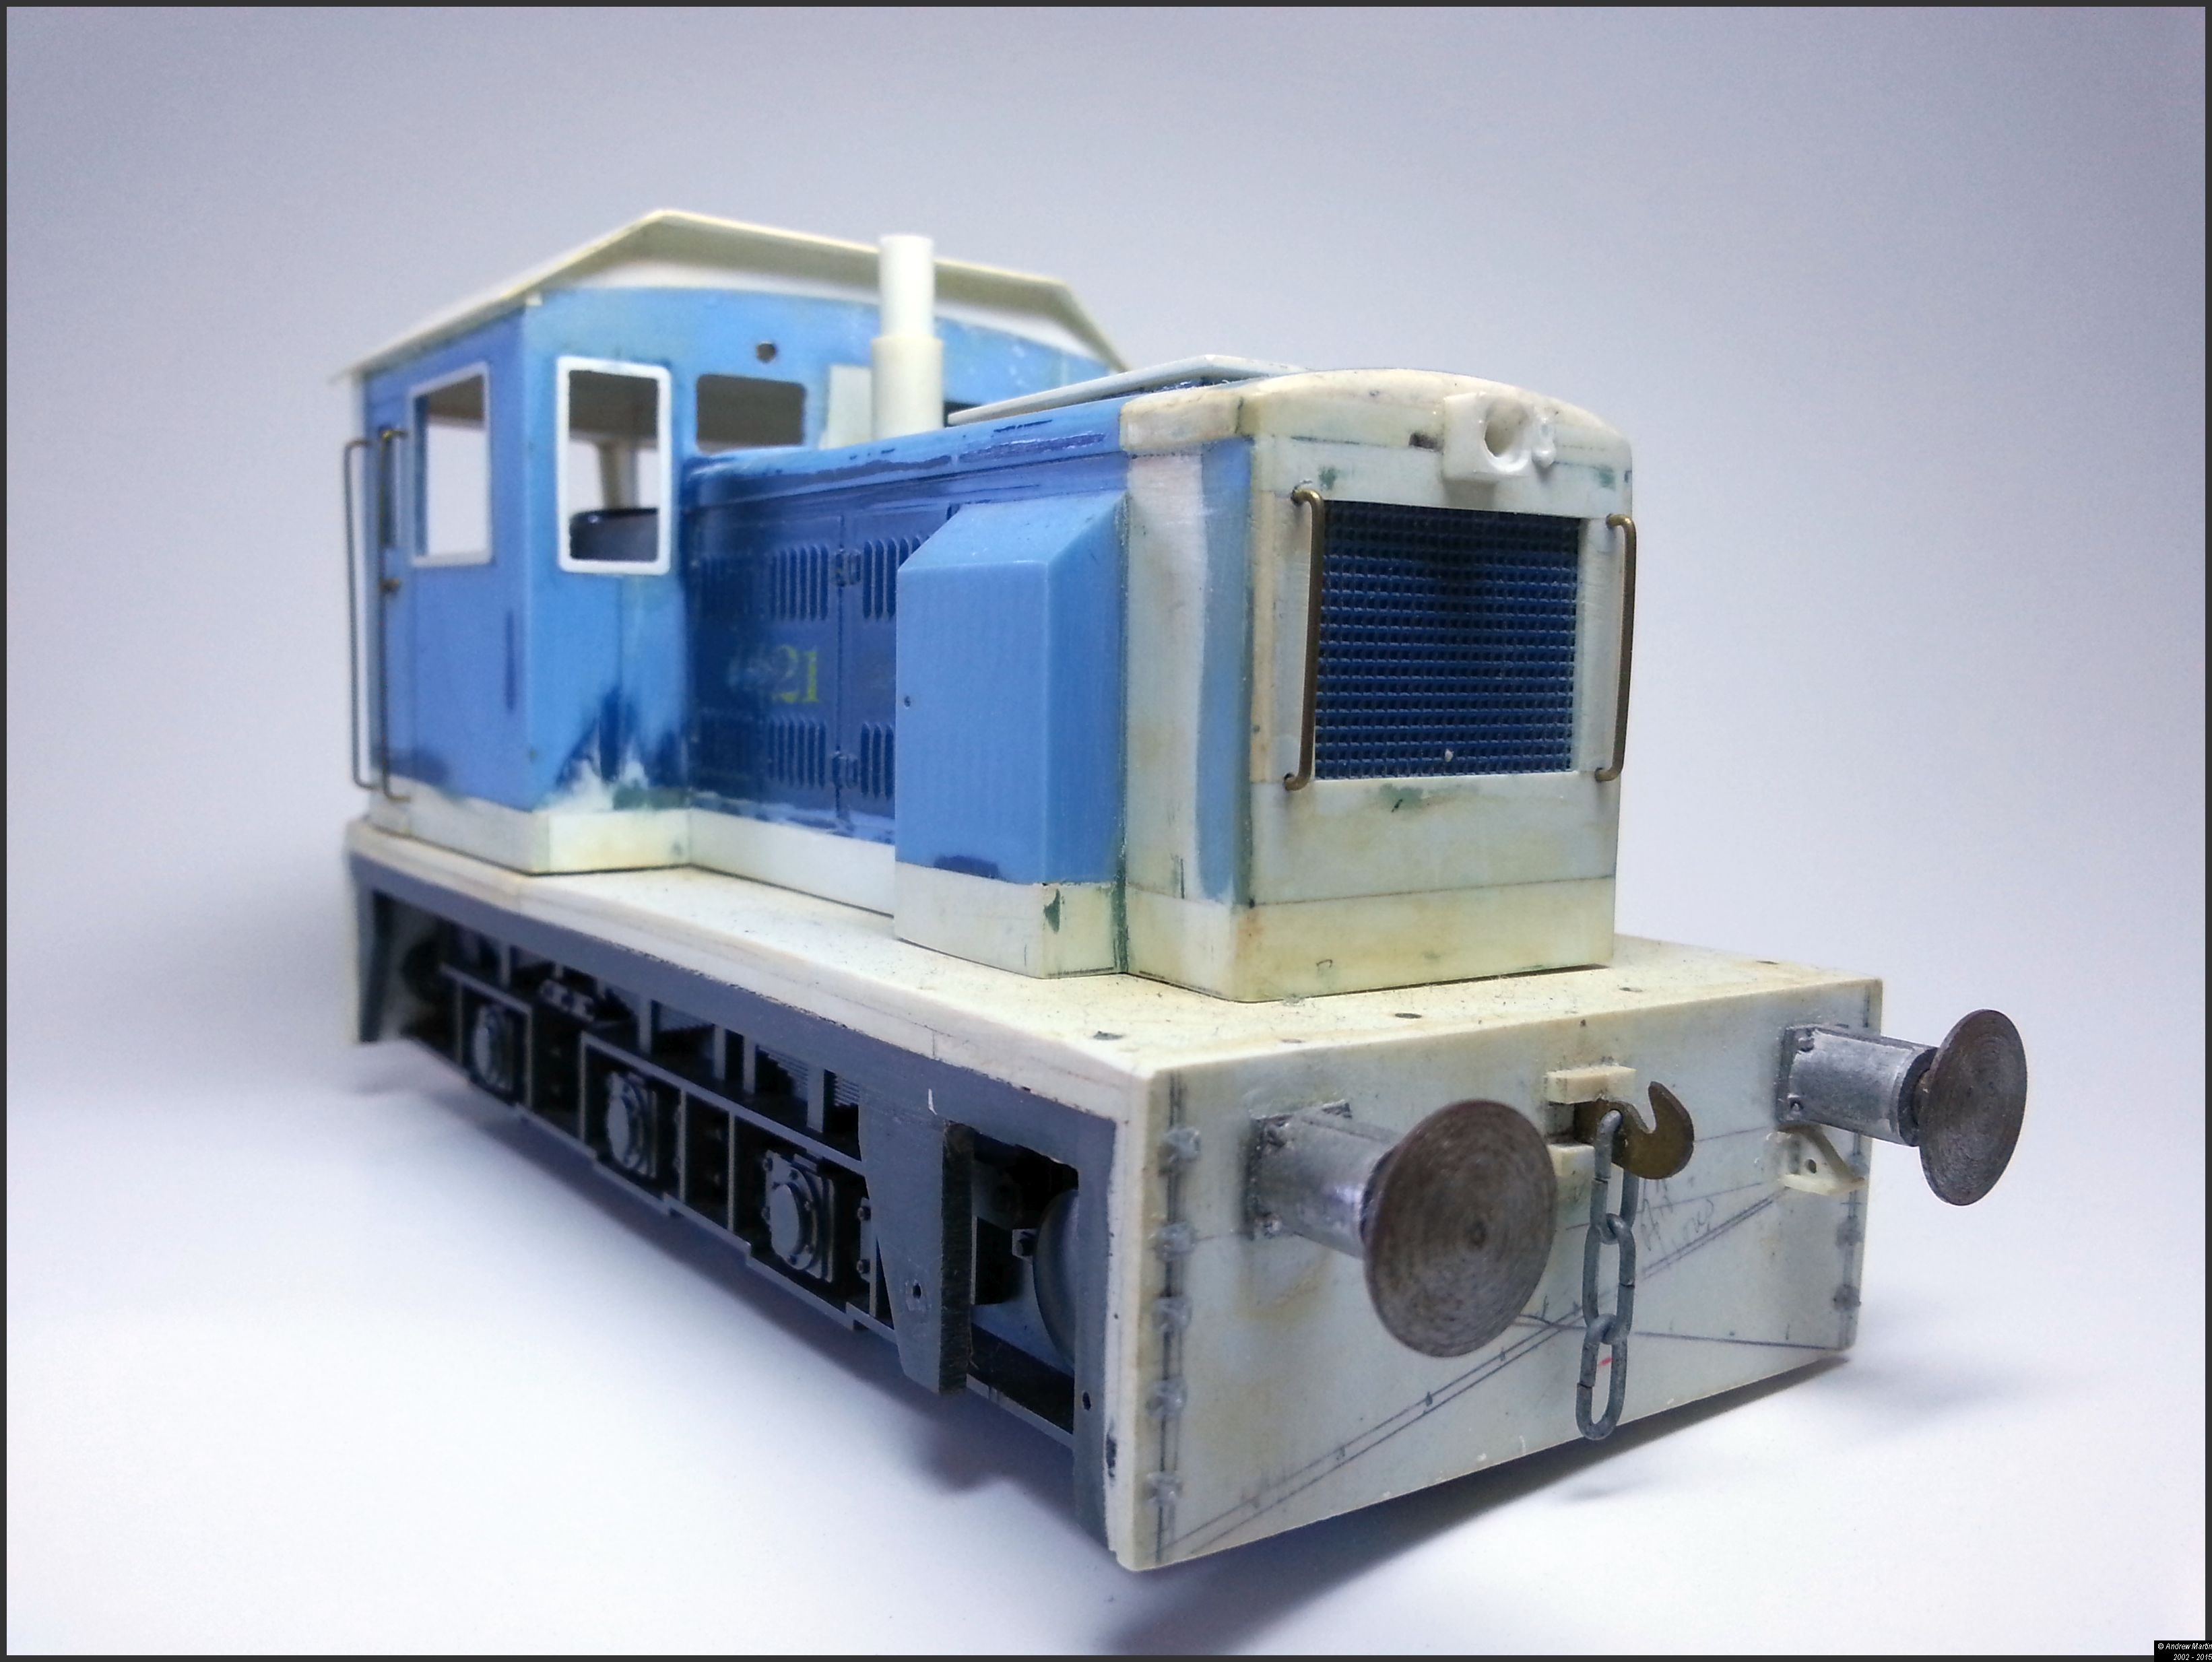
If it’s blue, it’s not new. The bubbly mess of plastic in the cab end of the hood is what happens when you try and speed up curing of putty with an incandescent bulb. The stove pipe chimney was the result of that and not planned. However, I did add 5mm in the front of the hood to extend the hood forward and rebuilt the front top are of the hood too as the bulky light on the original just irked me too much to live with. The entire cab roof, and rear wall was sawn out, and a plasticard cab end and roof was put in its place. This sounds fairly straightforward, until you see the amount of work that actually went into designing and building the new cab end.
Photo 2: Cab end plate, and ribbing waiting for the skin to go on
Photo 2 above shows the planning and work that went into the design of the new cab. When the skin (10 thou plasticard) went on it was measured and cut in one piece to ensure that there would be no visible seams on the face of the loco. This went off without a hitch and I learned a lot out of that exercise that has helped me in my model building since. Photo 3 below shows what the cab looks like after the skin has been cut and glued in place.
Photo 3: The new cab end completed
Also in Photo 3 above you’ll note the
Oleo buffers (from House of O Gauge in the UK – now gone I believe). These are working buffers and work as well as they look.
The electrical conduit to the light is fine solder Super-Glued in place. The light is a square styrene section with a circular section cut into the square frame and then drilled out to accept an LED. This will go back into the cab and into the DCC board. I had thought about having a duel sealed beam set, but I liked the look of this better.
To remove the need for a rear facing horn, I cut a small slot into the top left of the cab for the horn. I’ve yet to place a horn placed on the front of the loco.
The three link couplings are also working with draw gear behind them on the front and the back. Finally the electrical junction box is a 1:48th MU cover glued on to the face.
Finally the window frames are all 20 thou and allow a 0.5mm overhang into the window space. I am hoping to get some microscope slide covers cut and put in place in all of the windows. Should that prove too bothersome I will cut out some Monitor protector plastic that I’ve saved from work and use that in its place. It will be secured in either case by Revel clear cement.
Photo 4: The front of the loco_
It’s getting late, so I’ll just add a couple more photos. If you have questions let me know in the comments and I’ll answer them for you.
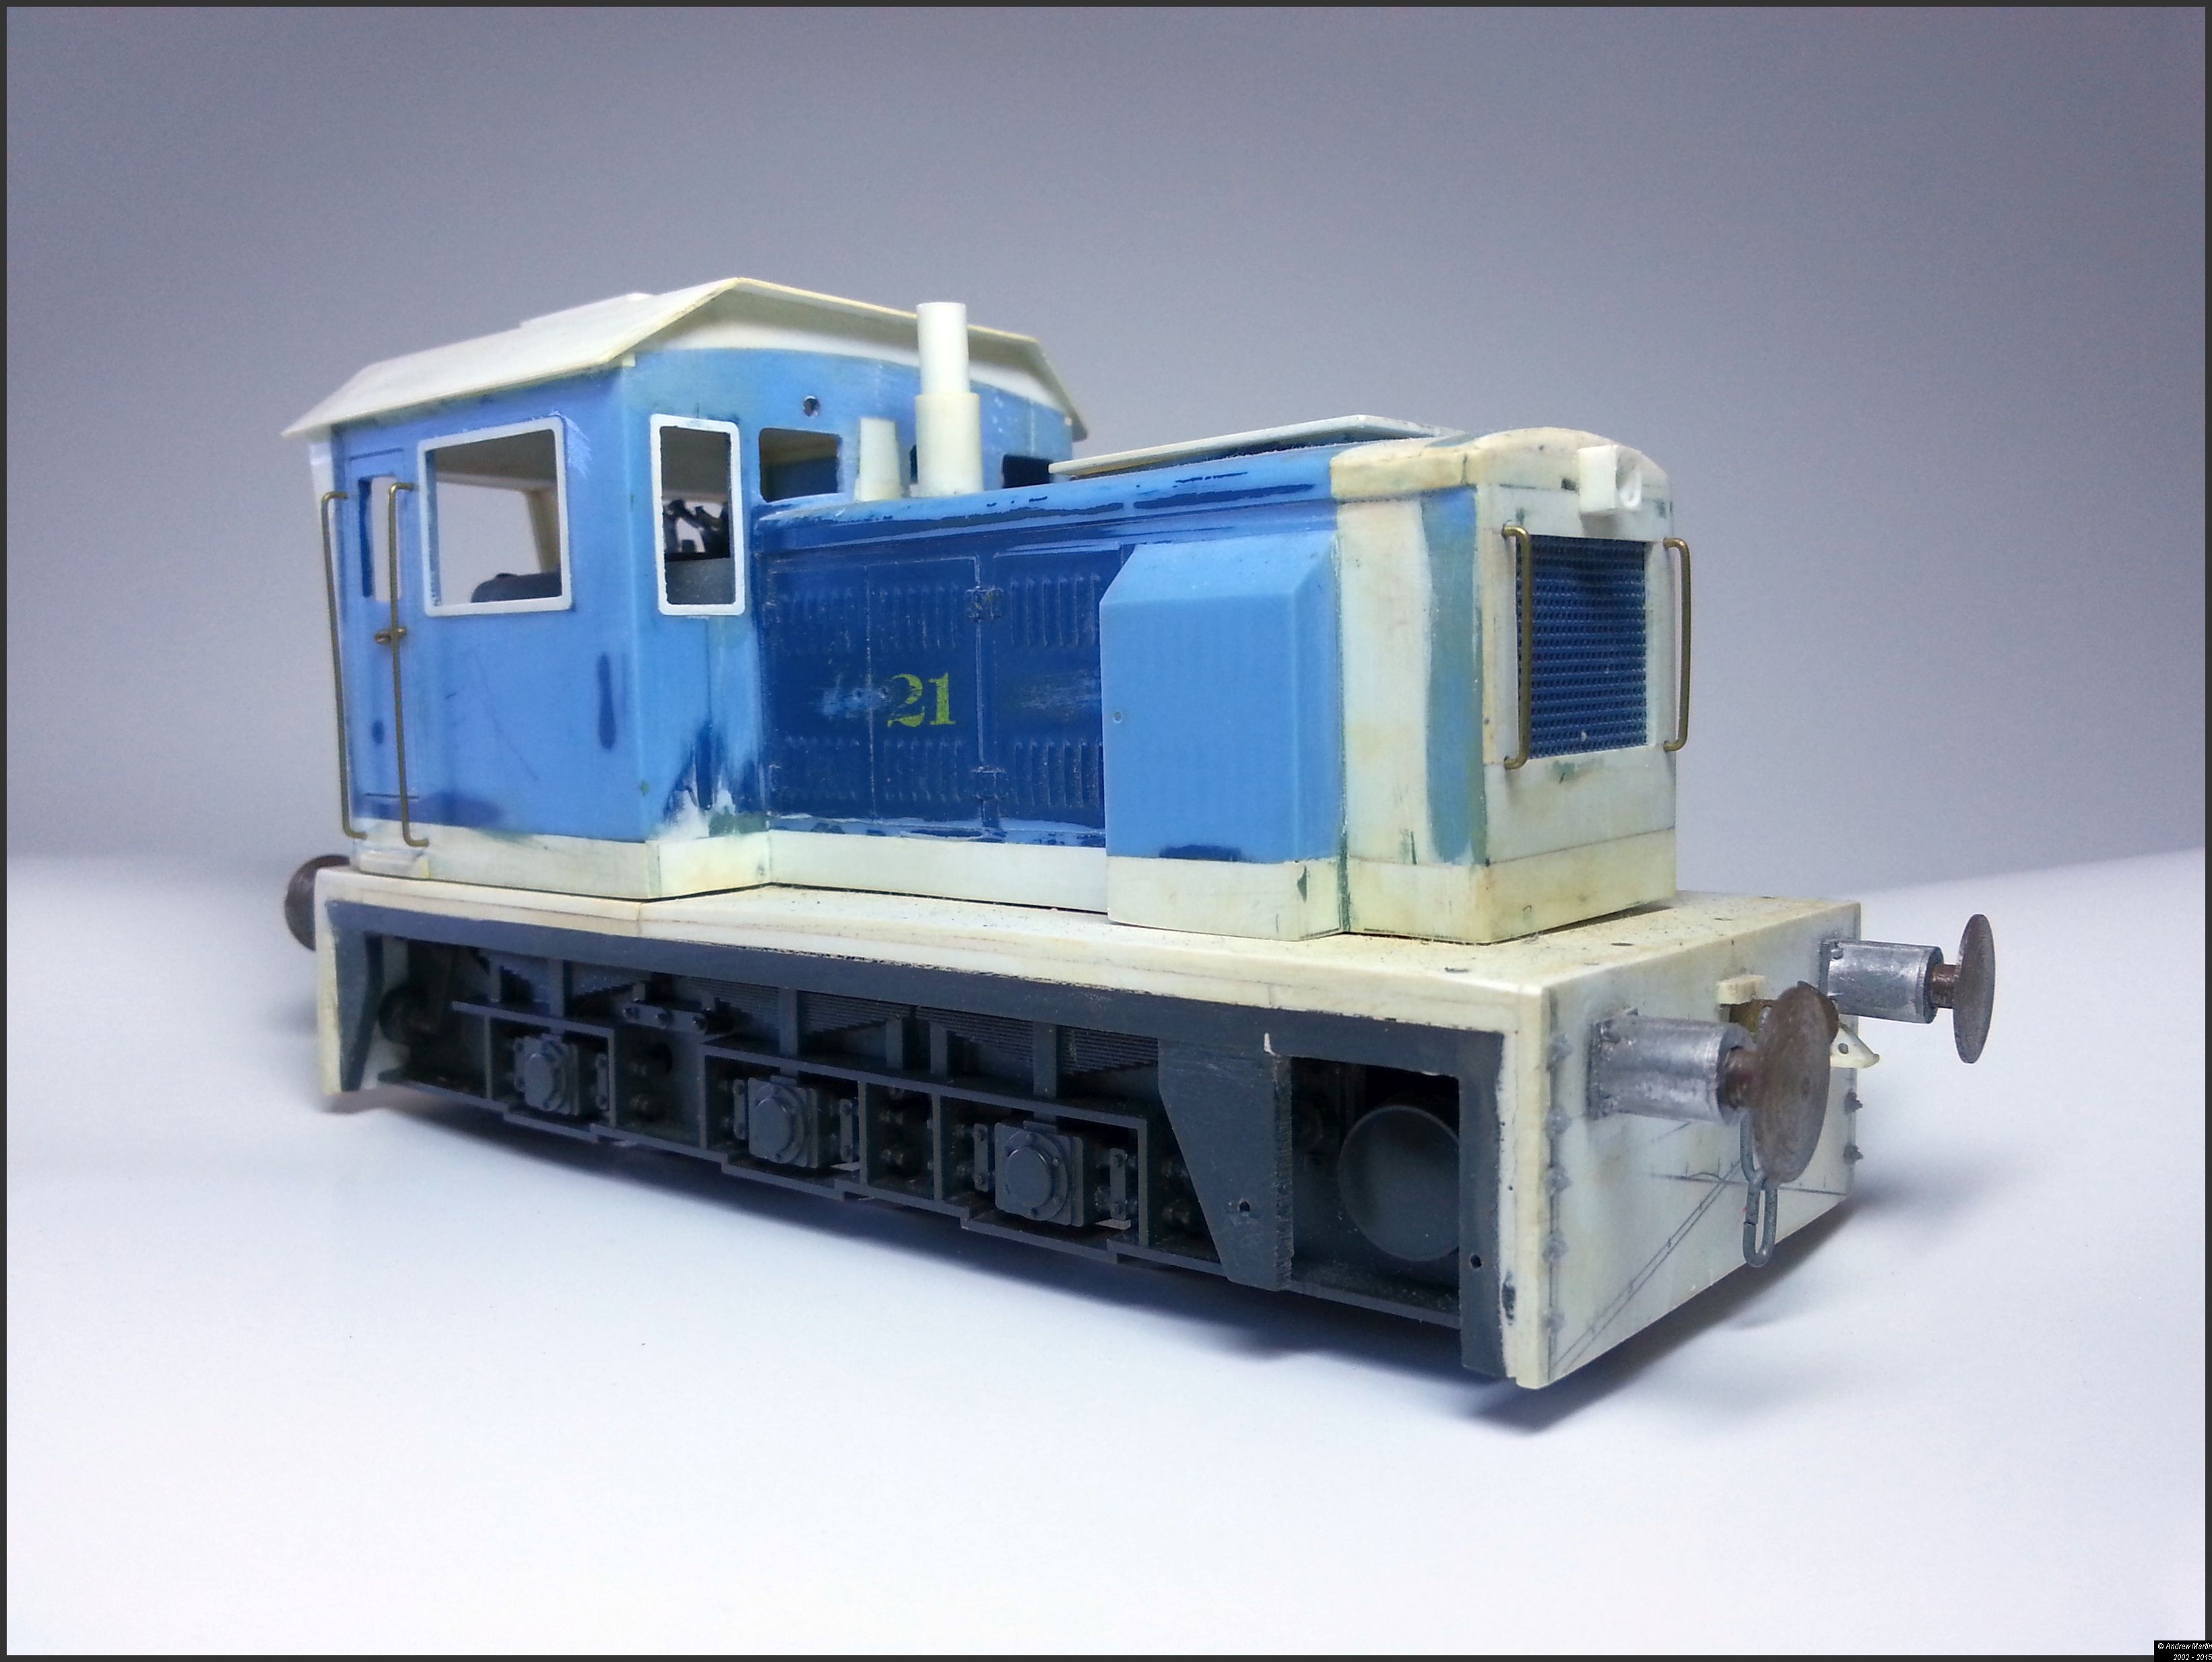
Photo 5: A 3/4 view of the front of the loco
I’m not sure if I am going to leave the running gear showing like this or turn it into a tram loco. But the tram idea has me in its grip at the moment.
Photo 6: Rear left 3/4 view showing the fuel filler and tank gauge
The fuel filler and gauge are from a 1:48 scale add on kit I’m using on my GP38-2 rebuilds.