Category Archives: Prototype

Site seeing – March 06 – Bruce Petty’s Glendale Freight house Module Redux edition

In a post on January 18, 2017 I made mention of Bruce Petty’s excellent module of the end of the Union Pacific’s Glendale Branch and the freight station located there. Bruce’s Module is 5 feet (1500mm) x 18 inches (450mm) but to my eye looks much bigger because of the great use of the space he has made. There is no crowding, no feeling of busyness, only the feeling of a warm summers afternoon in Los Angeles sometime during the 1960s or 1970s. This small scene is evocative and places you immediately in the place and time, even if that is coloured by your chosen time period.

The majority of my layout designs fit into an 8 foot space Bruce’s layout module with the addition of a 3 foot fiddle yard fits right in the space available and would make an excellent display or exhibition layout. More importantly it would fit with any time period from the late 1940s – early 1950s (when I believe that the freight house was built) through to the mid to late 1980s when I believe the freight house fell out of use.

As I said in the previous post I’ve pondered over how to use Bruce’s track plan in other ways. I’ve even worked the design up into a 1/12th scale model to see how it might work. I’ll come back to the alternative in my next post; for now let’s revisit Bruce’s excellent module.

A closer look at Bruce’s module

While this module is a part of Bruce’s larger railroad forming the end of the UP’s Glendale branch it can also stand alone as a layout in its own right. At its heart it is an Inglenook layout. Each of the freight house roads can take two 40 foot boxcars against the dock. For those of you interested in modelling this layout at a later stage it is highly likely that the Freight station never hosted more than 2 x 50 foot boxcars at any one time. If it did so then they would be placed on the right most track with the second car either unloaded directly into trucks as shown in Photo 1 above or set off spot on the left most track and switched out once a suitable space was available at the dock. Lots of switching possibilities here.

Of particular note in the photo above is the connecting piece to the rest of the layout. I like this little yet important touch. The wooden insert which allows the module to join the layout has been disguised as a typical UP/SP bridge. Very smart and ensures that the layout and the module appear to be a single whole and not something that Bruce built later on.

Operation

Operations on this layout would be pretty good too. As we’ve discussed before on the blog Inglenooks are completely prototypical and often used by railroads in tight places. Operating with a locomotive pushing in – pulling out switching focuses on the industry or industries served. The longest track on Bruce’s layout I would use as my switching storage and sorting track. The incoming train pulling outbound cars before spotting them on the long track. Cars would then be switched according to requirement on the remaining two car tracks at the docks. Any cars from those pulled needing to be spotted back at the dock could then be spotted before the locomotive crew pick up the remaining outbound cars and head back across the bridge and back to the yard. And here endeth the session.

Short, clear, easy to achieve, enjoyable and within the 30 minutes to 1 hour per day play time that a small layout should give you. Whether you use a single person (driver/engineer only) or two person (driver/engineer and conductor) crew to do the work the time taken will remain roughly the same. I prefer a two person crew simply because it makes the play time more fun when family or friends get involved.

Hope that this revisit has been of some use. If you like the blog don’t forget to Like and Subscribe. PLease comment if you are looking for more information on layout designs or on the designs I’ve previously posted. And of course take the time to visit the “further reading and resources” links below.

Further Reading and Resources

An industry you can model – Kensington Grain Siding (Victoria, Australia)

On June 02, 2015 I made mention in a post of a grain silo operation close to the CBD in Melbourne, Victoria that allows for interesting operation, and would keep a model railroader busy and interested for the length of a short operating session (around a half an hour).

Image 1: G529 stabled in the dead-end siding at Kensington. The grain hoppers and the switch engine are down by the flour mill (courtesy of wongm’s rail gallery – LINK)

A little background

For those of you not in Australia let me give you a little background on the site from image 1 above. The photo above is from the grade (level) crossing at Kensington station. The station buildings are directly behind the photographer.  G529 is sitting at the north end of the site on a dead-end siding used for second units or for red-carded (bad-ordered) cars.

The two lines under wire are the UP (left-hand line to Melbourne) and the DOWN (right-hand line from Melbourne) lines to the outer suburban terminus of Craigieburn, a fast growing suburb 26 Km to Melbourne’s north. Grain trains come north from Tottenham Yard and back into the sidings. When they leave they have to do a long looping route north, then west before returning to the yard once more. A fair bit of this is on the suburban Craigieburn passenger line. This situation occurred because of changes to rail lines for the Regional Rail Link that has taken freight lines out of service.

The single slip allows access into the site from the DOWN line. On the mill site there are two spurs with the left road running over the under track unloading auger; the right is a passing siding. The switching problem on this site is that the turnout at the end of the two roads only has enough room for two grain cars, and one locomotive at a time.

Site Overview

Image 2: An overview of the site (courtesy of Bing – LINK)

Operation

Generally the train has two locomotives. While a single locomotive can handle the work, and would be easier on the crews when switching, the extra power helps clear the path for the passenger services on the Craigieburn line. Melbourne’s rail network is greatly used by the it’s citizens and the infrastructure is congested requiring new signalling to allow greater train density. Anything that holds up one train has knock-on effects that can and do regularly impact on the rest of the network. So any freight movements using passenger routes tend to be over-powered.

Image 3: A track diagram showing the grain siding and signalling at Kensington (courtesy VicSIG)

1. Arrival

The shift begins with the loaded grain train arriving early on the north-bound suburban tracks. The train pulls into Kensington stations up platform road, before informing train control that they are ready to reverse into the facility. Train control (under CTC) unlocks the shunt signal 7, switch 8 and switch 9 to allow the movement and the train reverses into the site, putting the grain cars onto the ‘left-hand’ unloading road. On completion of the move the crew contacts train control once more and the switches and signals returned to normal.

2. Set up

The crew has to unload one of the locomotives. Without the room to run the power around at the switching end on the unloading road one loco is usually parked on the ‘B’ siding at the north end of the site. Image 2 below shows the problem on-site with the short headshunt (switching lead).

Image 4: The switching problem – the short headshunt (courtesy of wongm’s rail gallery – LINK)

3. Switching / Shunting

Prior to unloading beginning the mill staff remove the metal grate covers to allow grain to begin unloading into the under-track auger. With only one loco for shunting (switching) the operation is fairly straight-forward:

  • The first two cars unload at the under-track auger
  • When unloaded the train pulls forward to two car lengths to begin the unloading process again and handbrakes are applied
  • The loco cuts off the two empty cars, pulls them to the headshunt, before pushing back onto the passing siding
  • Handbrakes are applied on the two empty cars before the loco cuts off and moves back to the headshunt
  • The loco reverses onto the loaded cars, and the cycle repeats until all the cars are empty.

With all the cars emptied the mill workers cover the auger pit with the metal covers. The loco eases off the unloaded cars, runs into the headshunt, and backs through the unloading road back to siding B. Here it picks up the previously stabled locomotive and once MU’d they back onto the empty cars; with the air pumped and they wait for train control to authorise their return to the running lines.

Modelling

Operation of this layout design element offers a lot of opportunity. Whether a small train or a large one the work to be done, including air brake operations and taking time to switch back and forth would give a lot of interest for those so inclined. I can see this being a great industry especially for the modular railroader. Across two or more modules, you’d have the best of all worlds with action on the main, and then a lot of switching action on the modules.

Being self-contained the industry is a real winner and could be transplanted anywhere.

Resources

There are a couple of videos available below for you to get an idea of the action at Kensington.

In the second video you can see the operation under way with the switching in this case being handled by BL class # 32.

You can find out more about the locomotives using the resource links below:

  • V/Line G Class Locomotives: Link
  • Australian National BL Class Locomotives: Link
  • V/Line X Class Locomotives: Link

Feedback?

If you have information that you can share about operations at the site, please let me know. I’ve found everything that I can about the site and its operation, but there is nothing like a driver or someone else knowledgeable of the site sharing what they know. Leave a comment, like and subscribe to the blog if that suits you.

Why I carry a camera on every trip out and about

You never know what you are going to capture with your camera. Sometimes you’ll get a photo, and unprecedented access to things that you might never have believed would happen. Other times you manage to get a great series of photos just before a major event happens in the life of your chosen subject, after which event, things are never the same.

Just after we cam be back to Australia from the United States in 2006, my wife asked me why I bothered to take all of these photos of trams and trains. I told her that it was simple: “Today’s photo is tomorrow’s history”.

Over on the Rails West blog there are two recent posts that follow in just this theme.  Zip on over for a 1979 trip through the SP’s Hardy Street shops in Houston Texas.

Click the link to take you there: A trip to the Roundhouse…(Part I).

Why I chose not to design my layout – part 2

Introduction

In my last post (Why I chose not to design my layout – part 1) I discussed some of the reasons for ‘eyeballing’ my new layout and not ‘designing’ my new layout. This time around I wanted to clarify any uncertainties around the design process, and continue on with some meta-data about the design to help me clear my vision of the layout and the eventual role I’d like it to take in the future.

The Mod. 1, Mark 1 Eyeball

There is nothing better than eyeballing a space, and understanding how all the elements fit together. Obviously it makes the process easier if you understand what you aim to make, and have a sense of perspective on the amount of track you can reasonably have within the bounds of the layout space.

The layout’s story

My layout’s story revolves around switching within an industrial park. Service delivery is the primary focus of the layout and thus switching is the primary activity of the layout. With the design I wanted to be able to have a train:

  • arrive from the class 1 partner (interchange track),
  • be brought into the industrial park (switching yard),
  • switched into job lots for delivery within the park (customers), or to off-spot storage (storage yard),
  • run out to the customers needing switching that day, switch the site and then return to the yard,
  • have outbound cars switched and readied for delivery to the class 1 partner, and finally
  • have the outbound cars switched to the interchange track

Because I expect to have multiple small operating sessions each week, independent jobs that allow me to complete a little part of the operating session (between 30 – 50 minutes) each day I need a layout that supports that kind of operation.  Should I manage to get a couple of people over who want to operate a full session, we can simply pick up the next job sheet and continue on from where we started.

Why the design I’ve come up with?

A multiple industry layout was always my goal since I decided to build another layout in 2003. You can see some of these layouts in the Layout Design Gallery (Offsite Link), or directly from the ‘Resources’ section below.

I read about the Modesto & Empire Traction in Model Railroader many years ago, and have a lot of research on them. But as we don’t own our own home I am loath to build something bigger than my current proposed layout even semi-permanently at the moment. So I’ve gone down the path with my own module design, that can be added to over time. Another influence was the Progressive Rail layout that MR did several years ago. Again too big for me, but there is a core of the operation that I can mimic in the space I have.

In the next post ‘Why I chose not to “design” my new layout – part 3’ I’ll review my ideas on the operational aspect of the layout; the proposed paperwork that I want to use. It’s getting late and Sons of Liberty is on the Tele tonight. From Ballarat, on a cool and clear evening – good night.

Resources:

Multi Industry Switching Layouts


Moving cars …(without a locomotive) — Part III

Over on Chris Gilbert’s new layout thread I’ve posted a suggestion for a car  puller. Using nothing more than a map pin. You can view my response here: Offsite Link

As always happens you post one thing and then find another site with an even better idea. Rails West has already done all of the hard work and provided not one but three posts all about car pullers.

Moving cars …(without a locomotive) — Part III.

via Moving cars …(without a locomotive) — Part III.

Enjoy your reading on car pullers.

Site seeing – February 13

There are some who believe in Friday the 13th as a bad omen. I like to think of Friday the 13th as a good time to get things done while everyone else is cowering under their beds, waiting for the sky to fall.

Site 1 – Clear Iron (YouTube)

I just got through posting about the new Rapido RDC-1. If you are unfamiliar with this little cracker of a design enjoy this video from 1952 about the RDCs.

Site 2 – Trinity Railway Express (YouTube)

When we lived in Austin Texas we’d head on up to Dallas and Fort Worth every now and then so I could indulge my railfanning needs, which to be honest I never could really meet in Austin.

Of interest is the ex- B&M 6110 RDC-1 heading the consist of 3 RDC’s. TRE #2005, TRE #2006, and TRE#2007

Site 3 – US Budds (again from YouTube)

This much longer but just as interesting video takes a look at the US operators of RDC-1s including:

  • Belfast & Moosehead Lake,
  • Connecticut DOT/Amtrak (SPV2000’s),
  • Metro North,
  • Bellefonte Historical RR,
  • North Shore Scenic RR (Duluth),
  • Trinity Rail Express (Dallas area),
  • Reading & Northern, and
  • Cape May Seashore Line

Enjoyed a massive storm through Ballarat tonight, and now the temperature is dropping away. Hope the day has been great where you are.

Rapido trains in releasing a brand new model of the RDC

Introduction

I think that the RDC is a great addition to any layout. For those who model passenger operations anywhere from the late 1950s on, these little beauties fit right in. I believe that even in the USA they’re mostly gone now from day-to-day service.

Rapido’s new RDC-1

Thankfully they’re going to be remade by Rapido. And the work they put into this is amazing. Apparently they’ve scanned the real thing, and then worked off the scans and the blueprints to decide what was as-built, and what was in-service.

These cars also ran as is here in Australia. The Commonwealth Railways bought three of them for service in South Australia. I believe that ComEng (Commonwealth Engineering – Granville NSW) also built a set or two under license for use on the South Coast Daylight trains running from Sydney to Bombaderry (Nowra) and return daily but they never worked right for the NSWGR.

Eventually they had the motors pulled and became loco hauled (which is how I remember them in my youth on runs down the coast).

In chugging around their site I noticed that Rapido will produce units that are painted but unlettered. Hopefully this gets some of the Australian modellers interested.

They’re not cheap at CN$325 (especially with our rapidly sinking currency), however, I just checked and the Canadian Dollar is worth slightly less than ours at the moment (0.97 as of writing) so with shipping I’d expect landed costs to be under AU$375 mark..

Resources

The product information page: http://www.rapidotrains.com/rdc1.html

The versions page showing all the versions being produced: http://www.rapidotrains.com/rdcus.html

Brett – a great small layout you can model

Introduction

When you travel for business, you can spend a lot of time staring at the walls of your hotel room. While travelling in June of 2014 I came across Martin Hogg’s YouTube channel and his switching layout – Brett. Martin has built one of the best operating layouts for a small space. 8 feet long and 1 foot wide it packs in plenty of switching while allowing short, focused operating sessions that you can set up and run any evening without a lot of effort.

Martin’s Videos

Here’s Martin’s first Video:

In November 2014 Martin posted another video:

In November I was lucky enough to catch up with Martin; I wanted to find out what had been his inspiration and focus for designing Brett.

Designing Brett

Previously known as Dreary, Martin’s layout has been renamed to Brett after a recent revamp. Still set in Idaho in the early 80s the layout is at the end of a branch line, now under the ownership the Yellow Pine Railroad (YPRR). Essentially a run-around loop, with industries off each end of the loop and an interchange track, trains enter from front right and loads are spotted at industries according to the crew’s switch list for that day.

Martin says that his attention has wandered recently and that the railway had taken a backseat to other modelling interests. “I decided to re-vamp the shelf layout. I have various plans brewing for another American one, but I decided to try to get some more out of this and I have to say, so far it is working.” The layout is essentially a loop with sidings.

Martin says that “there was no room to have a traditional staging or fiddle yard”.

“The track at the front right acts as the ‘interchange’ or in/out track.”

Operating Brett

Early on in the design Martin decided that “there was little point in creating an illusion of ‘somewhere else’ as this layout wasn’t going to be leaving my spare room. So the front track acts as the on-scene staging and provides the start and end point for the game play.”

The loop in front of Smith & Hogg’s track can contain a maximum of three 50 foot cars, Northwest Lumber can  handle 2 cars, and Farmers Co-Op can handle up to three 50 foot cars, while the team track and Smith and Hogg can manage a single car each.

The aim of the game Martin says is not to overload the layout with too many cars. Martin prefers to switch a couple of cars for 30 minutes at day’s end, rather than spend a couple of hours once every now and then. Additionally only having to setup a couple of cars means it is faster to set up and tear down an operating session at the end of the working day.

“I planned to allow 1 loco+2 cars (or 3 cars) as an ideal length for each spur to allow switching moves. The ‘interchange’ or fiddle track at front is the same.”

Industries

There are four industry spots on the layout. From Left to right they are:

  1. Team track
  2. Northwest Lumber
  3. Smith & Hogg Hardware, and
  4. Brett Elevator (Farmer’s Co-Op)

More information

Would you like to learn more about Brett and Martin Hogg? You can download a full article by clicking here: Small Layouts: Brett – A switching layout design

A Texas Inglenook prototype – The ADM Mill facility New Braunfels

Occasionally for the small layout builder, a prototype comes along that you simply cannot forget. The ADM Mill located in New Braunfels, TX is a perfect example. A simple Inglenook switching location that could be built as a standalone, or incorporated into an existing layout as a peninsula. The site when I took the photos in 2004-5 was used mainly as a hard wheat facility. In the past, though it had been used for milling multiple grains as well as corn.

This photo shows the whole of the north side of the facility. Of note is the circular storage silo in the foreground which has 7 separate silos within it to allow storage of different types and kinds of grains depending on the season. The other photos in the set show different sides of the facility buildings mainly from the grade crossing on E Mill St, or further up the road in the case of the Southernmost photos.

Essentially the site lies East-West; the road crossing runs North-South. The main Mill lies on the Northside of the tracks and is the oldest part of the building; the newer storage silos on the south side look to be built during the 1970s. The main office building is on the East side of the mill, across San Antonio Street, on the East end of the Mill. Once you see the overview you’ll get a better lie of the land.

All in all, this is a nice simple Inglenook and can provide the operator with plenty of work in a small space, with nothing more than a TrackMobile for motive power. The staging can be cassette, plugin or hidden depending on whether you are using this stand-alone. If you love covered hoppers though, this layout will appeal.

ADDITIONAL

You can view the entire album of images at the following link: –>Click Here<–

Layout Ideas – The Bergstrom Industrial (Vinson) Lead – Austin Texas

Introduction

The Bergstrom Industrial lead diverges from the UP main line, at Vinson (MP 183.8). Here the extra track on the east side becomes the Bergstrom Industrial lead (heading east to the former Bergstrom AFB, now Austin-Bergstrom International Airport. Back in 2000 I spent quite some time photographing the area. As a wide eyed immigrant I had never had such close up access to class 1 US railroading and the industries it served. And this was in my new backyard.

009_9
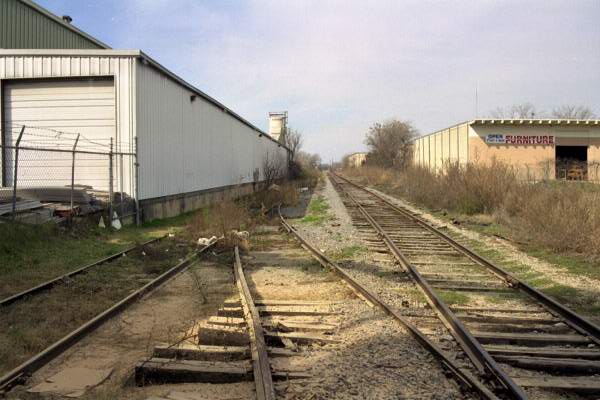
Image 1: Originally Brazos Forest Products (now Jeld-Wen Windows and Doors) – a former UP customer

You can view the gallery that accompanies this article here: The Vinson Lead Gallery

A detailed guide to industrial lead and the industries served

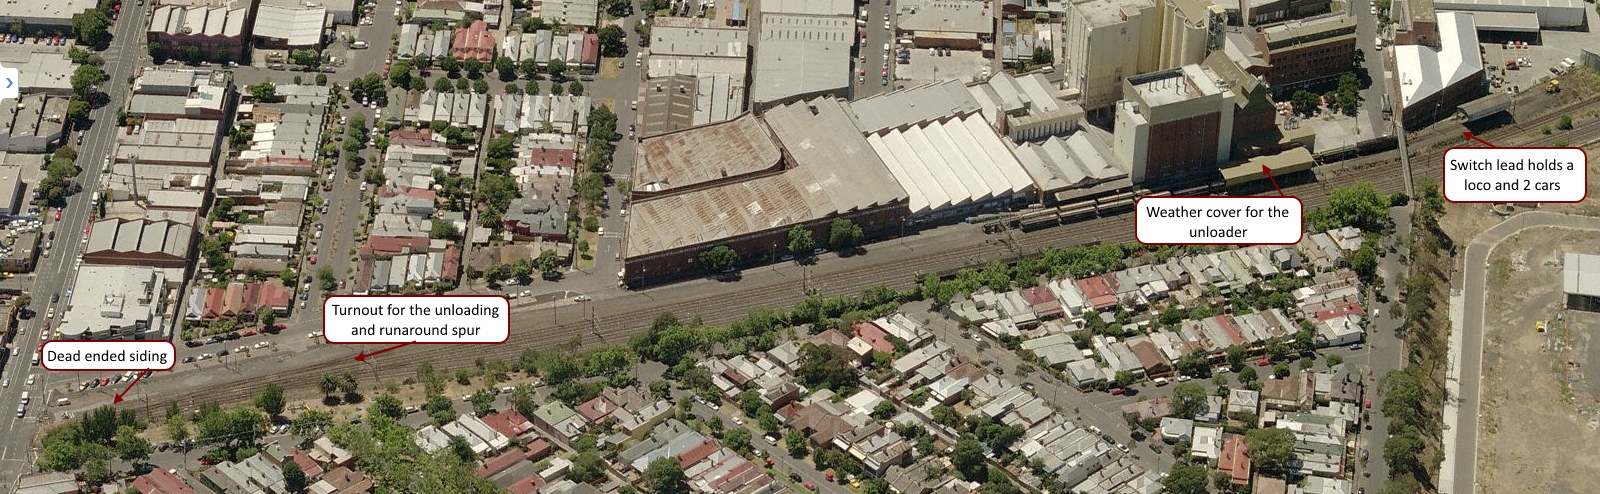
The switch into the Bergstrom (AKA Vinson) industrial lead comes off the mainline at a point between Falcon Cove, off Richmond Avenue and Emerald Forest Circle (off Emerald Forest Drive) in south Austin. The siding runs north eastwards along side the UP Main until crossing Vinson Drive at grade. Continuing North eastwards it crosses St Elmo Road West before curving due East behind the St Elmo Elementary school. The next road crossing is South 1st Street just south of Clifford Drive. The line continues eastwards for a short way before turning south-east and running beside Radam Lane. Where the line begins to run along Radam Lane there was a switch, since removed, that provided a permanent way siding. This stretch of line was used (and still may be) when the circus trains came to town to offload all of the road vehicles from flat cars. The next grade crossing is with South Congress Avenue midway between East Ben White Blvd and Industrial Blvd. The line will parallel the former all of the way until changing course and following the line of Burleson Road for the remainder of its journey south-west toward ABIA.

DelStar Technologies
The first customer served on the line comes from a trailing switch to the north-east of the intersection of Willow Springs Rd, and Industrial Blvd. This switch curves and drops away from the branch line to the South-West before crossing Industrial Blvd and running in the DelStar gates. Another switch is located within the grounds of the facility allowing four hoppers to be unloaded at the silos there.

Jeld-Wen Windows & Doors
I originally had this business showing as Brazos Forest Products, but on checking more today (24/04/2013) I find that the company is now Jeld-Wen Windows and Doors. I have several images of Jeld-Wen double plug door cars travelling the rails, and for the modeller this could be a great choice for deliveries to this location, or for pick-ups from their manufacturing site in Austin, for shipping to other locations across the nation.

Original text for Brazos Forest Products: Continuing south-east the next grade crossing, and the next customer, is at Terry-O Lane. Just before Terry-O lane there is a large factory complex that used to be rail served. This I would have imagined took dimensional lumber (because of the cyclones and the storage hopper at the North-western edge of the property). While no longer rail served today, backdating the layout would allow you to reconnect them and ship dimensional lumber.

Commercial Metal Recycling
South-east of Terry-O Lane is the scrap metal dealer. They can handle 5 high-sided scrap cars there and these are loaded by the in-plant heavy equipment. This operation can be seen from the rear parking lot of the Taco Cabana.

The next grade crossing is Santiago St, followed closely after by the South I-35 frontage road. The line then bends eastward while passing underneath the elevated I-35 south and north bound lanes, and then crosses over the North I-35 frontage road.

Four Hands Home
The next grade crossing is at Woodward Street. 100 metres further on a trailing switch leads into a set of doors at a large industrial building which is Four Hands Home’s factory outlet store location. The location is 2090 Woodward St, Austin, TX 78744. I do not believe that there is any rail traffic going in to the building via the siding. But for the modeller you could reasonably find a use for some Hi-Cube boxcars for transporting furniture.

Passing Track & Austin Water Utility
Continuing south-east we cross South Industrial Drive where the only passing loop on the lead is located. Off the south (passing) track is a trailing switch onto a single door at the Austin Water Utility (Glen Bell Service Centre). Location is 3907 south industrial drive. I have no evidence of the spur or the door being in use, but again modeller’s license comes into play.

Todd Lane
Continuing south-east the next grade crossing is at Todd Lane. The passing loop ends about 50 metres short of Todd lane and is sandwiched between Austin Energy’s electricity distribution location and the City of Austin’s recycling centre off Business Centre Drive. In the past the loco worked the train to here, and then shuffled cars around on the Todd Lane end to get them into order before proceeding on to complete any work required further down the lead.

Stock Building Supply
Once across Todd Lane the line curves gently toward the South east and runs alongside Burleson Road. Opposite the McDonald’s there are two grade crossings into Stock Building Supply. Another 125 metres along the line is the trailing switch into Stock Building supply which takes dimensional lumber on centre beam flatcars. This siding curves quite tightly into the facility and ends at 90 degrees to the branch line. There is a Wye switch about 3 car lengths in that splits the industry lead in two and provides storage for a minimum of 8 cars through about 14 all up if the lead is also used. The image on Bing shows 9 cars on the lead and siding in loaded and unloaded states.

I am certain that the industry siding has been rebuilt since 2000 when they only had space for four cars to be spotted and unloaded there. But I admit that I never did get onto the premises during this time and am relying on memory.

The sub-branch
Continuing south-west the line crosses Drossett Drive at grade a sub-branch comes off the Bergstrom Industrial lead at a trailing switch just before the next grade crossing at Promontory Point Drive and Burleson Road. This sub-branch swings away from the Bergstrom Lead on a tight curve and heads due west.

Budweiser Distributor
The first industry  lead about 50 metres in from the switch on the south side of the track and runs along the edge of the local Budweiser Distributor. There is a concrete ramp and loading dock that would have been used at some time for unloading full kegs and reloading empties for return to the nearest brewery. I never did see this in use in my time working in South Austin.

Unknown Industry 01
A further 10 metres along on the north side of the track another switch serves a tilt-up concrete building with 6 external doors. Currently there is no one in the building but the front of the building has truck docks so this could have been a distribution centre of some form or another. There used to be boxcars spotted there during the late 1990s and early 2000.

Goodman Distribution
50 metres further on another switch to the north goes to the back of Goodman Distribution. Goodman has been building quality Goodman brand air conditioning and heating equipment since 1982. I have no idea how long they have been in this location, but I do recall seeing boxcars at the rear of the building during my time in the area.

Alcoholic Beverage Commission
30 metres on are two switches one after the other. The first to the south is a track into the rear of the Alcoholic Beverage Commission building. I have not seen any cars delivered here in my time. But again it is your standard concrete tilt-panel construction with 4 doors along the back wall. It could be used for almost any warehousing if you the modeller were so inclined.

Tri-Supply/InCycle Electronics
The second switch coming off the branch to the north goes to the Back of Tri-Supply/InCycle Electronics.

  • Tri-Supply are suppliers to the building trade and supply everything; doors, windows, mill work, appliances, electrical, fireplaces, bathroom fixtures and home decor. I have never seen cars spotted here during my time in Austin but the building is a modern tilt-up panel building with 5 door spots. So anything is possible.
  • The second tenant in the building is Incycle who are EPA certified and qualified by the TECQ (Texas commission of environmental quality) as a centre for handling electronic waste and as an electronics Recycling Centre for the City of Austin.

Unknown Industry 02
The branch curves away to the south-west for around 90 metres to the final switch on the branch. The industry is currently vacant but that looks on Bing to have been a storage (possibly a moving company) facility. There is a single door in the end of the building.

Clampitt Paper
The branch continues across Winnebago Lane before ending at Clampitt Paper. Although the branch does not run to the facility and dead ends in the grass behind them.

US Foodservice
Back on the Bergstrom lead heading south-west again we cross Promontory Point Drive, and travelling another 200 metres we come to the last trailing switch on the line, again curving tightly 90 degrees to the south-west for the US Foodservice warehouse. There are 6 doors here, with only one of them being in the cold room area.

Team Spot
Lastly heading south-west we come to a small team area at the end of the branch opposite the El Meson Taqueria. The line then carries on for another hundred metres or so before going dead in the weeds.

The remainder of the line
The line used to go on to the Air Force Base (Bergstrom AFB) but after the base was closed, the line was truncated back to Burleson Road, although the right of way appears to still be intact all the way through to Highway 183.

Along the way it would have:

  • crossed Montopolis Drive at grade,
  • passed Mrs Baird’s Bakery off Old Burleson Road,
  • travelled for some way until crossing Metlink Rd before hitting Hwy 183

From having seen the architect’s model when I worked at Austin Bergstrom International Airport, the line for the light rail would have crossed under the highway and then travelled sub-surface into the terminal buildings. Sadly this was dropped from the original scheme.

And this completes the detailed description of the Bergstrom Industrial Lead, Industries and sub branch. Hope that you have enjoyed the ride. Don’t forget to visit the gallery. I’ll be adding more pictures gathered from BING and Google as I go over the next few days. Unfortunately it looks like the line has fallen into disuse which is a shame as it could have provided a great location for some creative shortline magic. There were numerous industries and a lot of switching locations available, and the line along Radam Lane would have made a perfect interchange location with the shortline.

Additionally the area around Clampitt paper would have made the perfect location for a shortline office/engine facility and it would not have bothered anyone because the entire area is zoned industrial. If only the real world were as simple as the modelled one.

Have a great day, wherever you are.

Andrew