While I primarily model railways in HO scale and O scale, I do love sci-fi, and armour. In that vein today I wanted to share a site pointed out on Giant Freaking Robot Amazing Sci-Fi Ship Models Made Entirely Out Of Paper
These are not what you’d expect. And they all come with downloadable paper kits (I can see one or two of these becoming plastic models in the near future). Additionally there’s a build guide for each one.
Head on over to Uhu02 Paper Craft (in Japanese but google does a reasonable translation of it) and prepare to be gob-smacked.
I live very close to Melbourne in Victoria – home of the worlds largest urban tramway network in the world. The entire network covers 250 kilometres of track; has 493 trams, 25 routes, and 1,763 tram stops. Melbourne’s tram network is larger than the largest networks in Europe (admittedly not by much) such as those in St. Petersburg (240 km), Berlin (190 km), Moscow (181 km) and Vienna (172 km). What does all of this have to do with today’s site seeing post? Funny you should ask that question.
Site 1: Victoria Park
The first site I wanted to mention is Victoria Street (Link here). This great tramway layout has visited several of the model shows in my region and is a well thought out and small layout. Somewhere in my large collection of digital photos I have some of the layout. When I can find them I’ll post them up.
Site 2: Proto: 87 stores
If you’ve decided to model a tramway, you can use the track and switch components found on this page (Link Here) to make all that lovely street trackage. Now this is not just for tramways, any street railway can be modelled using these components. Very nice stuff.
Overcast and cool in Ballarat today. Hope you are having a great day where you are.
I’ve not seen this layout before, but being a fan of passenger rail, and really wanting to model a smaller (read portable) layout, I really rather like the look of Victoria Park. Take a look at this one I think that you will enjoy it.
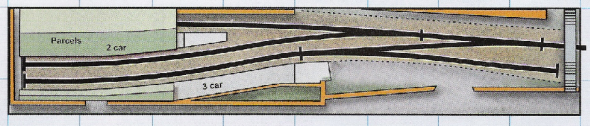
I think I’ve settled on a plan and it’s time to start talking about it. As I mentioned in the title, I’m going to build a second version of Ian Futer’s Victoria Park plan. This was the same plan I used for the first of the micro layouts I built last winter. Here’s a quick view of the plan:
I’ve shared it before, but here’s a superb Youtube video of the layout in operation:
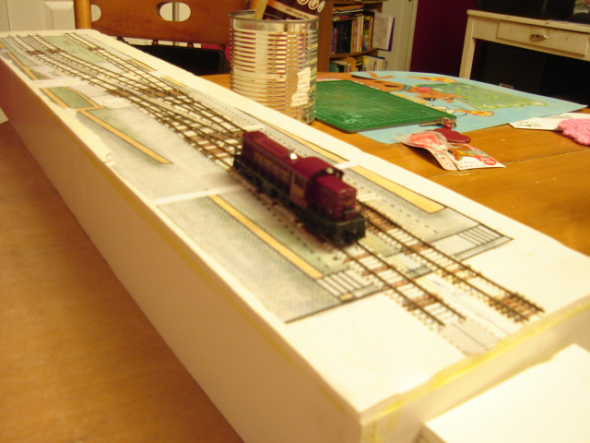
And, finally, a photo of what I built the first time: While it doesn’t show in my photo, the top of that baseboard wasn’t exactly level. This was more from my inadvertantly leaning on it than any structural issue with the foam core-based structure. Worse, the length of track designed to exit the board and connect to the staging sidings was some of the worst I think I’ve ever built and it was really almost too…
If you have not seen a tuning fork layout, it is a very simple 1 turnout operation. If you are still not seeing it in your mind, think of the letter ‘Y’. Most of the layouts I’ve seen assume either a mainline and a siding, or two sidings. However, that does not mean little operational potential. I found a video by Thornapple River Rail Series on YouTube [Link is below] this week and it got the creative juices flowing.
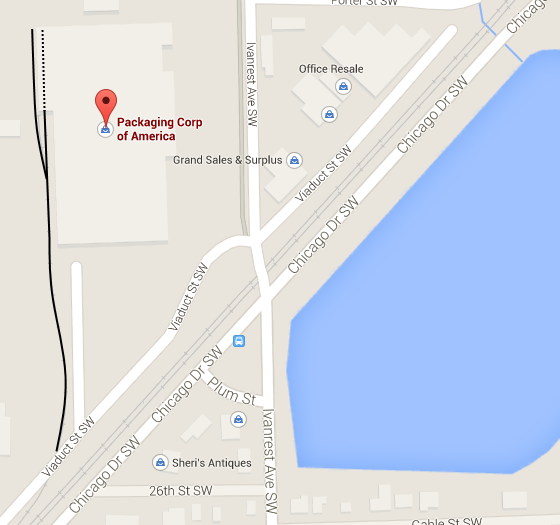
Image 1: The location of the facility from Google Maps
The kicker is that the second of the spurs is used to allow switching to take place on the spur itself. Before you do any more reading watch the video (It is 18 odd minutes long but if you start at about the 4:36 minute mark you’ll get the gist pretty quickly).
Video 1: thanks to Thornapple River Rail Series
Operations
If you start at about the 4:40 mark into the video you’ll see the following occur:
Loco and first three cars cut off from the train
Same pulls forward of the spur switch, and reverses across Viaduct St SW toward the plant
You’ll notice the second spur on the outside of the plant as the train pushes back toward the plant
Once the roller door comes up, the train pushes back into the dock area, picks up the outbound cars, and pulls forward again to clear the switch for the spur
Next, the outbound cars get pushed onto the exterior spur
Inbound cars get pulled forward onto the spur again, the switch is reset, and the inbound cars are pushed back into the dock
Loco cuts off, pulls forward to clear the switch, and once changed over, pushes back to hook on and pump up the air on the 3 outbound cars
Pulling forward the loco and three outbound cars cross over the road and re-join the train
Just to add the cherry on top, the train then reverses back to the yard with the engineer riding the caboose
Now all of this takes between 10 – 14 minutes of video time. But what a fantastic way to spend your 5-20-5 minutes of daily modelling / operating time (read a post on that concept here).
If you want to make it last a little longer, first re-arrange the incoming cars into the order as required by the plant. Additionally some cars may not be unloaded yet, and they need to be moved off-spot, and then back on again with new inbound cars. Some cars may need to be left off-spot on the exterior spur for the next switching session.
Layout idea
While I mainly model in HO my true passion is 0 scale (and bigger when I can manage it). Alas I have not the room for a big layout to run those sized trains – yet.
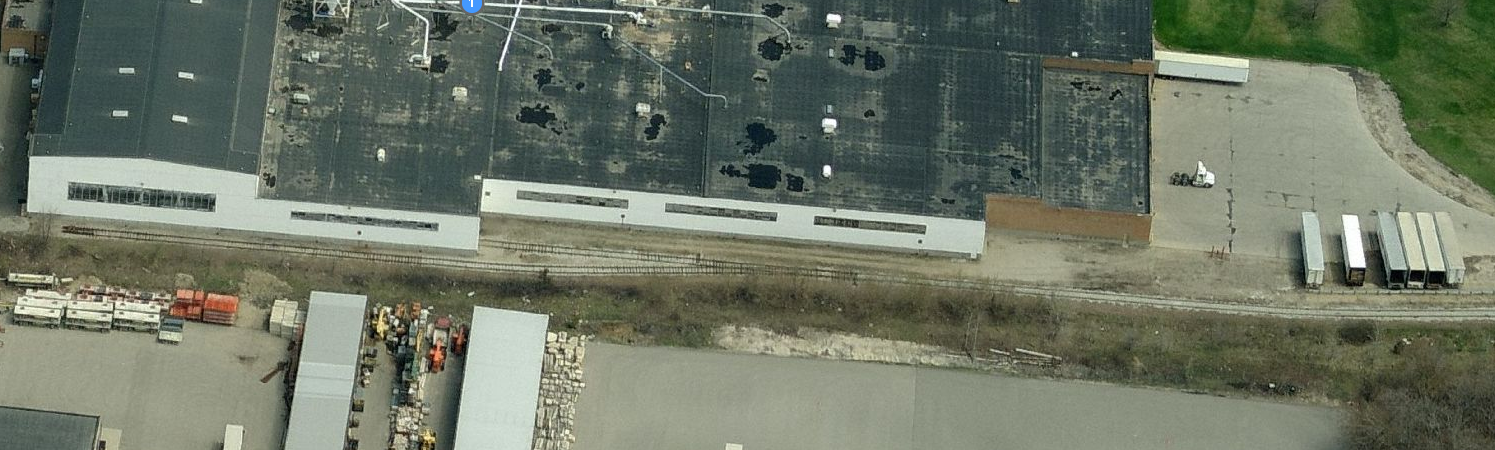
Image 2: The complete layout (click for a larger version of the file)
For an 0 scale layout I cannot think of a better idea. You could easily do that in 12 feet and no more than 12 inches wide. If you really had the room you could do it in 18 inches wide and go nuts with weathering, winter trees as in the video, and the knocked over Armco barriers. Glorious! The big gotcha here is that the switching lead ahead of the switch has to be longer than 2x the maximum number of cars you switch into the dock. Don’t forget to add a loco length on top of that too.
So if you switch in 3 cars and out 3 cars you’ll need to have six spots plus a loco length to allow the switching to take place.
Hope that this gets your creative juices flowing. And thanks to Thornapple River Rail Series for posting the video. I am going to be looking through a bunch of his videos now for other similar ideas for my layouts in the future.
It’s a sunny and pleasant Saturday afternoon in Ballarat, hope you’re enjoying your day where you are.
Hard to believe that we are at the end of January already; 1/12th of the year has already sped by.
While tooling around the web I found the following sites of great interest, and hope that you will find them useful and informative too:
Brian Fayle’s website (http://www.brifayle.ca/2abaseshadows.html) – I’ve followed Brian’s website since late 2003. I especially enjoyed his unique approach to figure painting. He starts from black and builds colour up layer upon layer, ensuring that shadows are a part of the painting process. Follow the link and enjoy a really good read. While you are there, take a look around at his range of layouts built over the years.
A new layout found on BigBlue Train forums: Bushwick Terminal (http://bigbluetrains.com/forum/viewtopic.php?f=46&t=6560). Some really great ideas on layout design and the layout itself is going to be really good to watch come to life.
Martin Hogg has been busy working on Brett (the small footprint switching layout I’ve discussed in the past). In this new video he’s posted today there’s work going on a-plenty.
First there’s new lighting, fences being pulled down for a repaint, a forest has sprung up, and weeds have taken root around the Co-Op. Most importantly there’s the promise of another video in the near future.
Chris Mears has posted another thought provoking article, this time based on the Claremont and Concord (written about as a project layout in Model Railroader some time ago). This time on a subject close to my heart – real time switching, and how watching how the big-boys do it can give you ideas for slowing down the Nascar switching on your own layout. It’s a great video, and well worth watching in it’s own right. And it follows on from the 5-20-5 minute post. Enjoy
Last year I wrote about the 5-20-5 minute idea and how much I enjoyed running regular, albeit short, operating sessions on my last layout. How much can you do in twenty minutes?
The above video was shot on the Claremont-Concord at West Lebanon. The video runs just under eight minutes in length. It has been edited from its original length but is a terrific record of just how long each movement takes and the pace of working a simple yard. Why not use the video itself as a measure of what can be accomplished in that same period of time on the model?
For the last several years I’ve not had a dedicated modelling space. This means that I have to beg, borrow, and often steal space and time from the family to build, detail and otherwise do anything model.
Chris Mears on his Prince Street blog wrote about this back in 2013.
It is a great article and I thought I’d share it with you here.
I’ve mentioned the “5-20-5” concept before and the more I think about it the more I like it. The idea itself refers to three distinct blocks of time totalling thirty minutes and representing an acheivable length of time to either build a model or operate your model railway. It’s based on things like the length of a typical television program or time we might otherwise spend surfing around on the internet and asked if this might be enough time to invest in this great hobby. We often complain that we simply don’t have the time to build a model or can’t imagine having enough time just sit down and run a train.
The first block of time is about five minutes in length. Take five minutes, get out some tools and a model and get ready to work on it. Obviously building a dozen turnouts might be out of the…
It’s the last day of 2014 and time to change the site theme to make better use of the available screen real estate. I’ve also updated the site logo, and referenced the site back to my well known and sadly still offline site “andrews-trains.fotopic.net”. This I hope will help those still looking for the old fotopic.net site.
Next year
During 2015, with a lot of time on my hands due to being laid-off, down-sized, or right-sized (choose your poison), my aim is to publish a lot more detail on my layout designs, along with suggested operating plans. In addition I expect to be able to complete my Industrial switching layout (ISL) during the year, at least to the point where I can operate the layout, even if all of the scenery and buildings are not complete.
A New Year’s wish
To those of you who read along with my writings, I hope that you had a merry Christmas, and wish you and your families’ a safe, happy and prosperous New Year in 2015.
When you travel for business, you can spend a lot of time staring at the walls of your hotel room. While travelling in June of 2014 I came across Martin Hogg’s YouTube channel and his switching layout – Brett. Martin has built one of the best operating layouts for a small space. 8 feet long and 1 foot wide it packs in plenty of switching while allowing short, focused operating sessions that you can set up and run any evening without a lot of effort.
Martin’s Videos
Here’s Martin’s first Video:
In November 2014 Martin posted another video:
In November I was lucky enough to catch up with Martin; I wanted to find out what had been his inspiration and focus for designing Brett.
Designing Brett
Previously known as Dreary, Martin’s layout has been renamed to Brett after a recent revamp. Still set in Idaho in the early 80s the layout is at the end of a branch line, now under the ownership the Yellow Pine Railroad (YPRR). Essentially a run-around loop, with industries off each end of the loop and an interchange track, trains enter from front right and loads are spotted at industries according to the crew’s switch list for that day.
Martin says that his attention has wandered recently and that the railway had taken a backseat to other modelling interests. “I decided to re-vamp the shelf layout. I have various plans brewing for another American one, but I decided to try to get some more out of this and I have to say, so far it is working.” The layout is essentially a loop with sidings.
Martin says that “there was no room to have a traditional staging or fiddle yard”.
“The track at the front right acts as the ‘interchange’ or in/out track.”
Operating Brett
Early on in the design Martin decided that “there was little point in creating an illusion of ‘somewhere else’ as this layout wasn’t going to be leaving my spare room. So the front track acts as the on-scene staging and provides the start and end point for the game play.”
The loop in front of Smith & Hogg’s track can contain a maximum of three 50 foot cars, Northwest Lumber can handle 2 cars, and Farmers Co-Op can handle up to three 50 foot cars, while the team track and Smith and Hogg can manage a single car each.
The aim of the game Martin says is not to overload the layout with too many cars. Martin prefers to switch a couple of cars for 30 minutes at day’s end, rather than spend a couple of hours once every now and then. Additionally only having to setup a couple of cars means it is faster to set up and tear down an operating session at the end of the working day.
“I planned to allow 1 loco+2 cars (or 3 cars) as an ideal length for each spur to allow switching moves. The ‘interchange’ or fiddle track at front is the same.”
Industries
There are four industry spots on the layout. From Left to right they are: