In Victoria there are two exhibitions (that I am aware of) on the Labour Day Long Weekend (March 7-9). First is the very large exhibition at Sandown Racecourse; the second is the great little exhibition at Kyneton.
On Saturday March 7 the kids and I decided to head off to Kyneton only, as there was also a trade fair on showcasing all of the Ye Olde trades that my son loves.
Having finally gotten the video uploaded today on youtube, I hope you enjoy the overview of the show.
This is one of the best little shows around in regional Victoria. It is easily doable by public transport, with a nice walk into town from the railway station. The food in town is really good, with a lot of great eateries.
If you are driving it is easy to get to, taking us only about an hour from Ballarat; roughly the same time from Melbourne. Quicker from Bendigo.
All of last week I was sicker than could be with the current Ballarat flu bug. I am almost over it just in time to see the cooler Autumn weather really kick in. As a result of the dreaded lurgy I did not feel in the mood to model or post or do anything beyond making a buck. The next few posts are a catch up from the last week and should bring me back up to speed.
With the current layout build under way, I’ve looked about for inspiration for the scenic treatment. In both the model and the prototypical sense I’ve found inspiration for the look as well as the overall design. Today’s site is a source of my inspiration. I hope that you enjoy looking it over as much as I have.
Trevor’s S Scale Port Rowan layout has been featured here before. Before this S Scale masterpiece there was an HO Scale masterpiece – The Peterboro Project. In 2006 he and a friend, intrigued by the Free-mo modular standard, decided to build a module.
Not just any module though, this was a complete layout module set, that could then be joined to other modules with like-minded Freemo modellers. While the layout itself is fantastic, the experiment did not work out for Trevor and his friend. The layout .
However, the pictures of the layout still exist, and are very worthwhile to review.
Lance Mindheim is a force in the design of operational layouts. Today’s site seeing tour takes us to an article on his views and to his new website (built on WordPress no less).
Site 1: Railroad Model Craftsmen
In this article (offsite link) Lance talks about the play value in our layouts, and how without the play value, the layout will in the long run fail to please.
Site 2: Lance Mindheim’s new site
Lance has moved his site (offsite link) across to a new platform that finally allows searching. He’ll be updating and moving older content across to the new site over time. But for the moment the link I’ve provided takes you straight to the blog. This is where most of the content is right now.
One image, can have vast and lasting influence on the viewer. For modellers, as Chris Mears points out in this post, one single image can make the difference between a model that works for you or one that falls short of your expectation. And none of us want something not quite right.
For Chris this image is iconic and is what he wants out of his model railroad experience. Enjoy reading along.
Steve Hunter kindly shared this photo he took it in 1981 at Mount Albion, Prince Edward Island. The subject is my favourite railroad operation and in the frame he found a way to capture why. This scene is central to my own layout’s inspiration. I’ll never have the words to properly thank Steve for sharing his passion for the railroad with me or inviting me into his archive.
There’s just so much to drink in from this photograph and it tells so many stories it’s hard to know where to concentrate one’s attention.
The train is sitting on the main line. We’re facing Hazelbrook and ultimately Charlottetown. When the Murray Harbour sub was first built this line actually continued straight into Charlottetown on a bridge across the Hillsborough River. The bridge ultimately proved too light and by the 1950’s was closed. The subdivision was trimmed back, station by station, to…
In my last post (Why I chose not to design my layout – part 1) I discussed some of the reasons for ‘eyeballing’ my new layout and not ‘designing’ my new layout. This time around I wanted to clarify any uncertainties around the design process, and continue on with some meta-data about the design to help me clear my vision of the layout and the eventual role I’d like it to take in the future.
The Mod. 1, Mark 1 Eyeball
There is nothing better than eyeballing a space, and understanding how all the elements fit together. Obviously it makes the process easier if you understand what you aim to make, and have a sense of perspective on the amount of track you can reasonably have within the bounds of the layout space.
The layout’s story
My layout’s story revolves around switching within an industrial park. Service delivery is the primary focus of the layout and thus switching is the primary activity of the layout. With the design I wanted to be able to have a train:
arrive from the class 1 partner (interchange track),
be brought into the industrial park (switching yard),
switched into job lots for delivery within the park (customers), or to off-spot storage (storage yard),
run out to the customers needing switching that day, switch the site and then return to the yard,
have outbound cars switched and readied for delivery to the class 1 partner, and finally
have the outbound cars switched to the interchange track
Because I expect to have multiple small operating sessions each week, independent jobs that allow me to complete a little part of the operating session (between 30 – 50 minutes) each day I need a layout that supports that kind of operation. Should I manage to get a couple of people over who want to operate a full session, we can simply pick up the next job sheet and continue on from where we started.
Why the design I’ve come up with?
A multiple industry layout was always my goal since I decided to build another layout in 2003. You can see some of these layouts in the Layout Design Gallery (Offsite Link), or directly from the ‘Resources’ section below.
I read about the Modesto & Empire Traction in Model Railroader many years ago, and have a lot of research on them. But as we don’t own our own home I am loath to build something bigger than my current proposed layout even semi-permanently at the moment. So I’ve gone down the path with my own module design, that can be added to over time. Another influence was the Progressive Rail layout that MR did several years ago. Again too big for me, but there is a core of the operation that I can mimic in the space I have.
In the next post ‘Why I chose not to “design” my new layout – part 3’ I’ll review my ideas on the operational aspect of the layout; the proposed paperwork that I want to use. It’s getting late and Sons of Liberty is on the Tele tonight. From Ballarat, on a cool and clear evening – good night.
I’ve designed a lot of layouts over the years, because I wanted to and because I got paid to. With my new layout though I wanted to take a more organic approach, one that relied less on the ruler and more on the eye.
Apparently I’m not the only one following this process. Over on Lance Mindheim’s blog, he recently wrote in a post that (offsite Link Here) – “… with a smaller project a lot can be accomplished in 1:1 scale simply by mocking things up full-scale with boxes and loose pieces of track. The elements can be re-sized and moved around until you get the look that you want…”
I know exactly what I want this new layout to look like. I know the signature scenes I want to include, and I have my set of wants that have to be included to make this enjoyable for me. Sometimes you simply cannot beat the mod 1, mark 1 eyeball to tell you when you’ve hit the mark.
It’s all about the operations
Over the last couple of months I’ve played around with the physics on my DCC & Sound equipped engines. When I’ve times the sessions using an old Tablet computer set aside specifically for that task, what I’ve noticed is that when running prototypically, that is with slow switching speeds, easy moves, and time between moves to allow the offsider (a conductor, or second person) to do their work, eating up 20 minutes is very easy.
To enjoy an operating session I have to be actively involved in the doing of the work. To do this I have made changes to freight cars that I’ve found have a profound effect on how I work. For example; I’ve brought average car weight up, close to the Cubed-Root (CR) of the real car. You might not want to do this if you are running plastic trucks and wheel-sets or have cars traversing long distances as wear and tear will show.
Coupler Bounce what the … ?
With Kadee equalised metal trucks and metal wheel sets I’ve noticed a complete change in the physics involved, and that is what I had hoped for. So when I couple up to a single freight car with a CR close to the real weight you do not get what I call coupler bounce.
Coupler bounce is where the car takes off in the opposite direction (thanks Sir Isaac) when a locomotive pushes up against the car’s coupler face. My lighter freight cars continued to do this no matter how lightly I pushed up to couple on. The added weight causes friction in the Kadee truck journals, and physics come into play such that the extra CR weight requires more energy to get moving.
As I convert cars over to Kadee trucks I’m making sure that I CR the weight to make sure I get better handling characteristics. I know that this flies in the face of the accepted practice, but once you see this in action, especially in a longer string of cars when the slack runs out, you can never go back.
It’s all in the switch action
I love working yards, and switching industries. I was born to play at doing this. It keeps me happy, and engaged, and with many locations to switch, that are independent of each other I will never get bored with the challenge of switching a layout with multiple customer spurs and car spots.
I love the down and dirty, first mile, last mile railroad action that you find in customer switching. With a marshalling area that allows me to make up trains for delivery to interchange, and break down trains for delivery to customers and I’m about as happy as anyone can be.
In part two of this particular rant, I’ll talk more about the operations and paperwork that I’m going to use on the layout. For now, the sun is out, the wind is very cool and all is well in Ballarat. So I’ll leave you to it…
In early February Chris Mears (on the Prince Street blog) posted a great article on the difference between real railroaders, and most model railroaders.
I won’t say much more about this – first read the post, and then come on back to this blog and read about some of my wants in the design of the new layout.
I recently wrote about building more time into a typical operating session and filling that newly-minted time with time to enjoy watching the trains I was running and also time to incorporate more aspects of a typical day of work on my little stretch of railway so that what I was watching looked like real railroading. After posting that, a reader sent me an email offline relating his experiences at the throttle on an actual shortline. He introduced things I never knew or thought about and his contribution was just so wonderful I couldn’t imagine not sharing it. Given his relationship with the railroad I wanted to find a way to share his message while not compromising his position. I have edited his message with that in mind.
I like your comments about allowing sufficient time for each function. Watching other modellers running trains can be pretty comical at times…
In the last post about my own layout, I said I’d cast aside regrets and was moving on to do some drawing in AnyRail to make sure that everything fit. The reality was somewhat different, and since it would have taken some time to do the layout in AnyRail anyway, I did a ‘Chris Gilbert’ and started layout planning with gusto.
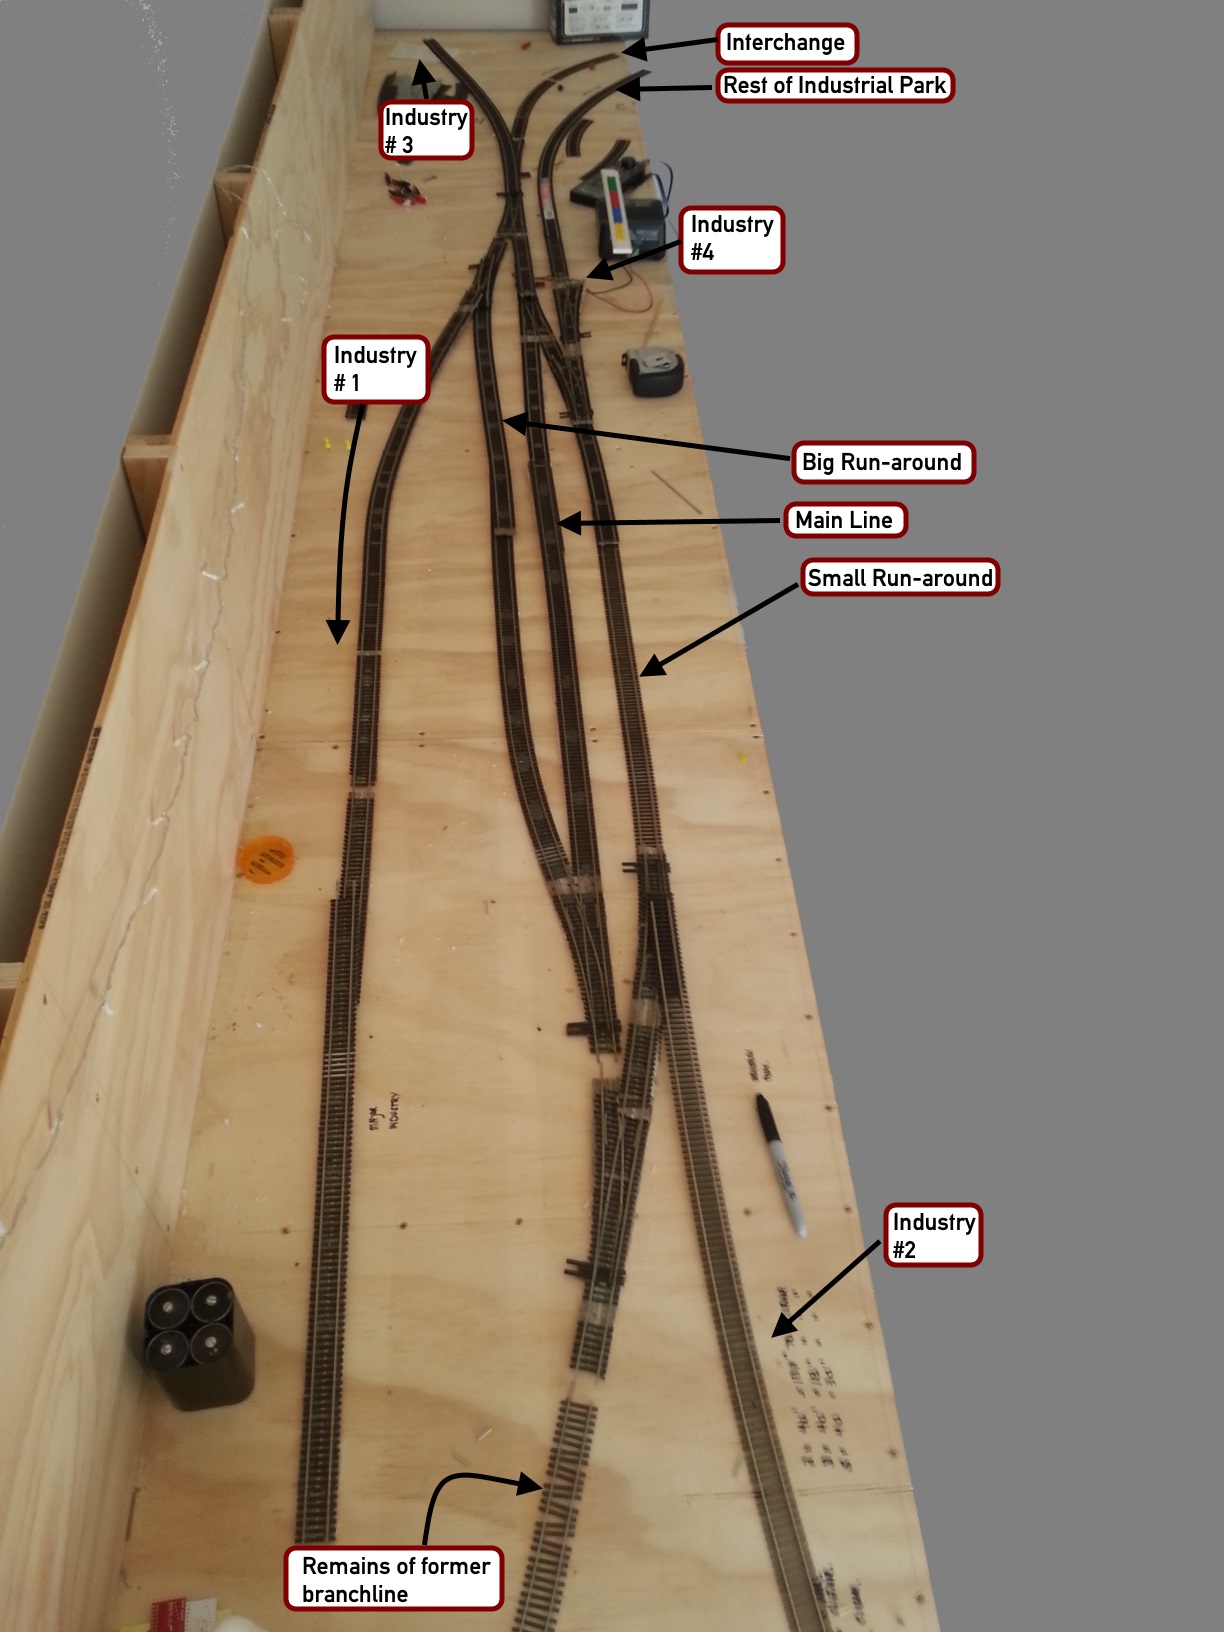
The basic design is an L shaped layout that is 12 x 2 feet (visible in the photo below) on the one side and 8 x 1.5 feet on the other. I am in the process of manufacturing a new set of higher legs for the boards from a former layout so they do not appear in the picture as yet.
Here’s a photo of the layout in its ‘take 1’ guise. I’m still playing around with siding lengths at this time, just to check and make sure that I can do what I’d like to do in the space available.
I’m interested in what you might think. Post a comment and let’s talk about it when you have a moment. More later this week.
I have toyed with track plans for some time to see how best to fit a layout into the current space that I have. I’ve drawn out 50 different track plans, all of which will fit my needs and space, none of which really grabbed me emotionally.
I took another look at a layout I’d designed early in 2014 last week. Designed to be portable and to be taken to exhibitions. In the space I gave it (8 feet or 2400 mm long) the design was right on the perfect size if for me just a little short of perfect. There is nothing wrong with the layout design or operations plan; it works exactly how I’d designed it to work and with the attached fiddle yard it will be a cracker of a layout to work for extended periods at an exhibition.
It will be:
Easy to work by one person,
Take about 30 minutes per show (operating session),
Allow short bursts of work, interspersed with periods of talking with the people asking questions about the layout), and
Worked from the front of the layout.
To get a sense of what I’m aiming for take a look at this video from Model Railroad Hobbyist:
MRH shot the video on Mike Confalone’s layout (I loved it so much I bought his video and book set – they are really worth their weight.) Watch the thing and you’ll be hooked.
Introspection
The layout is a fictional end of the line switching area. I’ve long been a fan of a little layout call Iota from a long ago RMC article. But while I wanted to make a larger version of the Iota, and have devised several track plans to do just that I’ve never been able to get it to work for me in my space.
I’d even thought about doing Box Car Haven (link here) as I have the space and boards ready to go. However, I wanted something simpler, with enough work operationally to allow me greater play time, and less staging and management.
Context
The fact that my location and layout is fictional means little to me. I have thought about the location, its history, and its present in-depth. There’ll be a sense of abandonment, growth, decline and then regrowth in the scenic treatment; buildings will also show this time of change on their surface, with old parts, and new construction giving the viewer a sense of time having passed.
The layout sits at a datum of 49 inches off the floor. This is about right for my son’s eye height at the moment. My wife and daughter are a couple of inches shorter than my son and so for now the layout stays where it is. I’d like to have the datum moved up to my eye height of 66 inches above the floor, but then no one else would enjoy the show.
I’ve designed lines of sight into the layout to stop people from being able to see the entire layout at any one time, and forcing them to move, change their viewing angle, look around corners and peer through building alleys into the layout.
The layout though small works on the principle of a two person crew. So even through the engineer cannot see the distances he has to go, his conductor is on the ground guiding him in – just as in the real world of railroading.
Physics
I’ve changed all the freight car bogies over to Kadee fully equalised trucks. Proto-weighted the cars to their cubed scale-weight equivalent, and weighted them heavy down low but glued weights along the tops of the cars in the corners to ensure that I’ll get a little rocking motion; it’s not perfect or quite how I’d like it but I cannot fully scale down the physics. In this way the cars move in a very prototypical fashion along the rails – especially Boxcars and Covered Hoppers.
During testing on the mocked up track plan I had a couple of months ago, the cars moved pretty much like you’d expect a real car to move. My switcher strained to get cars moving (so I’d get to feed power in to take up the slack) and then I could ease back on the throttle to keep them moving. In HO scale (I also model in O scale) you have no idea how sweet it is to see a switcher stretching a train and watching cars fight the move until inertia takes over. Once the load stretches out you have to drive the locomotive like the real thing.
The last thing on my list is to limit the speed of all loco decoders to around 25 MPH. And I’m going to drop the output level of the bell, and the sound decoder in general.
Additions
As a whole package the design will work, at least for me, to allow a simple and easy to set up switching session any night that I want to for around 30 minutes worth of fun. There’s little management time required and the fun starts with only a limited amount of set up time. There are additions I’ll be adding to the layout to extend the run around the second wall of the garage to extend the switching room and to lengthen the operation time to about the 60 – 75 minute mark for longer operating sessions.
Added to that the CV changes I’ve made to make sure that trains simply do not stop but roll on means that all along the way I’ll be happy working the model to give me and the other operators a sense of what it really means to work my layout.
Summary
Gritty, run-down, rebuilt and modernised, the Hunter Valley RR will be a lot of fun to run. I’ve got to spend some time working the track plan out in AnyRail over the next week. Once I have that completed I’ll post a copy here and see what you think.
Earlier in the month I had talked about Sadler’s sidings – T-Trak Andrew’s adventure into the world of operating layouts – his current work in N scale using something very close to T-Trak standards.
He has posted an update to that original post, about building the layout boards which I found to be very interesting considering how small these things are.
Andrew’s use of materials and his notes make for interesting reading. And he’s going to post a full description to his blog shortly. For right now though head on over to the N Gauge Forum – go to page 2 – and read all about it.
I have extended my description of the construction of the modules for Sadler’s Sidings at the N Gauge Forum on page 2 of the following thread: http://www.ngaugeforum.co.uk/SMFN/index.php?topic=26139.0
will update this blog in a more orderly manner in a week or two.