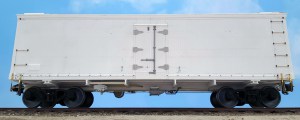
I’ve highlighted this build before, but wanted to share Gene’s final before paint images of his Wilson reefer. You’ve really got to take a close up look at the details he’s added during the build.
I had a few hours this week and was able to push to the completion on the Wilson meat reefer. Primer application is the next step in the process and finally the color. There are a few steps that I will go though showing details that were fabricated for the model.
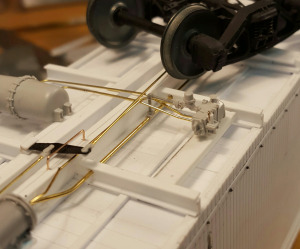
I added the control valve connection to the train line. The gray plastic parts were taken from a Grandt Line brake set. I sliced the bottom off the tee and mounted it to the train line with CA. The connection to the control valve with a cast elbow and pipe from the same Grandt sprue.
Ice was the cooling medium in these reefers. The water runoff from melting ice was drained via pipes or hoses on the underframe. I used some .060″ plastic hose inserted on a .040″ styrene rod. I made the hose about 18″ long. The drain is installed on the underside of the…
It’s a relatively quiet Sunday in Ballarat. After a wild night of gale force winds and driving rain, it’s been a quiet Sunday morning. Yesterday Mrs HVL and I headed into Melbourne to get away from town for the day. The Hawthorn Tramway Museum in Melbourne had an open day and we took the opportunity to ride public transport all the way to get there.
Site 1: The Melbourne Tram Museum – Hawthorn [Link Here –>]
Located at the junction of Routes 70 & 75 in Melbourne’s eastern suburb Hawthorn the Melbourne Tram Museum is a volunteer-based non-profit group composed of representatives from VicTrack, Heritage Victoria, honorary appointees with recognised expertise in tramway history and preservation, and representatives of the volunteer workers.
We visited as part of the Open House Melbourne. There are some outstanding examples of trams. Here are a selection of the photos taken on the day.
Why Z1 class tram #81 was highlighted
This tram represented the beginning of the renewal of Melbourne’s tramway system beginning in 1975, ending two decades of neglect by the Liberal State Government
It also signals the beginning of ongoing Federal intervention in the peacetime development of Australia’s urban infrastructure, which had previously been an entirely State government function. The Z class tram program was one of the enduring fruits of this fundamental shift in political responsibilities.
Number 81 was the first Z1 class tram to be built (the previous 80 trams of the Z class order were completed to a different standard, and upgraded later to the Z1 design).
In its new identity as ‘Karachi W11’, Z1 81 was used on Melbourne’s City Circle route for the duration of the Commonwealth Games, over the period 14-26 March 2006. The cultural experience for tram passengers was intensified by Bhangra and Pakistani music playing in the background. Special event conductors handed out souvenir tickets featuring the imagery and Urdu poetry displays typical of public transport tickets in Karachi.
After the end of the Games, Z1 81 was placed into storage, but was returned to limited service on the City Circle route on Friday evenings, from 3 November 2006 until 23 March 2007, as part of the City of Melbourne Living Arts program. Performances were conducted on its journey by artists, musicians and dancers during the sponsored program.
On completion of the season, Z1 81 was returned to storage, where it remained until it was placed into the collection of the Melbourne Tram Museum @ Hawthorn Depot on 19 June 2015.
You can find out more about this spectacularly beautiful tram by following the links in the resources section below.
Resources:
Bell Cord – Journal of the Friends of Hawthorn Tram Depot – Issue #28 – discusses the history and transformation of Z1 Class tram #81. A really great article about this car and it’s history and a lot of political history on the Melbourne Tramways that as an import I did not know about or understand.
It’s been a busy month with lots of travel for work. Posts have been somewhat on the light side. Add to that a very cold Ballarat (it was -6 degrees Centigrade this morning and frost everywhere) and I have been not much in the modelling mood. However, the weather changes and my mood with it.
Site 1: Gene’s p48 Blog
One of Gene’s blog readers suggested recently that he publish older articles on building models to help those who want to build their own equipment. Gene said that his first reaction was that ‘it can’t be done since they are copyrighted‘.
After a period of thought he realised that some builds and techniques are already on the Proto48 Modeler site and are already available.
First is a PDF presentation about building freight cars with styrene [Link here] opens the PDF in a new window. You can download it directly by right clicking in Windows and choosing save link as. Don’t own a Mac so cannot help you.
The second link of the day points to the Proto48 Modeler site [Link here] which has a few articles posted that provide a lot of guides on modelling that are applicable to all scales, however the focus is on Proto48.
Enjoy, and I hope that you’ve had a great weekend.
This is the small layouts section of the old HunterValleyLines.com/gallery website that is now offline as mentioned in my post yesterday. There are over 30 layout designs in this section.
This is the most interesting and fastest growing section of the website. The Ideas and scribbles section is the storehouse of all of the doodling and noodling that I’ve done over the years. There are narrow gauge loco designs, industry designs, layout ideas and designs but all are drawings only.
It’s a first for me; I’m building two Victorian Railways GY grain wagons from the excellent Steam Era Models (SEM) kit. Apart from the excellent moulding you also get photo-etch for a nice price (in the Australian market) of $17.50.
Most of the build focuses on upgrading the underframe, paint and weathering; there is little about the kit that needs work. This will be a multipart article. Part 1 is online now.
DCC (Digital Command Control) has changed the way we interact with the our model railroads. We no longer drive the track, or the single locomotive on it, now we drive our train. Just like the real thing we can now have corn field meets, SPADs (signals passed at danger) and other issues that DC powered layouts never had to deal with.
In the next 10 years the way we look at DCC will change too, indeed it already has. We now have DCC and sound, we have the beginnings of DCC sound and vision to go along with it. Soon though we’ll be offered the immersive nature of these working together, to totally immerse the driver or engineer, in the model railroad experience. Think of the difference that this will make for those operating in the garden, or for those on smaller layouts. That is what today’s site seeing will give you a glimpse of.
Site 1 – Bruce Kingsley – Ultimate DCC Throttle
Bruce’s project is audacious. I admire his scope, and the work he has put into the project. It is not for me, although if I could buy one commercially I would certainly consider this in the future.
The beginning of the video through to 3:20 minute mark is a little dry; from that point on however it is very enlightening and entertaining.
He has a lot of videos about the UDCC throttle. If interested in the technology behind it all you should take a look through the rest of his videos. He provides a lot of notes on the parts used to get his set up running. I’ve not visited his website; there is sure to be more there for you to learn.
On June 02, 2015 I made mention in a post of a grain silo operation close to the CBD in Melbourne, Victoria that allows for interesting operation, and would keep a model railroader busy and interested for the length of a short operating session (around a half an hour).
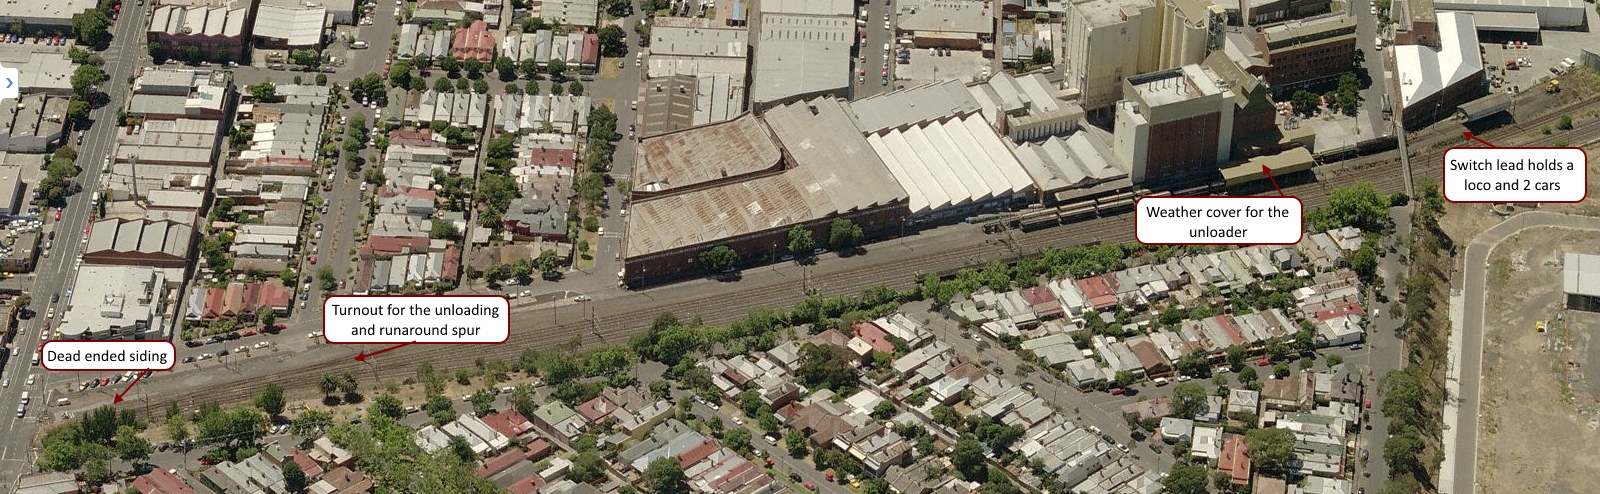
Image 1: G529 stabled in the dead-end siding at Kensington. The grain hoppers and the switch engine are down by the flour mill (courtesy of wongm’s rail gallery – LINK)
A little background
For those of you not in Australia let me give you a little background on the site from image 1 above. The photo above is from the grade (level) crossing at Kensington station. The station buildings are directly behind the photographer. G529 is sitting at the north end of the site on a dead-end siding used for second units or for red-carded (bad-ordered) cars.
The two lines under wire are the UP (left-hand line to Melbourne) and the DOWN (right-hand line from Melbourne) lines to the outer suburban terminus of Craigieburn, a fast growing suburb 26 Km to Melbourne’s north. Grain trains come north from Tottenham Yard and back into the sidings. When they leave they have to do a long looping route north, then west before returning to the yard once more. A fair bit of this is on the suburban Craigieburn passenger line. This situation occurred because of changes to rail lines for the Regional Rail Link that has taken freight lines out of service.
The single slip allows access into the site from the DOWN line. On the mill site there are two spurs with the left road running over the under track unloading auger; the right is a passing siding. The switching problem on this site is that the turnout at the end of the two roads only has enough room for two grain cars, and one locomotive at a time.
Image 2: An overview of the site (courtesy of Bing – LINK)
Operation
Generally the train has two locomotives. While a single locomotive can handle the work, and would be easier on the crews when switching, the extra power helps clear the path for the passenger services on the Craigieburn line. Melbourne’s rail network is greatly used by the it’s citizens and the infrastructure is congested requiring new signalling to allow greater train density. Anything that holds up one train has knock-on effects that can and do regularly impact on the rest of the network. So any freight movements using passenger routes tend to be over-powered.
Image 3: A track diagram showing the grain siding and signalling at Kensington (courtesy VicSIG)
1. Arrival
The shift begins with the loaded grain train arriving early on the north-bound suburban tracks. The train pulls into Kensington stations up platform road, before informing train control that they are ready to reverse into the facility. Train control (under CTC) unlocks the shunt signal 7, switch 8 and switch 9 to allow the movement and the train reverses into the site, putting the grain cars onto the ‘left-hand’ unloading road. On completion of the move the crew contacts train control once more and the switches and signals returned to normal.
2. Set up
The crew has to unload one of the locomotives. Without the room to run the power around at the switching end on the unloading road one loco is usually parked on the ‘B’ siding at the north end of the site. Image 2 below shows the problem on-site with the short headshunt (switching lead).
Image 4: The switching problem – the short headshunt (courtesy of wongm’s rail gallery – LINK)
3. Switching / Shunting
Prior to unloading beginning the mill staff remove the metal grate covers to allow grain to begin unloading into the under-track auger. With only one loco for shunting (switching) the operation is fairly straight-forward:
The first two cars unload at the under-track auger
When unloaded the train pulls forward to two car lengths to begin the unloading process again and handbrakes are applied
The loco cuts off the two empty cars, pulls them to the headshunt, before pushing back onto the passing siding
Handbrakes are applied on the two empty cars before the loco cuts off and moves back to the headshunt
The loco reverses onto the loaded cars, and the cycle repeats until all the cars are empty.
With all the cars emptied the mill workers cover the auger pit with the metal covers. The loco eases off the unloaded cars, runs into the headshunt, and backs through the unloading road back to siding B. Here it picks up the previously stabled locomotive and once MU’d they back onto the empty cars; with the air pumped and they wait for train control to authorise their return to the running lines.
Modelling
Operation of this layout design element offers a lot of opportunity. Whether a small train or a large one the work to be done, including air brake operations and taking time to switch back and forth would give a lot of interest for those so inclined. I can see this being a great industry especially for the modular railroader. Across two or more modules, you’d have the best of all worlds with action on the main, and then a lot of switching action on the modules.
Being self-contained the industry is a real winner and could be transplanted anywhere.
Resources
There are a couple of videos available below for you to get an idea of the action at Kensington.
In the second video you can see the operation under way with the switching in this case being handled by BL class # 32.
You can find out more about the locomotives using the resource links below:
If you have information that you can share about operations at the site, please let me know. I’ve found everything that I can about the site and its operation, but there is nothing like a driver or someone else knowledgeable of the site sharing what they know. Leave a comment, like and subscribe to the blog if that suits you.
I love signalling, and modelling signalling systems. In the future I have a plan for an exhibition layout running under catenary, fully signalled using automatic block signals. For now though the plan is to get the current layout done.
In the meantime we can all enjoy some great old video – thanks to YouTube.
Site 1: YouTube – The Railroad Signal by the New York Central System’s PR Department
I love these old videos and collect them when I can. This one is great, and shows a lot of features of the steam era railroad that you might not otherwise notice.
While I chose not to (over) design my layout, there are some aspects that simply have to have a structured and logical approach to simplify troubleshooting for the longer term. These need to be in place to allow me to add to and grow the layout in the future. This post focuses on the wiring standard for all layouts that I build going forward.
After watching the current work being done over at Everard Junction with the wiring of the new section of his layout (+ Link) one of the things I noticed was the colour code in use. I feel that in the future he’ll find that there’ll be more stress and confusion in the future when tracing and troubleshooting.
As a former telephone technician colour codes are very important to me. As a result I’ve written a module / baseboard wiring standard. If you are not worried about troubleshooting your wiring in the future you can ignore this post now. Each module / baseboard will have a dual wiring BUS. One BUS will power the Locomotives and DCC accessories (the DCC BUS) while the other will power the DC accessories and other non-DCC devices (the DC BUS).
You might be wondering why I’d have non DCC accessories. Think for a moment of LED lighting. LED Lighting is 12V DC so lighting the module / baseboard is made easier using the 12 volt BUS. Additionally internal building lights, signalling and repeater panel lights that do not use DCC to operate can be powered off this BUS. Finally there is no extra effort required to wire these up later; its wired into the module / baseboard from the get-go. There’s no extra work to get DC powered items wired up beyond setting up dropper wires to the DC BUS.
The wiring standard for the boards and modules is a work in progress. You are welcome to download version 1. Please keep in mind it is not in the public domain. You may use it for personal use only. Any commercial applications of the document should be run by me first.
I don’t claim that this is the standard you should be using; it works for me. If it works for you too, then please download and use it.
As I mentioned in yesterday’s post my site hosting company is changing a lot of their backend stuff around. And that is causing all sorts of issues with the gallery. I’ve already moved all the posts from the old blog to here.
Today’s site seeing is about the beginning of that moving process.
My small layouts gallery contains layouts that are no larger than 16 square feet. Some are 8′ x 2 foot, others are longer but narrower. Enjoy taking a look around the layout designs. They’re all designed to be operated, and most have text on the image to help you understand the design. I’ll be updating the individual layouts over time with a suggested operating instruction set.