Category Archives: Exhibition

Layouts seen at Exhibitions in Australia and Overseas

More on the new layout

Originally posted on the old DasBlog – Thursday, March 28, 2013

While I am not working on the layout of a weeknight, doesn’t mean that I am not thinking on the layout.

My son Ewan (who is 8) got me to thinking about a new layout after a Sunday morning spent switching on a plank I have setup for testing car and coupler heights and and so on. He enjoyed it so much, big smile – the works, that he asked me to build something bigger because he liked driving the loco up to the cars and switching and coupling/uncoupling the cars so much.

He is a mad gamer, and is asking me to help him learn to code so that he can write his own games. So I figured why not make sure that he could “role play” with the locomotives and cars. I have spent quite some time getting the physics of the locomotives right in the decoders and this has formed the basis of my thoughts for the new layout.

What I have currently

I have the following DCC loco’s:

  • 2 x Bachmann 70 Tonners (cause I love them – one in Red and the other in Green – and yes they are noisy enough without sound – working on a fix for this in the future)
  • 1 x BLI Trackmobile (which moves like honey in summer it is so smooth and oh-so-nice to switch with…)

I have the following DCC & sound equipped locos:

  • 1 x BLI EMD SW7 (in UP colours – my Wife’s favourite scheme)
  • 1 x Proto 2000 GP20 (also in UP colours)

What all of this means to the emerging layout design is this:

  • Long runs where ever possible: This allows the physics that I have programmed into the locomotive’s decoders to come into play. For sound equipped locos I have made sure that the SW7 takes a shorter time to load up before pulling away. This simulates the locomotive gearing, while the GP20 takes longer to load up before moving off for the same reason. Once a loco is moving, having watched a lot of videos on you tube, the power is usually cut and the loco coasts. I can now do the same thing with the Deceleration set reasonably high to ensure that the loco will slow if going up a grade, and maintain or speed up slightly when going down grade. When I need to stop I give a brake application (F7 on my MRC Prodigy Advanced 2 system) whence I get brake squeal, and the locomotive and train stop where needed.
  • Proto weighted cars where possible: I use Kadee trucks This ensures that the cars track much better than NMRA weighting standards. I use Kadee trucks under all stock and it they run much better when they are weighted properly to compress the main springs. I use a cubed root formula spreadsheet to track each car type and the weight they should be carrying. One nice side effect is that the clickety-clack as trucks go over rail joints sound much better in my opinion.

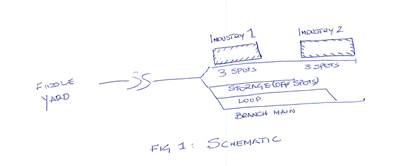
One location that is getting serious design time right now is a Miami Transload Facility. My version would only have three tracks in the Transload facility, the centre one being an overflow (99 off spot according to the SP) track that would also increase the switching.

In the background I am still thinking of adding the bakery that Lance Mindheim wrote about. This effective uses one switch for two long sidings. This would allow the two locations to be switched separately, but different operators that are still within arms reach, and yet still stay true to the area they are modelled on.

During my original planning I had though of extending the design from the 12 foot board through to the 8 foot return board, and using a rotating sector plate (rotates completely through 360 degrees) on the final four foot board with an overhang to provide staging.

Still thinking this over as well as the Boxcar Haven design. More thinking at the moment, will yield a better design in the end. Thanks for following the internal monologue; any comments are always welcome.

HO Scale Supernook

Posted originally on the old HVL DasBlog – Friday, June 07, 2013

Operations and Display Running

Apart from building my new (largish) layout at home, I have promised to provide a small layout for a show next April. The industries can depend on what type of cars you want to run, but the classic inglenook approach still applies of a 5:3:3 Inglenook within the Supernook.

The Supernook is my modification of Alan Wrights classic Inglenook. The Supernook though provides the means to turn a train, that is reverse its direction through the use of a loop to allow the locomotive to swap ends of the train.

The premise being that the train:

  • Enters the stage, in this case from stage left (staging),
  • Breaks down its incoming train,
  • Switches the industries
  • Makes up its outgoing train, and
  • Then Exits the stage to stage left (staging)

Exhibition operation

Apart from talking to people who are interested in modelling at our exhibitions, the most fun I’ve had is to make things work, or show others how things work. To that end I want to present a layout that would keep my interest, and the interest of the viewer for perhaps 5 minutes while they’re wandering around the show.

If I get lucky and I have someone who wants to have a go, and gets into the spirit of Operations then all the better.

The Nitty Gritty
Here is how I would see an operating session go on the new layout:

  1.  Our train arrives from off-stage, and parks itself on the branch main,
  2.  The crew:
    • Sets handbrakes on the cars,
    • dumps the train air,
    • cuts off the caboose or guards van from the rear of the train,
    • cuts off the engine,
    • runs around the train using the Loop track,
    • couples up to the caboose, before pushing it forward to the tail track on the branch main to clear the loop for switching.
  3. The conductor or guard checks the bill box at the entry to the industry track
    • The paperwork here tells the crew which cars are to go where along the industry track
  4. The crew:
    • Climb aboard the loco, and under direction of the conductor/guard:
    • pull the outbound cars from the industry track to the loop,
    • move off-spot cars and the incoming cars from the branch main to the industry spots at the end of the track, continuing to back-fill the industry track until they have completed the switching instructions left for them by the customer.
    • Any cars the crew could not place at the industries are pushed into the storage track.
  5. The crew with all switching moves completed begin the task of reassembling their train and readying it for departure:
    • First all of the outbound cars are marshalled together, and if so required may be blocked for delivery to other yards and industries,
    • Remember that as cars are put together into a rake, brakes must be unlocked, airlines connected and air pumped to operating pressures. All of this takes time, so slow down and account for that time.
    • With the train now almost formed the caboose, previously set out on the tail track, is connected to. The air pumped up, and a set and release performed to ensure that all brakes on the train are working.
  6. Finally with a train ready to depart the whole consist leaves the modelled portion of the line, stage left, for the fiddle yard.

This completes the operating session.

Additions

You can increase the level of operation on the layout by having in-plant switching taking place in addition to the interchange operation by the delivering railroad. In-plant switching would involve the local switcher, either leased, in-plant or track-mobile moving the cars from the doors/loading docks/UT Auger as they are unloaded and placed out on the storage road, pending the interchange move with the delivering carrier. The aim would be to use the loop and branch as needed, but to have them clear by the time the interchange carrier is ready to arrive. Say give it ten minutes to ensure that you have everything cleared out of the way to allow the interchange loco to run-around the train.

Enjoy
Andrew